Download

1 / 34
340 likes | 586 Views
CGT 110 – Technical Graphics Communication. Week 9: Tolerancing Practices. CGT 110 – Technical Graphics Communication. Here’s what we talked about last time…. Week 9: Tolerancing. CGT 110 – Technical Graphics Communication. Dimension elements…. Week 9: Tolerancing.

E N D
CGT 110 – Technical Graphics Communication Week 9: Tolerancing Practices
CGT 110 – Technical Graphics Communication Here’s what we talked about last time….. Week 9: Tolerancing
CGT 110 – Technical Graphics Communication Dimension elements…. Week 9: Tolerancing
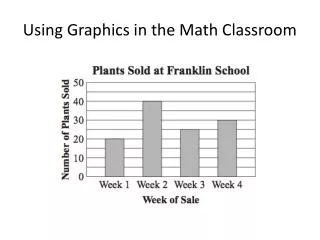
CGT 110 – Technical Graphics Communication Dimensions are used to show an object’s: 1. Overall: Width Depth Height 2. The actual size of features (rounds, fillets, holes, arcs, etc.) Week 9: Tolerancing
CGT 110 – Technical Graphics Communication 3. And where features are located such as centers, angles, etc. Week 9: Tolerancing
CGT 110 – Technical Graphics Communication Dimensions should be stacked in a “broken chain” format. “Breaking the Chain” refers to leaving out one dimension as shown above so that manufacturing tolerances are maintained. Week 9: Tolerancing
CGT 110 – Technical Graphics Communication As a general rule…Stay off the object as much as possible. Week 9: Tolerancing
CGT 110 – Technical Graphics Communication 3. Extension lines can be shared and even broken to clarify crowded dimensions. Week 9: Tolerancing
CGT 110 – Technical Graphics Communication Some features are dimensioned from their center lines. The center line may also be used as an extension line. Week 9: Tolerancing
CGT 110 – Technical Graphics Communication Leaders with dimensions are used to show negative cylinders (holes). The leader should always be placed to penetrate the center of all round features. Week 9: Tolerancing
CGT 110 – Technical Graphics Communication Features such as counterbores, countersinks and spot faces are all dimensioned using a leader.Note: Each of these features has a special dimensioning symbol that can be used to show: a. Diameter b. Shape c. Depth Week 9: Tolerancing
CGT 110 – Technical Graphics Communication Arcs are always dimensioned as a radius. Full circles are dimensioned showing their diameter value. Week 9: Tolerancing
CGT 110 – Technical Graphics Communication When dimensioning a part, always start with the inner-most dimensions and work to the outer-most values.Remember:Dimensions are used to show both the size and location of features. Week 9: Tolerancing
CGT 110 – Technical Graphics Communication Always dimension features and not lines…..and remember….NEVER, NEVER, NEVER dimension to hidden lines! Week 9: Tolerancing
CGT 110 – Technical Graphics Communication ∙ Tolerances are used to control the variation that exists on all manufactured parts. Today’s Lecture - Week 9: Tolerancing ∙ Toleranced dimensions control the amount of variation on each part of an assembly. ∙ The amount each part is allowed to vary depends on the function of the part and of the assembly. For example: the tolerances placed on a swing set is not as stringent as those placed on jet engine parts. ∙ The more accuracy needed in the machined part – the higher the manufacturing cost.
CGT 110 – Technical Graphics Communication Representing Tolerance Values ∙ Tolerance is the total amount a dimension may vary and is the difference between the maximum and minimum limits. (A) Tolerance = .04 (B) Tolerance = .006 ∙ Tolerances are represented as Direct Limits (A) or as Tolerance Values (B). Which part costs more to manufacture? Week 9: Tolerancing
1. Geometric Tolerances. “GDT” CGT 110 – Technical Graphics Communication Tolerances can also be expressed as: 2. Notes Referring to Specific Conditions. 3. A General Tolerance Note in the Title Block. Example: ALL DECIMAL DIMENSIONS TO BE HELD TO ± .002” Week 9: Tolerancing
CGT 110 – Technical Graphics Communication Plus and Minus Dimensions With this approach, the basic size is given, followed by a plus/minus sign and the tolerance value. Notice that a Unilateral Tolerance varies in only one direction, while Bilateral Tolerances varies in both directions from the basic size. Week 9: Tolerancing
A System is two or more mating parts. CGT 110 – Technical Graphics Communication Important Terms of Toleranced Parts Nominal Size is used to describe the general size (usually in fractions). The parts above have a nominal size of 1/2” Basic Size – theoretical size used as a starting point for the application of Tolerances. The parts above have a basic size of .500” Week 9: Tolerancing
Actual Size is the measured size of the finished part after machining. The Actual Size of the machined part above is .501” Limits – the maximum and minimum sizes shown by the tolerance dimension. The slot has limits of .502 & .498, and the mating part has limits of .495 & .497. The large value on each part is the Upper Limit, the small value = Lower Limit. CGT 110 – Technical Graphics Communication Important Terms of Toleranced Parts Week 9: Tolerancing
Allowance – the tightest fit between two mating parts. CGT 110 – Technical Graphics Communication Important Terms of Toleranced Parts (The minimum clearance or maximum interference). For these two parts, the allowance is .001, meaning that the tightest fit occurs when the slot is machined to it’s smallest allowable size of .498 and the mating part is machined to its largest allowable size of .497. The difference between .498 and .497, or .001, is the allowance. Week 9: Tolerancing
Tolerance – the total allowable variance in a dimension; the difference between the upper and lower limits. The tolerance of the mating part is .002” (.497 - .495 = .002) The tolerance of the slot is .004” (.502 - .498 = .004) CGT 110 – Technical Graphics Communication Important Terms of Toleranced Parts Week 9: Tolerancing
Maximum Material Condition (MMC) The condition of a part when it contains the greatest amount of material. The MMC of an external feature, such as a shaft, is the upper limit. The MMC of an internal feature, such as a hole, is the lower limit. CGT 110 – Technical Graphics Communication Important Terms of Toleranced Parts Least Material Condition (LMC) The condition of a part when it contains he least amount of material possible. The LMC of an external feature is the lower limit. The LMC of an internal feature is the upper limit. Week 9: Tolerancing
Piece tolerance The difference between the upper and lower limits of a single part (.002 on the insert in this example, .004 on the slot.). System tolerance The sum of all the piece tolerances. For this example (.006) CGT 110 – Technical Graphics Communication Important Terms of Toleranced Parts Week 9: Tolerancing
CGT 110 – Technical Graphics Communication Fit Types: Clearance & Interference fits between two shafts and a hole Shaft A is a Clearance fit, shaft B is an Interference fit Week 9: Tolerancing
CGT 110 – Technical Graphics Communication Fit Types: Transition Fit A Clearance Fit occurs when two toleranced mating parts will always leave a space or clearance when assembled. An Interference Fit occurs when two toleranced mating parts will always interfere when assembled. A Transition Fit occurs when two toleranced mating parts are sometimes an interference fit and sometimes a clearance fit when assembled. Week 9: Tolerancing
Functional Dimensioning begins with tolerancing the most important features. CGT 110 – Technical Graphics Communication Functional Dimensioning Then, the material around the holes is dimensioned (at a much looser tolerance). Functional features are those that come in contact with other parts, especially moving parts. Holes are usually functional features. Week 9: Tolerancing
Dimensioned from the left. Dimensioned from the right. CGT 110 – Technical Graphics Communication Occurs when dimensions are taken from opposite directions of separate parts to the same point of an assembly. Tolerance Stack-up AVOID THIS!!! Week 9: Tolerancing
Better still, relate the two holes directly to each other, not to either side of the part. The result will be the best tolerance possible of ±0.005. CGT 110 – Technical Graphics Communication Avoiding Tolerance Stack-up Tolerance stack-up can be eliminated by careful consideration and placement of dimensions. (Dimension from same side). Week 9: Tolerancing
CGT 110 – Technical Graphics Communication Basic Hole System The basic hole system is used to apply tolerances to a hole and shaft assembly. The smallest hole is assigned the basic diameter from which the tolerance and allowance is applied. Week 9: Tolerancing
Check the work by determining the piece tolerances for the shaft and the hole. To do so, first find the difference between the upper and lower limits for the hole. Subtract .500” from .503” to get .003” as a piece tolerance. This value matches the tolerance applied in Step 4. For the shaft, subtract .493” from .496 to get .003” as the piece tolerance. The value matches the tolerance applied in Step 3. The difference between the largest hole (.503” upper limit) and the smallest shaft (.493” lower limit) equals a positive .010”. Because both the tightest and loosest fits are positive, there will always be clearance between the shaft and the hole, no matter which manufactured parts are assembled. Using the assigned values results in a clearance fit between the shaft and the hole. This is determined by finding the difference between the smallest hole (.500” lower limit) and the largest shaft (.496” upper limit), which is a positive .004”. As a check, this value should equal the allowance used in step 2 Using the basic hole system, assign a value of .500” to the smallest diameter of the hole, which is the lower limit. The allowance of .004” is subtracted from the diameter of the smallest hole to determine the diameter of the largest shaft, .496”, which is the upper limit. The lower limit for the shaft is determined by subtracting the part tolerance from .496”. If the tolerance of the part is .003”, the lower limit of the shaft is .493” The system tolerance is the sum of all the piece tolerances. T o determine the system tolerances for the shaft and the hole, add the piece tolerances of .003” and .003” to get .006” The parts are dimensioned on the drawing. The upper limit of the hole is determined by adding the tolerance of the part to .500”. If the tolerance of the part is .003”, the upper limit of the hole is .503” Creating a Clearance Fit Using The Basic Hole System
CGT 110 – Technical Graphics Communication Creating an Interference Fit Using The Basic Hole System ADD here Follow the same sequence of steps as you did for a Clearance Fit, except that you ADD the allowance in Step 2, instead of subtract. Week 9: Tolerancing
CGT 110 – Technical Graphics Communication Week 10: Working Drawings