Chapter 8/9 Dimensioning/Tolerancing
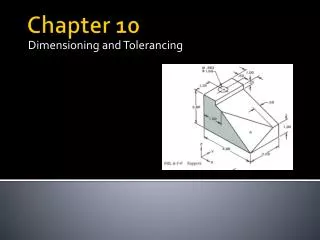
Chapter 8/9 Dimensioning/Tolerancing. Agenda. Chapter 8: Dimensioning Terminology and Conventions Linear Dimensions Dimension Styles, Scale, Units Aligned Radius and Diameter Angular Ordinate, Continue, Quick Leader Holes Applications to Sectional and Orthographic views.

Chapter 8/9 Dimensioning/Tolerancing
E N D
Presentation Transcript
Agenda • Chapter 8: Dimensioning • Terminology and Conventions • Linear Dimensions • Dimension Styles, Scale, Units • Aligned • Radius and Diameter • Angular • Ordinate, Continue, Quick Leader • Holes • Applications to Sectional and Orthographic views
Linear Dimensioning Methods • Select linear dimension, start, end, move, click • For vertical same, except may need type V • Select linear dimension, R-click, select object
Change Text in Dimension (fig 8-7) • Start Dimension, after selecting 2nd extension line, type t, then 5 x 1.5 (7.50) <enter> • You may also type m for Mtext and use dialogue • To edit an existing dimension, use dimension text edit tool • change style or justification • To edit dimension text, choose the A dimension symbol
Dimension Styles • We’ve used this to change center marks to lines • Also can change the scale of measurements for drawings not-to-scale • Primary units tab • Dimensions must always reflect true size • Does the preview reflect change in scale? • Also can change text size & placement • Text tab, modify height, alignment, placement
Different Format Requirements for Millimeter and Inches drawings
Units • All dimension values are given default tolerances formanufacturing, for example: • Therefore a dimension of 5.50 means less tolerance than 5.5000 • Again, go to Dimension Styles>Primary Units • Experiment with leading zero suppression (needed for inches drawings) • Experiment with precision, and format
Aligned Dimensions • Can be by selecting extension lines • and by selecting object • Hit return after starting, select line, and location • You may type M, T for text options, A for angle of text
Radius and Diameters • Rule: arcs use radius, circles use diameter • Any arc > 180 degrees use diameter • Radius: select arc, position dimension • leader line is neither horizontal nor vertical • Modify text by typing M, type “– 4 Places” • Can remove center pt mark: syms&arrows/none • Circles: need diameter value + center pt info • Change center pt to center line • Tweak the scale factor so line crosses edge • Add horizontal and vertical dimensions to circle • Then add diameter dimension…angle leader line
Angle Dimension Do NOT over-dimension
Angle Dimension • Rule: arcs use radius, circles use diameter • Any arc > 180 degrees use diameter • Radius: select arc, position dimension • leader line is neither horizontal nor vertical • Modify text by typing M, type “– 4 Places” • Can remove center pt mark: syms&arrows/none • Circles: need diameter value + center pt info • Change center pt to center line • Tweak the scale factor so line crosses edge • Add horizontal and vertical dimensions to circle • Then add diameter dimension…angle leader line
Ordinate Dimensions • Based on X-Y coordinate system. • No extensions, arrows, etc • Useful when there are lots of circles • to place center points
Ordinate Dimensions • First, relocate the origin • Tools>New UCS>Origin • Click on lower left corner • Turn on ORTHO button • Select Ordinate Dimension Tool • Select lower endpoint of circle centerline • Select point on X-axis directly below centerline • Right-click to repeat on other features • Extend centerlines as needed • Add diameter dimension for holes
Baseline Dimensions • Used to show a series of dimensions originating from a baseline • Eliminate tolerance buildup associated with chain type dimensions • Only use after an initial dimension drawn • Linear Dimension first (nearest object) • Select baseline tool • Continue to select extension lines for remaining objects
Continue Dimension • Chain dimensions based on initial linear/angular/ordinate dimension • Place first linear dimension • Choose Continue dimension • Continue placing new dimensions along edge of object
Quick Dimension • Inserts many dimensions at once • Lets you select a number of extension lines, • Then c for continue OR o for ordinate
Quick Leader • Leader—slanted lines that extend from notes or dimensions to a specific feature on the drawing • Usually end with an arrowhead or dot • Same as Radius and Diameter but used when no circle present • Click Leader tool • start point (arrowhead), end point (of slant) • End point (of horizontal line) <enter-2x> then text • Curved line possible if type s after clicking on tool
HOLES IN SECTION VIEWS
HOLE PATTERNS
FILLETS AND ROUNDS Are usually the same size…can use a note:
SECTIONAL VIEWSmay need to adjust section angle for dimension line visibility
ORTHOGRAPHIC VIEWS Do not double-dimension Holes dimension in circle view This would doubly define the 30 !! 30 GOAL—Minimum Dimensions needed to completely define all features
Agenda • Chapter 9—Tolerancing • Direct tolerance • Tolerances in Inches and Millimeters • Plus and minus tolerances • Limit tolerances • Angular Tolerances • Chain vs Baseline Dimensioning : effect on tolerance
+/- Tolerances ACCEPTABLE OBJECTS, Millimeters
+/- Tolerances ACCEPTABLE OBJECTS, INCHES STYLE
AutoCAD Plus/Minus Tolerances • Text option • Linear dim, t, type text “5.00%%p.02” for +/- • Mtext option • Linear dim, m, click to right of value, %%p, etc. • dimension style/primary units to set precision • Using Dtext • Type dtext, place start, define ht/angle, type dim • 5.00%%p.02, then enter • Dimension Styles – sets for all future dim’s • Modify/tolerances/ method/symm, value • (or deviation, 2 values)