Download
1 / 8
80 likes | 201 Views
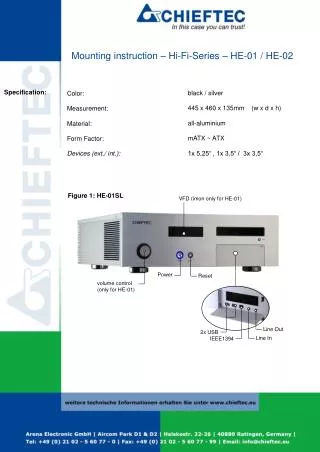
Mounting instruction – Hi-Fi-Series – HE-01 / HE-02. Specification :. black / silver. Color:. 445 x 460 x 135mm (w x d x h). Measurement:. all-aluminium. Material:. mATX ~ ATX. Form Factor:. Devices (ext./ int.):. 1x 5,25“ , 1x 3,5“ / 3x 3,5“. Figure 1: HE-01SL.

E N D
Mounting instruction – Hi-Fi-Series – HE-01 / HE-02 Specification: black / silver Color: 445 x 460 x 135mm (w x d x h) Measurement: all-aluminium Material: mATX ~ ATX Form Factor: Devices (ext./ int.): 1x 5,25“ , 1x 3,5“ / 3x 3,5“ Figure 1: HE-01SL VFD (imon only for HE-01) Power Reset volume control (only for HE-01) Line Out 2x USB Line In IEEE1394
Mounting instruction – Hi-Fi-Series – HE-01 / HE-02 layout HE-01: explanation of layout:
Mounting instruction – Hi-Fi-Series – HE-01 / HE-02 You need a screw driver at least 15 cm long for mounting or dismounting certain components! note! min. 15cm 1. How to open the case Please loosen the six screws of the top cover. 2. Now it is easy to remove the top cover. 3. You have free access to all components, connectors and fittings.
Mounting instruction – Hi-Fi-Series – HE-01 / HE-02 4. Installation of the mainboard Please mount the I/O shield and find the right position for the mainboard. You can fix the board with the supplied screws and the necessary grommets. 5. Dismounting of the 5,25“ device rack For devices‘ installation, you must dismount the complete rack. That is essential! The rack is fixed with six screws (4 x on the bottom of the case, 2 x on the front) 6. Installation of 3,5“ HDD There is possibility to install a 3,5“ HDD on top of the 5,25“ rack. The necessary screws you can find in the accessory box.
Mounting instruction – Hi-Fi-Series – HE-01 / HE-02 7. Installation of the 5,25“ device Please insert the device from the front site and fix it with the necessary screws. Afterwards you can mount the rack back into the case. External 3,5“ device (Card reader) It is possible to install a 3,5“ device under the 5,25“ rack . E.g. (e.g. Chieftec CRD-151 Card reader) or a FDD Important! 8. Dismounting of the 3,5“ HDD rack Please loosen the four screws from the bottom of the case. 9. Remove the HDD rack.
Mounting instruction – Hi-Fi-Series – HE-01 / HE-02 10. Installation of 3,5“ HDD‘s It is possible to install max. two hdd‘s. You need to fix the hdd with the related two holding pins on the bottom of the case. Be sure that the hdd connectors face the front of the case! Important! 11. Mounting of 3,5“ HDD rack Put the hdd rack over hdds and fix the rack slightly with the screws again. Make sure that the rubber rings are in the right position and fix the screws afterwords correctely. 12. Fix the hdds Fix the hdds with the delivered screws on top of the rack.
Mounting instruction – Hi-Fi-Series – HE-01 / HE-02 Important! Before you install the PSU, please make care that the I/O switch is on! 13. Installation of the PSU Remove the two stainless steel screws from the PSU frame. Important! Please keep in mind, that all needed cables (such USB/Audio/LED) cables have to be in the right position before mounting the PSU! 14. Installation of PSU Remove the PSU frame and place the frame in the correct position on the PSU. Fix the frame with four screws. Now you have to connect the power cord extension with the PSU and fix it.. 15. Fix the PSU
Mounting instruction – Hi-Fi-Series – HE-01 / HE-02 16. Power supply and components Connect all components, like motherboard, VGA card, devices , fans etc. with the PSU. 17. Assembly of front connectors Connect all cables of the case front, e.g. Power Switch, Power LED, Reset Switch, etc. according to the instruction of your motherboard manual. 18. Add the DVD cover In the accessory box, you can find a DVD cover. Remove the protection of the adhesive tape on the back and press it exactly on the original DVD cover. 19. Close the case When all works have been done, you can close the case and screw it together. Have fun with your new CHIEFTEC case!