Download
1 / 8
80 likes | 463 Views
PROOF #1. Given: KL || MN; KL @ MN L is the midpoint of JN Prove: JK || LM. K. M. J. L. N. PROOF #1 – ANSWER KEY. Given: KL || MN; KL @ MN L is the midpoint of JN Prove: JK || LM. Statements Reasons. K. M. J. L. N. PROOF #2.

E N D
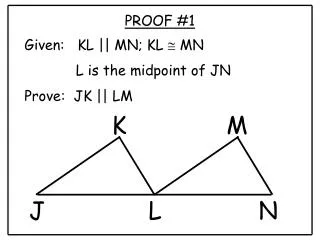
PROOF #1 Given: KL || MN; KL @ MN L is the midpoint of JN Prove: JK || LM K M J L N
PROOF #1 – ANSWER KEY Given: KL || MN; KL @ MN L is the midpoint of JN Prove: JK || LM Statements Reasons K M J L N
PROOF #2 Given: LF || WH; HY LY Prove: ΔWHY ΔFLY F H Y L W
PROOF #2 – ANSWER KEY F H Given: LF || WH; HY LY Prove: ΔWHY ΔFLY Y L W Statements Reasons
PROOF #3 Given: X and Y are right angles; WZ bisects XZY Prove: ΔWXZ ΔWYZ W X Y Z
PROOF #3 – ANSWER KEY Given: X and Y are right angles; WZ bisects XZY Prove: ΔWXZ ΔWYZ Statements Reasons W X Y Z
PROOF #4 Given: B and C are right angles; AB DC Prove: ΔABD ΔDCA B C A D
PROOF #4 – ANSWER KEY Given: B and C are right angles; AB DC Prove: ΔABD ΔDCA Statements Reasons B C A D