Analog Inputs
E N D
Presentation Transcript
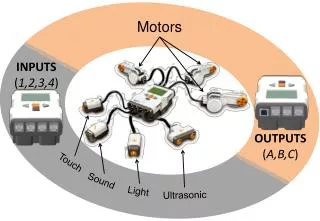
Introduction • There are eight analog inputs on the Mojo, accessible though the 10-pin connector. • However, FPGAs don’t usually have any analog circuitry built in. Because of this, these analog inputs are from the microcontroller on the Mojo. • After the microcontroller does its job of programming the FPGA, it becomes a USB-to-serial converter as well as an analog-to-digital converter (ADC). • In this tutorial, we are going to read the analog inputs and use their values to vary the brightness of the eight LEDs on the Mojo.
The AVR Interface • We’ve used the AVR Interface component before. However, this time weare going to use the ADC portion of it instead of the serial portion. • The ADC on theAVR takes a voltage input in the range of 0–3.3 V and converts it to a number from0–1,023 (a 10-bit value). • As before, we will start by creating a new project based onthe AVR Interface example project. • If you take a look at the avr_interface module, there are four signals we care aboutwhen trying to read the analog inputs:
The AVR Interface • You’ll probably notice that only one of these is an input. That means the value we have to worry about providing is channel, which is the number of the input we want to read. • If you look at your Mojo, there are eight analog inputs, but they arenumbered a little strangely. The inputs are A0, A1, and A4–A9. A2 and A3 are missing. • They simply don’t exist for this package of the microcontroller. • To use the ADC, you need to set channel to a channel to read. Samples will then start to come in. • If you don’t need to use the ADC, you should set channel to any invalid value, such as 15. When the ADC isn’t being used, the microcontroller will have more time to service the USB-to-serial portion of its job, and the bandwidth will be substantially higher. • Remember, it isn’t an FPGA, so the single processor has to split its time between tasks.
The AVR Interface • When channel is a valid value, new samples will start to show up. • When a new sample arrives, new_sample will be 1. This tells you that the data on sample and sample_channelis valid. • The signal sample is the actual sample value, while sample_channel is the channel the sample was taken from. If you set channel to a constant, you can safely ignore sample_channel, but if you change sample, you should verify that sample_channel matches the channel you are looking for, as it could be from the old channel. • To test out the ADC, let’s first sample only one channel. Add the Pulse Width Modulator component to your project again. Then change line 41 in mojo_top to the following: • By setting avr.channel to 0, we will be continuously reading from A0.
The AVR Interface • We then need to instantiate the PWM module and connect it to the AVR : • Add this to the end of the always block:
The AVR Interface • We update the PWM value only when we have a new sample, and we use the 8 MSBs from the sample as the PWM value. • The ADC takes 10-bit samples, but if you need only 8 bits, as we do here, you can drop the LSBs. This is equivalent to dividing by 4. • Finally, we connect the output of the PWM module to all eight LEDs. • A potentiometer, you can connect it between GND and V+ and connect its output to A0 to vary the brightness of the LEDs. • Be careful not to connect it to RAW, as this will damage the microcontroller. • We then need to instantiate the PWM module and connect it to the AVR.
All the Channels • Now that we have one channel continuously sampling, we can make it a little more interesting by sampling all eight. • To do this, we are going to use a counter that counts from 0–7. • However, we have to modify the count value to generate the actual channel value. If the counter is greater than 1 (2–7), we will add 2 to it so it will count 0–1 then 4–9. • We need to increment the counter after we receive a sample for the currently selected channel. • To do this, we need to convert the sample channel back to a counter value by subtracting 2 when the value is greater than 1 • To store these two intermediate values, we can use sig types:
All the Channels • The sig real_channel will hold the ADC channel that the counter is on, and sample_channelwill be the 0–7 value converted from the avr.sample_channel value. • Generating these two values is pretty easy using the ternary operator. The ternary operator, ?, selects one of two values based on the logical value of a statement. It looks like STATEMENT ? WHEN_TRUE : WHEN_FALSE. When STATEMENT is true, the first, WHEN_TRUE, expression will be used: and when it is false, the second, WHEN_FALSE, • expression will be
All the Channels • When the value is greater than 1, we select the modified value. Otherwise, we pass the signal along unchanged. • Each time a new sample shows up, if it matches the counter value, we increment the Counter. Because we are going to have a different value for each LED, we need eight PWM modules. • We could instantiate eight different ones, but we can instead instantiate an array of modules: • When you create an array of modules, each port has the module’s dimensions prepended to it. That means the signal pwm.update, which used to be a single bit, is now an array of 8 bits. • If a signal was already an array, such as pwm.value, it becomes a multidimensional array. In this case, pwm.value is now an 8 x 8 array.
All the Channels • The first index selects the module instance. • We can use the sample_channel value to index into the array of modules to select which one receives the new sample. However, we need to assign a default value to all the modules because seven of the eight won’t be assigned a value now. • We just need to set pwm.update to 0 and pwm.value to don’t care, as it doesn’t matter when pwm.updateis 0:
All the Channels • Remember that pwm.value is now an 8 x 8 array, so when we assign a default value, it also needs to be an 8 x 8 array. • The value 8hxx is an array of size 8, so we need to wrap it in the array builder syntax, {}, to make it a 1 x 8 array. • We can then use the array duplication syntax, Nx{}, to duplicate the outer dimension eight times, making it an 8 x 8 array. • With the default values taken care of, we can use the sample_channel value to index the specific PWM module. • Finally, because pwm.pulse is an 8-bit array, we can simply assign it to led. The full mojo_top source can be found in the “ADC Multichannel Example”. • If you build and load the project, the eight LEDs will now show the eight ADC inputs. • Try connecting individual inputs to different voltages between 0 V and 3.3 V.