Download
1 / 11
200 likes | 508 Views
Digital & Analog Inputs. Review. Fundamental parts of an Arduino program are … Setting output types using pinMode . Declaring variables Can write a digital signal (0/1) to a pin using digitalWrite . Can read a digital signal (0/1) from a pin using digitalRead .

E N D
Review • Fundamental parts of an Arduino program are … • Setting output types using pinMode. • Declaring variables • Can write a digital signal (0/1) to a pin using digitalWrite. • Can read a digital signal (0/1) from a pin using digitalRead. • Must have a variable to store the value
IF, IF-ELSE, and IF-ELSE-IF if (someCondition) { // do stuff if the condition is true } if (someCondition) { // do stuff if the condition is true } else { // do stuff if the condition is false } if (someCondition) { // do stuff if the condition is true } else if (anotherCondition) { // do stuff only if the first condition is false // and the second condition is true }
Your turn • Challenges: Complete in order • Push the button and have it display an LED pattern • Fireworks! • Push the button and have it turn on alternate LEDs • Button HIGH – Yellow • Button LOW – Red • Push the button twice to turn on LED • Need a COUNTER -- if you get to this stage, ask one of us for help
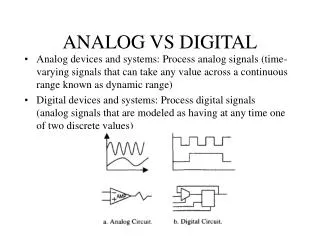
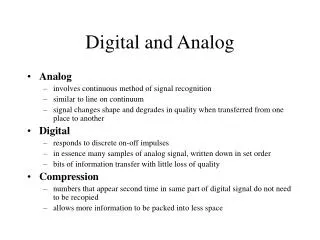
Analog Signals • What is an analog signal and how does it differ from a digital signal? 0 1 1 0 1 1 1 0
Analog Signals & Arduinos • The Arduino can read an analog signal on one of the analog input pins. • analogRead • The signal that can be read must be between 0 and 5 V. • The Arduino converts the signal to a number between 0 and 1023. • How many values are there for a digital signal? How many values are there for an analog signal on the Arduino?
Program Time! • We’re going to write a program that will turn on the Arduino’s LED when “threshold” value is reached. How: • Use a Voltage Divider to change the voltage on the analog input pin. • Use the Arduino to detect when the voltage has reached a certain level. • Turn on the LED! Analog Input Potentiometer
Analog Signal Detector • Step 1 – Declare Variables: intinputPin= 0; // select the input pin for the potentiometer // ( can be 0 through 5). intledPin = 13; // select the pin for the Arduino’sLED intinputValue= 0; // variable to store the value coming from // the voltage divider. • Step 2 – Setup: void setup() { pinMode(ledPin, OUTPUT); //Declare the LED pin as an //output. } • We do NOT have to declare the analog pin as an input. Why?
Analog Signal Detector • Step 3 – The Loop: void loop() { inputValue = analogRead(inputPin); // Read the analog //input, what are // the possible values. if(inputValue > 511) // Check our threshold. { digitalWrite(ledPin, HIGH); // Turn on the LED. } else { digitalWrite(ledPin, LOW); // Turn off the LED. } }
Your turn • Challenges: Complete in order • Design a program to make the LED flash at a speed dependent on the value on the analog input pin. • Turn on a number of LEDs that is proportional to the analog input value.