Sheep Heart Dissection
Sheep Heart Dissection. Objectives. By the end of this lesson, students will be able to: Demonstrate proper dissection safety techniques Identify the right and left sides of the heart


Sheep Heart Dissection
E N D
Presentation Transcript
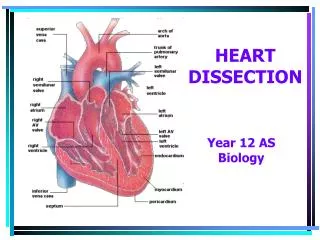
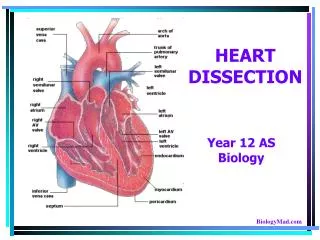
Objectives By the end of this lesson, students will be able to: • Demonstrate proper dissection safety techniques • Identify the right and left sides of the heart • Identify the parts of the heart: auricles, superior vena cava, pulmonary vein, aorta, left ventricle, pulmonary artery, bicuspid and tricuspid valve. • Measure the diameter of the aorta, pulmonary trunk, left atrium, left ventricle and right ventricle. • Compare and contrast the structure of a sheep heart to a human heart
Why Dissect? Dissection allows students to: • Practice safety procedures • Construct science process skills • Organize the hierarchal relationships of tissues, organs, organ systems and organisms • Compare similarities and differences among organisms • Connect organism complexity to its diversity
Materials • Sheep heart specimen • Dissection tray or Styrofoam meat tray • Dissection kit with scissors, pins, scalpels, tweezers and probes • Gloves • Goggles • Plastic aprons • Student worksheets
General Safety Rules • The classroom should be well ventilated • Work space should be flat and free of unnecessary materials • All equipment should be clean and unbroken • ABSOLUTELY no eating, drinking or gum chewing during dissection activities
Sharp Instrument Safety • Prepare a container for disposal of broken instruments or glassware • Dispose of the container intact and replace with a new one to prevent others from being cut • Inventory all sharp items to ensure all objects remain in the classroom • Ensure that students use sharp instruments properly. • Remind students they should always cut away from themselves and others
Before we proceed While dissecting, be respectful of your lab partners and of the specimen you are about to explore, observe and learn from. Take extra care with your dissection tools. Your scissors are your most important tool, but be sure to handle them carefully and always double check before cutting. If you have any questions, please ask.
Attire • Wear Gloves • Wear Aprons • Wear Goggles (ANSI Z87.1) Always!! No Exceptions!!!!
Interesting Facts Sheep have a four chambered heart, just like you. By studying the anatomy of a sheep’s heart, you can learn about how your own heart pumps blood through your body and keeps you alive.
Interesting Facts • Most heart diagrams show the left atrium and ventricle on the right side of the diagram. Imagine the heart in the body of a person facing you. The left side of their heart is on their left, but since you are facing them, it is on your right. Right Side Left Side
External Anatomy • Identify the right and left sides of the heart. On one side of the heart you will see a diagonal line of blood vessels that divide the heart. • The half that includes all of the apex (pointed end) of the heart is the left side. • Confirm this by squeezing each half of the heart. The left half will feel much firmer and more muscular than the right side. Right Side Left Side Apex
External Anatomy • Turn the heart so that the right side is on your right, as if it were in your body. • Examine the flaps of darker tissue on the top of the heart. • These ear-like flaps are called auricles. Auricle
External Anatomy • Find the large opening at the top of the heart next to the right auricle. • This is the opening to the superior vena cava. • Stick a probe down the vessel. You should feel it open into the right atrium. Superior Vena Cava Auricle
External Anatomy Superior Vena Cava • A little down and to the left of the superior vena cava, there is another blood vessel opening. • Insert your probe into this. It should also lead to the right atrium. This is the inferior vena cava. Inferior Vena Cava Inferior Vena Cava
External Anatomy Inferior Vena Cava • You can also see another blood vessel next to the left auricle. This is the pulmonary vein. Superior Vena Cava Pulmonary Vein
External Anatomy • Sticking straight up from the center of the heart is the largest blood vessel you will see. This is the aorta. The aorta takes oxygenated blood from the left ventricle to the rest of the body. Aorta Left Ventricle
External Anatomy • Behind and to the left of the aorta there is another large vessel. This is the pulmonary artery. Pulmonary Artery
Incision 1 • Insert your dissecting scissors or scalpel into the superior vena cava and make an incision down through the wall of the right atrium and ventricle, as shown by the dotted line in the picture. ChordaeTendinae Papillary Muscle Tricuspid Valve Moderator Band
Incision 2 • Insert your probe into the pulmonary artery and see it come through the right ventricle. Make an incision down through this artery. Pulmonary Semilunar Valve Pulmonary Artery
Observe and Measure • Observe the right half of the heart. • Identify the following: • Tricuspid valve • Pulmonary semilunar valve • Papillary muscles • ChordaeTendinae • Measure the following: • Diameter of the right atrium and ventricle • Wall thickness of the right atrium and ventricle • Diameter of the aorta and pulmonary trunk
Incision 3 • Insert your dissecting scissors or scalpel into the left auricle at the base of the aorta and make an incision down through the wall of the left atrium and ventricle as shown by the line. ChordaeTendinae Bicuspid Valve Papillary Muscle
Incision 4 • Insert a probe into the aorta and observe where it connects to the left ventricle. Make an incision up through the aorta.
Observation • Observe the left side of the heart. • Identify the following: • Mitral or Bicuspid valve • Aortic Semilunar valve • Papillary muscles • Chordaetendinae • Measure the following: • Diameter of the left atrium and ventricle • Wall thickness of the left atrium and ventricle.
Clean Up • Place all dissecting specimens and parts into approved container provided by the instructor. • Wash dissecting equipment and trays in dilute bleach solution provided by the instructor. • Dry equipment thoroughly to prevent rusting. • Clean table tops with dilute bleach solution provided by the instructor. • Wash hands thoroughly before leaving the classroom.
Resources Color Me Heart www.childrenheartinstitute.org/kidsonly/heartflw.htm Heart House www.childrenheartinstitute.org/kidsonly/hearthse.htm Heart Dissection Lab www.hometrainingtools.com/articles/heart-dissection-project.html Heart Anatomy www.enchantedlearning.com/subjects/anatomy/heart labelinterior/label.shtml
Resources Heart Lessons http://www.smmm.org/heart/lessons/heartDiagram.htm Animations/Interactives http://www.smm.org/heart/heart/top.html Heart Diagram http://classroom.kidshealth.org/classroom/6yo8/body/systems/cardiovascular_handout1.pdf Color Heart Diagram www.heartfoundation.org.au/document/NHF/heartimage.pdf