Download
1 / 11
110 likes | 272 Views
Transflo Xpress (TFX) is set to replace the traditional Trip Pak process for drivers, allowing them to scan their paperwork directly instead of mailing it in. This innovative system accelerates payment and billing processes significantly. Drivers can scan their documents at designated TFX truck stops or using USX Service Center kiosks. The streamlined workflow ensures that important barcodes remain clear, and drivers must adhere to specific scanning protocols to achieve the best results. Efficient processing leads to quicker returns, improving overall satisfaction.

E N D
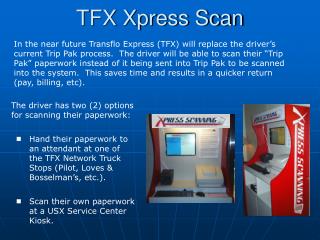
TFX Xpress Scan In the near future Transflo Express (TFX) will replace the driver’s current Trip Pak process. The driver will be able to scan their “Trip Pak” paperwork instead of it being sent into Trip Pak to be scanned into the system. This saves time and results in a quicker return (pay, billing, etc). • The driver has two (2) options for scanning their paperwork: • Hand their paperwork to an attendant at one of the TFX Network Truck Stops (Pilot, Loves & Bosselman’s, etc.). • Scan their own paperwork at a USX Service Center Kiosk.
XPRESS SCAN PROCESS Step 1: When you complete your load or leg of the trip you must send either Macro8 (Empty At Final Stop), 36 (Complete Repower) or 38 (Complete Terminal Transfer). Each of these macros have a “Trip Barcode #” field at the top of the form / macro.
Trip Barcode # XPRESS SCAN PROCESS • Enter the “Trip Barcode #” in Macros 8, 36 or 38 prior to sending the macro. • DO NOT cover or mark on the barcodes. This will keep it from scanning properly. Step 2: The “Trip Barcode #” is located in the middle of the Trip Cover Sheet. Step 3: Cover Sheet: • Completely fill out the trip’s cover sheet and place it on top of the trip paperwork. • Either have the trip paperwork scanned at a TFX truck stop location or scan it yourself at the Xpress Scan kiosk at all USX Service Centers.
XPRESS SCAN PROCESS • Step 4: SBOL Barcode Stickers: • The driver must place a SBOL Barcode Sticker on the SBOL (Signed Bill of Lading) prior to scanning the documents. • It is IMPERATIVE that the driver does not cover the pieces, weight, signature or other valid information with these stickers, as this can delay payment from the customer. • These stickers are to be used ONLY on the SBOL.
Scanning Enabled EXPRESS MAIN MENU SYSTEM MESSAGES F1 = Scan Documents F7 = Print Brochure F10 = View or Print Last Receipt F12 = Administration Menu IMPORTANT: PLEASE READ BELOW It is important that your scanner is cleaned everyday to ensure quality scans are being sent from your store. Also, it is imperative that you check all paperwork before scanning to ensure there are no staples or paperclips. TRANSFLO XPRESS SCAN PROCESS Step 5: Scanning: Scanning instructions for the kiosk will be displayed at the USX Xpress Scanning Kiosk, as well as shown on the monitor screen for the driver to view during the scanning process. • The driver must scan ALL trip documents as well as logs. • NOTE: Use only one cover sheet per trip / pro.
Lay paper here XPRESS SCAN PROCESS • Step 5: Scanning (continued): • Place pages on scanner per the directions on the kiosk with the Cover Sheet on top. (Remove all staples & paper clips prior to scanning.) • On the keyboard press the F1 key twice to start scanning. • If the images are not legible: • Press F5so the documents can be scanned again. • Press F1 to confirm. • Restack pages properly (see step 3). • Repeat steps 3-5 again. • To add new pages to the batch, press F8 and follow instructions 3 - 5 above.
XPRESS SCAN PROCESS Step 5: Scanning (continued): Complete the transaction press F1. When the transaction is completed a receipt will print out. Match the # of pages scanned on the receipt to the number of pages you actually scanned to ensure every document was properly captured. Keep this receipt and your trip documents until you are paid for the trip on your settlement sheet.
Viewing Scanned Documents Drivers can view the status of his/her trip documents and scanned trip documents on the Human Resources web page (http://usxhr.usxpress.com). • Log onto the USX • Human Resources • webpage; • Select or click on the • “Xpress Scan • Image Viewer” on • the bottom left of • the menu screen.
The “Paid Date” column displays the date the trip/pro was paid. Sort the list by clicking on any of the column headers. TIM JONES Click on the magnifying glass in the “View” column to view the scanned paperwork for a specific trip/pro Viewing Scanned Documents The Xpress Scan Image Viewer screen will display trips / pro’s the driver has completed within the last 30 days.
Viewing Scanned Documents Magnified View of Documents