Download
1 / 10
100 likes | 287 Views
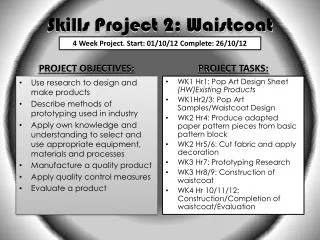
Skills Project 2: Waistcoat. 4 Week Project. Start: 01/10/12 Complete: 26/10/12. PROJECT OBJECTIVES:. PROJECT TASKS:. WK1 Hr1: Pop Art Design Sheet (HW)Existing Products WK1Hr2/3: Pop Art Samples/Waistcoat Design WK2 Hr4: Produce adapted paper pattern pieces from basic pattern block

E N D
Skills Project 2: Waistcoat 4 Week Project. Start: 01/10/12 Complete: 26/10/12 PROJECT OBJECTIVES: PROJECT TASKS: WK1 Hr1: Pop Art Design Sheet (HW)Existing Products WK1Hr2/3: Pop Art Samples/Waistcoat Design WK2 Hr4: Produce adapted paper pattern pieces from basic pattern block WK2 Hr5/6: Cut fabric and apply decoration WK3 Hr7: Prototyping Research WK3 Hr8/9: Construction of waistcoat WK4 Hr 10/11/12: Construction/Completion of waistcoat/Evaluation • Use research to design and make products • Describe methods of prototyping used in industry • Apply own knowledge and understanding to select and use appropriate equipment, materials and processes • Manufacture a quality product • Apply quality control measures • Evaluate a product
Design Brief HOMEWORK: DUE NEXT LESSON – Collect a range of EXISTING PRODUCT Images Design and make a prototype of child’s waistcoat, inspired by the Pop Art movement, using a range of decorative and constructional textiles techniques. Task 1: Pop Art Research – When using a specific topic to inspire the design of your product you need to find out about that topic. For this project it has already been done for you!. • The information and images you have been given need to be presented on an A3-A2 sheet along with your own designs and a small number of linked textiles samples. Hour 1 What are main themes/styles associated with Pop Art? Who are the main/most popular artists? Are there any iconic/famous images or objects associated with Pop Art? Create some of your own original drawings/designs inspired by the ones you have been given. You will then be able to use these for your textiles work next lesson.
Hour 1 Pop art presented a challenge to traditions of fine art by including imagery from popular culture such as advertising, news, etc. Pop art employs aspects of mass culture, such as advertising, comic books and mundane cultural objects Bright Colours, Repeat Patterns Brands and Logos Marylin Monroe, Coca Cola, Campbells, Soup, Mickey Mouse, Comic Books Consider these key points and images to produce a range of your own images and designs linked to pop art.
Hour 2/3 Textile Pop Art Task 2 • Complete your Pop Art Design sheet with the addition of some Textile Samples that are linked to your Design work – Consider which techniques will work best for the type of design you are trying to create. Task 3 • Produce a front and back drawing of your intended waistcoat design – INCLUDE decorative features. • Label to explain techniques to be used.
Hour 4 Pattern Making Aim: Use pattern block to create own paper pattern piece Cutting Line Use the pattern block you have been given to create your own paper pattern – you may want to adapt shape/size of certain areas to match your design. Label your pattern pieces using the appropriate markings Sewing Line Notches Grain Line Darts Fold Line
Hour 5-6 Production - decoration Aim: Cut fabric accurately, apply decoration effectively • Use the pattern pieces you made last lesson to cut your fabric to correct shape and size. • You need both outer waistcoat pieces AND lining waiscoat pieces. Back piece X1 outer X1 lining Cut on the fold of the fabric Front right piece X1 outer X1 lining Front left piece X1 outer X1 lining When all pieces have been cut out, begin decoration of panels.
Hour 7 Theory - Prototypes Aim: Understand prototyping and production methods in industry Folens Unit 13: Testing and Prototypes • A design team will make a protoype of a new product. What is a prototype? • Discuss the value of making a prototype. • It is important that products are tested during the design process. Describe ways in which the product can be tested before the item is mass produced. • Explain the difference between mass production and making of a prototype. • Explain how computer technology might help reduce time spent protyping. • Explain what the term ‘Toile’ refers to.
Production - Construction Hour 8-10 Aim: Construction/Production of Waistcoat • Complete Decoration BEFORE constructing waistcoat. • Sew shoulder seams together (Right sides together) Do this for the outer pieces and then the lining pieces. 3. Open up the pieces and lay the outer section over the lining section (Right sides together). Sew around the edges, leaving the side seams open. 4. Cut notches into the seam allowance. 5. Turn right side out through the open side seams. Sew outer side seams together using the sewing machine, then close lining seams using ladder stitch.
Hour 11 Evaluation • Photograph your finished product – Front View, Back View, Special Features/Decoration. • Are you pleased with your work? Why/Why not? • Is your work of good quality? Do you think your product would last a long time? How can you Tell? • How could your product be improved further? What would you do differently if you were to make the product again? • How well did you use the time given and organise yourself? • Produce a plan of make (Flowchart) to explain how you made your product and where quality checks were used.