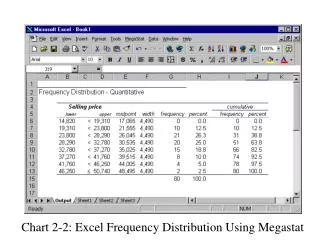
Download
1 / 31
310 likes | 483 Views
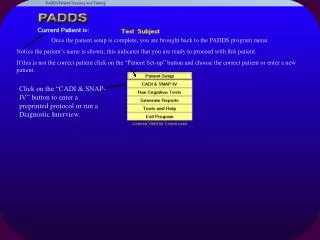
Once the patient setup is complete, you are brought back to the PADDS program menu. Notice the patient’s name is shown; this indicates that you are ready to proceed with this patient.

E N D
Once the patient setup is complete, you are brought back to the PADDS program menu. Notice the patient’s name is shown; this indicates that you are ready to proceed with this patient. If this is not the correct patient click on the “Patient Set-up” button and choose the correct patient or enter a new patient. Click on the “CADI & SNAP-IV” button to enter a preprinted protocol or run a Diagnostic Interview.
If you try to start a Diagnostic Interview without first associating a patient you will get this Warning screen. Click the “OK” button to go back to the PADDS main menu screen and either setup a new patient or choose from an existing patient.
The Diagnostic Interview is available in two different formats, Self Running and Clinician Input. The Clinician Input form for the Diagnostic Interview is used when a preprinted protocol has been completed. At this screen you can also input the SNAP-IV for the Parent and or Teacher behavior ratings. Enter the grade to which the child’s school grade in this field.
This screen comes up when you click on “The self-running Diagnostic Interview” button. It is interactive and designed to be administered to a parent or guardian of the patient. When the respondent has difficulty reading, or the pre-printed protocol was not used, the questions are presented and answered one at a time, in both audio and visual form. The number in this box represents the number of questions that will have a full repeat.(i.e. You have answered yes, if this is correct, click next to continue). The sound options screen is primarily meant to be informative; however, certain sound options can be adjusted if necessary, and headphones can be used for privacy. It can be started with or without sounds and/or instructions. Note these two boxes, you can turn off the answer repeating completely by checking the appropriate box and/or you can turn off all sound.
This is the Introduction screen of the Self-running Diagnostic Interview (CADI) letting the parent or guardian know the purpose of the interview. To continue click on the “NEXT” button.
To start the self-running Diagnostic Interview (CADI) tutorial click on the “BEGIN” button.
The instruction form for the Self-running Diagnostic Interview is intended to quickly orient the respondent with the objects on the form and describe the method of responding to the questions. Notice the answer is “YES” and the “YES” button is outlined in yellow. Click on the “NEXT” button to go to the next question If the question needs to be repeated click on the “Repeat Question” button. If a question is “skipped” it will show up as “skipped” in the final report. The questions are presented and answered one at a time, in both audio and visual form.
This is another example of a question and answer type in the Self-running Diagnostic Interview (CADI). The questions are answered with either less than or more than.
With or without the instructions, you will come to this screen. This is the begin Interview form; it will interactively progress through all the questions. Click on the “Click Here to Begin Interview” button to begin.
This is the first question in the interactive Diagnostic Interview form. It will run through 113 questions. This interview covers Medical History/Systems Review; Developmental History; Social/Emotional Functioning; Depression/Anxiety, Behavioral and School History . Notice the “NEXT” button is grayed out and not available, each question must be answered or skipped before the next question is available.
On this screen you select the grade the child is currently in. Click on the “NEXT” button to continue.
When the Self-running Diagnostic Interview is finished it will stop at this screen and require a password to continue. This is to prevent any accidental activity after the completion of the interview. At this point the attending clinician enters the Password PADDS (as shown above), all UPPERCASE, then click the “CONTINUE” button.
The Clinician Input form for the Diagnostic Interview is used when a completed protocol is used instead of the Self-running Diagnostic Interview. You input each of the SNAP-IV ratings by clicking on the appropriate button. This screen comes up when you click on the “CADI & SNAP-IV” button on the PADDS main menu. Use the “Self-running Diagnostic Interview” if the Parent or Guardian will be answering the questions during their child’s visit. Enter the grade to which the child is assigned in this field. Click on the “Exit” button to close this screen.
If you need to correct or edit a Diagnostic Interview (CADI) you will reenter it as you would a new one. This is the Clinician Input form for the Diagnostic Interview and will be the most commonly used form for inputting the answers to the interview. Click on the “Yes” or “No” button or type the letter “y” or “n” on your keyboard. In this example we are on the fourth question. When a completed protocol is available, the clinician or an assistant can quickly enter the results using the keyboard and/or mouse. Click the “Continue” button until all questions are answered. After answering the last question on the input form click on the “Continue” button and you exit this form and you will be brought back to the main PADDS menu. Once the Diagnostic Interview (CADI) is completed, a report can be printed for future reference.
Notice the SNAP-IV for the Parent and or Teacher still need to be input. Notice that it shows “A CADI Report already exists for this subject. Choose from the available options below”. Click on the “Exit” button to exit this form. Notice the CADI “Self-running Diagnostic Interview” button and the Clinician Input Form for Diagnostic Interview” button are grayed out (not available) this also lets you know it has been completed.
Click on “EDIT” to correct and replace an existing interview. If you want to view or edit the CADI first click on the “View/Edit Existing Diagnostic Interview” button. This will bring up the “View Only” or “EDIT” buttons on this form. Click on the “View Only” or “EDIT” button then click on the “Clinician input Form for Diagnostic Interview” button to bring up the existing CADI to View or Edit it. Click on “EDIT” to correct and replace an existing interview.
This is the View screen of the Clinician Input form for the Diagnostic Interview. Click the “Next” button until you view all the questions. When you answer the last question it closes the Diagnostic Interview (CADI) Clinician Input Form.
You will see this screen if there is already a Parent Report on file for this Subject. You will see a similar screen if there is already a Teacher Report, the difference being instead of it showing Parent Report” it will show “Teacher Report”. If you continue the original report will be lost. Generally you do not want to replace this report. Click Cancel and Close form to quit or Click OK to Overwrite the report. If you Overwrite the report it is gone.
If you try to open a report without first associating a patient you will get this screen. Click “OK” to go back to the PADDS main menu screen and either set-up a new patient or choose from an existing patient.
We recommend using the CADI because it is an important primary screening for possible co-morbid conditions that can mimic or exacerbate ADHD symptoms. The Computer Administered Diagnostic Interview (CADI) Summary Report covers items in the following domains Medical History/Systems Review Developmental History Social/Emotional Functioning; Depression/Anxiety Attention/Hyperactivity Behavior/School History
There are a total of 113 questions in the CADI. Depending on the answers given the report can be 3 to 6 pages long. Once the Diagnostic Interview has been input you can also View and/or Edit existing records.
To export your reports click on the symbol on the Title Bar that looks like an envelope with a red arrow on it. In this example we are exporting a CADI, all the reports will export using the same steps. When you click on the envelope symbol it will bring up this Export dropdown list. You will scroll through the list until you find the type of file you want, for example pdf, rtf etc… When you click on the OK button it will bring up the following screen (next slide)
This screen is where you choose which pages you want to save. It defaults to save all pages, if you want to export a page range click on the “Page Range” radio button and enter your “From” and“To” pages then click the “OK” button.
This screen is where you choose where you want to save the file to. In this example the machine is running Vista and it shows that it is going to save it to your Windows Temp file. (other operating systems will look different). If you want to save it to a different location you will need to navigate to that location on your computer. At this screen you will also rename the file and navigate to the folder or other location you wish to save it to. All of your reports will export using the same steps as this example.
You may see this screen if you click on the export (envelope symbol on Title Bar) twice, this is a Microsoft Outlook issue, you can ignore it, this won’t affect the program use. Click on the “OK” button and continue.
To input a completed SNAP-IV form, choose the appropriate button here.
Click on a button to register the answer This is the input form for the SNAP-IV Parent Report. It has 20 questions and is answered on a 4 point “Likert” scale. Notice the different color backgrounds of these two forms to help distinguish between Teacher and Parent ratings. Because the scoring is significantly different, it is important to not mix up the parent and teacher reports.
You can print or export a copy of the completed SNAP if desired.
Just click on the button to register the answer This is the input form for the SNAP-IV Teacher Report. It has 20 questions and is answered on a 4 point “Likert” type scale. Notice the different color backgrounds of these two forms to help distinguish between Teacher and Parent ratings. Because the scoring is significantly different, it is important to not mix up the parent and teacher reports.
You can print or export a copy of the completed SNAP if desired.
From the Tools and Help Menu Item At this screen you will be able to print your CADI and Snap-IV Protocols. They are available in English and Spanish. It is suggested to have these printed ahead of time so they are ready when you need them.