Download
1 / 33
330 likes | 437 Views
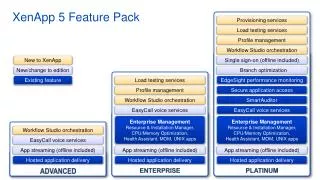
SMS 2003 OS Deployment Feature Pack. Fabrizio Grossi. SMS 2003 OS Deployment Feature Pack Overview. Distribuisce nuove versioni di Windows e Office ai desktop e ai portatili Sfrutta i benefici di SMS 2003: Pianificazione e targeting basata sull’Inventory Tracking e status centralizzati

E N D
SMS 2003 OS Deployment Feature Pack Fabrizio Grossi
SMS 2003 OS Deployment Feature PackOverview • Distribuisce nuove versioni di Windows e Office ai desktop e ai portatili • Sfrutta i benefici di SMS 2003: • Pianificazione e targeting basata sull’Inventory • Tracking e status centralizzati • Distribuzioni di immagini attraverso le aziende • Non è necessario l’intervento dell’utente • Si installa su SMS 2003 (SP1 o sup)
SMS 2003 OS Deployment Feature PackWindows Imaging Format (WIM) Caratteristiche Basato su File e non Distruttivo Elimina file duplicati Elevata compressione dell’immagine Mantiene la system partitions Benefici I dati Utente possono stare localmente durante la migrazione Diminuisce l’utilizzo della rete Aumenta le performance
SMS 2003 OS Deployment Feature PackUser State Migration Tool 2.6 • Caratteristica Corporate • Non richiede che l’utente sia loggato • Migration dei profili Multi-user • Filtro dei Profili • Domain, User name, Time since last logged on. • Supporto Encrypted File System (EFS) • Progress log, è possible abilitare l’invio di eventi a MOM 2005 • La compressione dei dati catturati riduce l’utilizzo della banda • Supporto dell’impostazione delle Applicazioni • Supporto per le impostazioni di Office da 2003 per versioni precedenti fino a Office 97: • 19 applicazioni comuni per Instant Messaging, Media players, … • Documentazione • Guida Step-by-step con esempi.
SMS 2003 OS Deployment Feature PackUser State Migration Tool 2.6 • 2 Strumenti a linea di Comando (no UI) • Impostazioni di Cattura Scanstate user:/DOMAIN/* -nl 30d /efs-raw c:/minint • Impostazioni di Ripristino Loadstate c:/minint • Passi amministrativi • Scaricate USMT 2.6 da microsoft.com • Configurate che impostazioni volete migrare • Test, test, test • Configurate SMS OSD Image Package: Azioni di Cattura e Restore
SMS 2003 OS Deployment Feature PackPassi Amministrativi • Catturate un’immagine di “Riferimento” • Create un SMS Image package • Distribuitelo ai Distribution Point di SMS • Identificate la collection (Target) • Advertisement verso la collection (Schedule) • Installazione è unattended con 3 reboot
Cattura dell’Imagine Prepare Machine • L’Amministratore configura un Computer modello. • C:\Sysprep • in Workgroup 2. Inserire l’Image Capture Wizard CD 3. L’Image Capture Wizard prepara computer Begin Capture 4. Computer si avvia dall’ Image Capture CD (Serve un DHCP) 6. Operazione completata 5. Viene catturata l’immagine “XP-SP2.wim”
Prerequisiti Reference Computer • W2k o sup. • Non deve essere assegnato a un Sito (o i Destination Computer devono finire nello stesso sito) • In Workgroup e con IP dinamico (DHCP) • SO installato in C: • C: partizione primaria NTFS. No partizioni nascoste • Crea CD con Image Capture Wizard
Prerequisiti Destination Computer • Upgrade di Computer installato • SMS 2003 Sp1 client (advanced o legacy) • NT 4.0 Service Pack 6a o sup. • C: partizione primaria NTFS. No partizioni nascoste • Installazione macchina nuda (CD-based installation - RIS server) • Nessun prerequisito (salvo differenze HAL)
Preparazione del Reference Computer • Installare patch • Rimuovere PC dal dominio • Abilitare boot da CD nel BIOS • Verificare che ci sia l’ultima versione di Sysprep • IP dinamico • Admin Password che sia coerente con i password requirements del destination computer
Cattura immagine • Avviare il CD Image Capture Wizard • Inserire informazioni • Cartella destinazione • Credenziali per accedere • Reboot • con il CD, premendo un tasto • se no parte il mini-setup Wizard • 21 min percatturare Win XP sp2 Trial in Ita • Disco C occupato: 1,9 GB • Generato un fle .WIM di 450 MB
Distribuzione dell’Imagine OS.WIM 1. Creare un image package dal file .wim catturato 2. Configurate le impostazioni di distribuzione 4. Create una collection di computer target e un advertisement 3. Distribuite il package ai distribution point
Creazione di un OS Deployment package • OS Deplyoment Package - New Package Wizard • Specificare file .wim creato nel punto precedente • Specificare una cartella NUOVA (la ripulisce) per il nuovo package • Configurare proprietà del package
SMS 2003 OS Deployment Feature PackImage / Image Package Windows XP SP2 Office 2003 AV Applications SMS Agent Image laptop_image.WIM WinPE OSD laptop_image.WIM Custom Actions Image Package
Demo Image Distribution
SMS 2003 OS Deployment Feature PackPassi Amministrativi • Catturate un’immagine di “Riferimento” • Create un SMS Image package • Distribuitelo ai Distribution Point di SMS • Identificate la collection (Target) • Advertisement verso la collection (Schedule) • Installazione è unattended con 3 reboot
Distribuzione di un’immagine di un Sistema Operativo • Nuovo Computer • RIS • OS Image Installation CD • Refresh • Cattura User State • Replace
Installazione dell’Immagine • Fasi dell’installazione dell’immagine • Validation • State Capture • Pre-install • Install • Post-install • State Restore • Azioni Custom possono essere aggiunte per estendere le funzionalità • Applicazioni addizionali possono essere installate in sequenza • Messaggi di stato vengono mandati al site server per ogni fase
Installazione dell’Immagine ISV/Cust. Validation Script Validation Phase State Capture Phase Interactive System Examples: • Check disk space • Check host name OSD Client
Validation Phase • Si possono eseguire Custom Action • Notifiche su cosa fa il package • Validazione se il package può funzionare sul PC • Verifica sufficiente spazio libero • No azioni che facciano modifiche cancellazione (le azioni vengono cmq eseguite anche se l’utente pospone)
Installazione dell’Immagine User Interface (Notification & Postponement) COM Image Package information (Customizable). ISV/Cust. Validation OSD User Notification OSD Client UI Validation Phase State Capture Phase Interactive System OSD Client
Installazione dell’Immagine User Interface (Notification & Postponement) User Interface (Progress) COM COM ISV/Cust. Validation OSD User Notification ISV/Cust. State Capture User State Capture (USMT) Machine State Capture SMS State Capture OSD Client UI Validation Phase State Capture Phase Interactive System OSD Client
State Capture Phase • Cattura di file e config utente esistenti (nome Pc, SMS Site, SMS Id), poi rutilizzabili • Azioni: • Custom • Custom script per salvare info/dati utente • Capture User state • USMT 2.6 • Connect UNC path • Credenziali per accedere a una share • Reboot System • Se un’azione finisce con codice diverso da zero: OS deployment Package si arresta e manda un messaggio di “failed advertisement” al Site Server
Installazione dell’Immagine Prepare Machine Install Windows PE, copy files, reboot REBOOT Installation Phase (Old OS) Installation Phase (Windows PE) User Interface (Progress) Pre-installation Phase Post-installation Phase (New OS) Interactive System OSD Client OSD Image Installer
Installazione dell’Immagine Prepare Machine Install Windows PE, copy files, reboot ISV/Cust. Action ISV/Cust. Action Diskpart WIM Installation Phase (Old OS) Installation Phase (Windows PE) User Interface (Progress) Pre-installation Phase Post-installation Phase (New OS) Interactive System OSD Client OSD Client OSD Client OSD Image Installer
Preinstall Phase • State Capture terminata correttamente • Reboot con Win PE • Preinstall Phase: Azioni per preparare il disco del destination computer • Azioni: • Custom • Connect to UNC path • Reboot • Creare / formattare dischi • Script per accedere a SQL (via ADO) per determinare il nome computer, ecc. (MAC Addr)
Install Phase • PC usa Win PE • Tutto quello che non è nella MININT viene cancellato • Viene installato il nuovo SO su C • Nessuna azione Custom
PostInstall Phase • WIM restore (Install Phase) ha successo • Prima del Reboot: Postinstall Phase • Il computer usa ancora Win Pe • Azioni • Custom • Connect to UNC path • Gestire Sysprep.inf • Copia di ulteriori driver (Network, Video, ecc.) in una cartella (OemPnPDriversPath in Sysprep.inf)
Installazione dell’Immagine User Interface (Progress) COM OSD Client REBOOT REBOOT State Restore Phase Complete Minisetup Interactive System New Operating System
Installazione dell’Immagine User Interface (Progress) COM ISV/Cust. State Restore User State Restore (USMT) Machine State Restore SMS State Restore OSD Client State Restore Phase Complete Minisetup User Logon Interactive System New Operating System
State Restore Phase • Comincia dopo il mini-setup wizard • Computer usa il nuovo SO • Azioni • Custom • Connect to UNC path • Restore user state • USMT 2.6 • Run SWD program • Avvia SMS package (unattended) • Es: • Restore user state • Installa altri package (office, LOB appl)
SMS 2003 OS Deployment Feature PackSystem Requirements • Destination Computer: • Windows NT 4.0 (Legacy client) • Windows 2000 (Advanced Client) • Windows XP (Advanced Client) • Windows 2003 Server (Advanced Client) • Reference Computer: • Windows 2000, Windows XP, Windows 2003 • Membri di un Workgroup (v. cattura) • Operating System installed on C: partition (NTFS) • Sysprep installed in C:\Sysprep • SMS 2003 Advanced agent should be pre-installed
SMS 2003 OS Deployment Feature PackBest Practices / Tips and tricks • Image Capture • Assign the SMS Advanced client to the correct SMS site server. • Image Package configuration • Add Validation scripts to check Disk space and Network access. • Add additional network and storage drivers. • Configure Admin Password, Domain account and Volume key. • Save User Data in protected directory %OSDSTATEPATH% • Sysprep modification • Modify in Post-Install phase. Example: Modify screen resolution, Add additional drivers. • If you do migrate your managers computer: • Take a complete backup first!