Download
1 / 28
300 likes | 584 Views
Extracting Drawings Dimensioning with SolidWorks. ENGR 1182 SolidWorks 08. Today’s Objectives. Formal Drawing Components: Extracted Drawings Dimensioning with SolidWorks SW08 In-Class Activity SW08 Out-of-Class Homework Assignment. Formal Drawings.

E N D
Extracting DrawingsDimensioning with SolidWorks ENGR 1182 SolidWorks 08
Today’s Objectives • Formal Drawing Components: • Extracted Drawings • Dimensioning with SolidWorks • SW08 In-Class Activity • SW08 Out-of-Class Homework Assignment
Formal Drawings Definition: Detailed multi-view representations of a finished part Formal Drawing Components: • Extracted Drawings • Extracted Views • Detailed Features • Title Block • Dimensions • Size and Type of Features
Extracting Drawings ENGR 1182 SolidWorks 08
Extracted Views Purpose: create 2D engineering drawings from solid models Top View • Part File to Drawing File • Place Base View • Project Top, Right • Isometric View Isometric View Base View Right View
Detailed Features • Automatically Aligned Features • Hidden Lines • Orthographic Views • NOT on Isometric Views (unless necessary) • Circular Features • Centerlines • Centermarks
Title Block • Specific to Company • Part Name • Scale • Units • Author • Date • Any Other Necessary Information
SolidWorks: OSU Title Block A pre-made drawing sheet with an OSU title block is found on the website under content. Download this file and file out your name, instructor, etc. and save the file as: OSU_TitleBlock_Initials Open this file and always use “Save As” in order to keep the file for repeated use.
SolidWorks: Drawing File Open a new Drawing file and use the “Model View” button to place a base view Select the correct part file from open documents or using the “Browse..” button to select closed files
SolidWorks: Model View Options Display hidden lines for orthographic views Choose base view (usually front view) Choose appropriate scale using the sheet scale or a custom option
SolidWorks: Extracted Views Place projected views by left clicking in the appropriate directions and spacing Insert base view by left clicking once at the correct location Press “Esc” when finished
SolidWorks: Changing Options The size of all the views can be changed by selecting the base view and changing the scale The isometric viewcan be selected in order to change it’s display properties to a solid part without edge lines
SolidWorks: Circular Features Center Marks and Centerlines must be added to define circular features in Orthographic views
SolidWorks: Title Block Finished Drawing Right click and select “Edit Sheet Format” Note: The views in the main space will disappear When finished right click and select “Edit Sheet” to see the views of the object again Double click text to edit
Extracting Drawing Wrap Up Extracted Views • Part file to drawing file Detailed Features • Aligned • Hidden • Circular Title Block • Author • Units • Scale Homework Assignment SW07-OUT: Model part and create 2D Drawings with all necessary formatting (to be used in next class)
In-Class Activity Open this part file and use it to extract 2D drawings. Add all necessary formatting. (Hint: Centermarks and Centerlines)
Dimensioning with SolidWorks ENGR 1182 SolidWorks 08
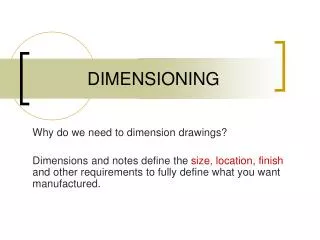
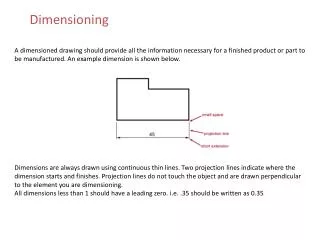
Basic Dimensioning Dimensioning is used to define an object so that it could be manufactured and must: • Define the overall size of the part in all 3 dimensions. • Define the size and location of the features of the part in all 3 dimensions.
Basic Dimensioning .75 .75 2 2 Overall Size Features Size and Location .25 1 2 2
Basic Dimensioning:Arcs and Circles .5 .5 Overall Size Features Size and Location 1 1 R1 R1 Ø1
Baseline Vs. Chain Dimensioning • There are many ways to use dimensions to locate features. • Chain • Baseline (Both techniques are acceptable, however baseline dimensions are preferred.) Chain Dimensioning Baseline Dimensioning
SolidWorks: Dimensional Standards Open the SolidWorks options menu • There are multiple dimensioning standards used in manufacturing and technical drawings. • ANSI – EEIC preferred Standard
SolidWorks: Dimensional Standards • ANSI – EEIC preferred Standard • Under Document Properties • ANSI is listed as the Overall drafting standard but usually needs reset • Reset System: • Switch to ISO, then hit OK • Then go back and switch it back to ANSI
Dimensions can be added using the “Smart Dimension” feature SolidWorks: Adding Dimensions Note that sometimes the Isometric needs to be re-scaled to allow adequate drawing space which requires a NOTE. Notes can be added to reduce the number of dimensions by stating symmetry or identifying fillet radii
Dimensioning Wrap Up Homework Assignment SW07-OUT: Model part and create 2D Drawings with all necessary formatting (dimension in next class) Basic Rules of Dimensioning • Overall size in all 3 dimensions • Size and location of all features in all 3 dimensions
In-Class Activity Open the following document: “Dimensioning –InClass Activity” and add dimensions to the following 4 shapes.
Important Takeaways • Extracted drawings are used to show 3D parts as 2D drawings. • Titles blocks are used for identification and informative purposes. • Dimensioning is used to define an object, including the overall size with 3 dimensions and the location and size of part features.
What’s Next? • Due Next Class: SW08 Out of Class HW • Before next class, you will read about dimensioning in detail. • Take SolidWorks 9 Quiz on readings