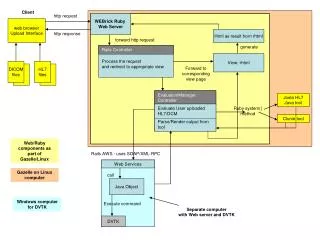
Aeries Browser Interface
Aeries Browser Interface. Lake Tahoe Unified School District Presented by Dave Mason. Logging On. Normally, go to sis.ltusd.org/abi Enter your username and password Choose the correct school Click the “OK” button or press the [enter] key on your keyboard. Logging On.


Aeries Browser Interface
E N D
Presentation Transcript
Aeries Browser Interface Lake Tahoe Unified School District Presented by Dave Mason
Logging On • Normally, go to sis.ltusd.org/abi • Enter your username and password • Choose the correct school • Click the “OK” button or press the [enter] key on your keyboard
Logging On • Today, go to demo.aeries.com/abi • Click “Login” to accept name & password for Eagle High School • Name: teacher • Password: teacher
Aeries Options • Click the link at the top of the page titled “User Options” • Notice the “Default Page” option – I use attendance, so that the attendance page opens immediately when I log on. • (doesn’t always seem to work, though) • Note also the password option.
Aeries Attendance • Click the link for Attendance, if you’re not already there. • A=absent • P=present (if you previously marked a student absent or tardy) • T=tardy • Note the green color on students whom you’ve modified.
Aeries Attendance • You can see the students’ previous two-weeks’ attendance to the right side of the screen. • If you click a student’s ID number, you’ll see that student’s attendance for the year (in all classes)
Aeries Attendance • Other attendance options (at the top): • Take attendance by photo • Take attendance by seating chart • Reports • Weekly attendance reports (for Birgie) • Class labels • Class roster
Aeries Gradebook • Click the Grades tab and click the “Gradebook” option. • To use the gradebook, you must first set up the gradebook the way you want it. • Steps must be followed in order!
Setting up Aeries Gradebook • Add all classes to the Gradebook • Add students • Link Gradebooks (if desired) • Add Assignment Types & set Final Mark Grade Scale • Add Assignments • Enter scores for students
Adding Classes to Gradebook • Add only 1 class at a time! • Click “Add New” and choose a class. • You can modify the information on screen • Class description, term, etc. • Think about the dates to use. • For today, use today’s date as the start.
Adding Classes to Gradebook • “Apply Changes” • Add another class and apply. • Repeat until all classes are listed.
Adding Students to Gradebook • Students cannot be imported until school starts (next Tuesday). • Click the “Enters/Leaves” link at the top. • Select your first class. • At the beginning of the year, click the “Add all students” button. • Later, if students add to your class, choose “add” next to the new student to add them.
Adding Students to Gradebook • The “Low” and “High” assign fields are used if a student is not responsible for all assignments. • If they enter your class after assignment 9, enter a 10 in low assign. • When students are added, click “submit” • Adding all students automatically submits. • Add students to all classes.
Linking Classes • If you want two (or more) classes to have IDENTICAL assignments, you can link them. • Any change to one class (in terms of assignments) will be applied to all linked classes. • Click the “Link Gradebooks” option if you want it. • Enter the same (nonzero) number to link classes.
Setup Assignment Types • Assignment types contain • A code • A description • The percent that this type of assignment is worth (if weighted grading). • Choose a Class Gradebook (above, left) • Click “Edit Assignment Types.”
Setup Assignment Types • Code is your choice. • Choose a number or letter • Hint: make letters meaningful: H for Homework, T for tests, etc. • If you don’t do weighted scoring, uncheck the “doing weighted scoring” box. • Enter a code, description, and weight, then submit.
Setup Assignment Types • Total percentage must add to 100. • Continue for other assignment types. • Choose your other classes and set up the assignment types for them as well. • Be sure to “submit” after each one.
Set up Grade Percentages • “Gradebook Maintenance” • Final Marks • Enter percentages. • Check the “show grade with …” box. • Ignore the unused marks.
Add Assignments • Choose a gradebook • “Add new assignment” • Choose the type. • Enter a description • “comment” field can be used for more detailed description. • Remember that parents can see your gradebook. • Enter the max score.
Add Assignments • Enter dates. • Don’t check the “grading cmplted” box unless you are ready to enter scores for students and have that assignment calculated into the grade. • Click the “Add” button to submit the entry. • Add other assignments, as needed.
Entering Grades • Entering “Scores by Assignment” is possibly the most common method. • Allows you to enter comments • Allows you to enter a “default” score for all students • Entering “Scores by class” lets you enter grades for several assignments at once. • Type a score, press the down arrow, repeat. • Enter “NA” to exempt a student from an assignment.
Entering Grades • Assignments are not calculated into class grades until the “due date” is reached AND the “grading completed” box is checked. • “Submit changes” and you’ll see the percentages. • Remember the 20 minute timeout! • Scores above the max will show a green box (and add as “extra credit”)
Grade Reports • “Gradebook Summary” is the standard report showing all students with all assignments. • Choose a class • Choose how to display students (name or id) • Choose which assignments to show. • “Preview report” to see it, and print it.
Display Options • “Options” link on the left menu. • Show only active gradebooks • Assignments per page • Assignments to show/calculate with. • Grading Rules (“drop lowest score”)
Student Info • From the main menu. • Classes • Grades • Attendance • Transcripts/graduation status
Starting a New Semester • Options: • Create a new gradebook • Easier to see old semester • Harder to set up • Change assignments to use. • From 75 – 999 for instance • Easy to set up • Must change the assignments to use to see first semester grade.
End of Grading Period • From main menu: Grades, Grade Reporting • Choose a class • “Load from gradebook” • Enter comments.
Entering/Leaving Students • Use the “High/Low assignment” from Gradebook Maintenance, “enters/leaves” • Easier than doing separate calculations.
Sending Grades • If parents have an e-mail address, display a student’s scores, select with your mouse, “copy” and paste into an e-mail message. • You can do the same to counselors.
TA mode • You can allow a TA to enter grades for specific classes, for specific assignments.
Parent Portal • Parents can log in and set up an account to see their children’s grades and assignments. • From the district website.