Download
1 / 6
60 likes | 87 Views
Learn how to use the Veho VMS-001 USB microscope to capture timelapse videos. Download the free webcam timelapse software and follow the instructions to start recording.

E N D
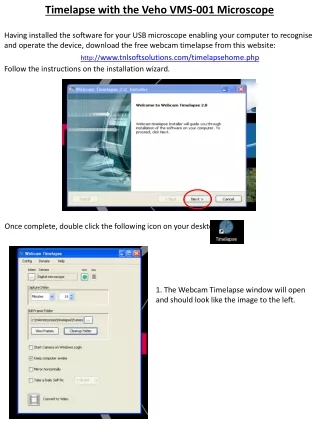
Timelapse with the Veho VMS-001 Microscope Having installed the software for your USB microscope enabling your computer to recognise and operate the device, download the free webcam timelapse from this website: http://www.tnlsoftsolutions.com/timelapsehome.php Follow the instructions on the installation wizard. Once complete, double click the following icon on your desktop 1. The Webcam Timelapse window will open and should look like the image to the left.
2. The first menu that the user will encounter is the Select Camera menu. By clicking on the button, labelled (highlighted red), the user can choose between a number of attached digital viewing devices, as seen on drop down menu (green). The format is selected on drop down menu (purple). Our recommendation is that 640 x480 pixels is the optimum selection for video capture with the Veho VMS-001. Whichever dimensions are used, the setting must be consistent or later stages of timelapse video creation will fail. 3. The Timelapse software works like an electronic flick-book and captures a single image at a pre-determined interval. These intervals can be as frequent as every second and have as lengthy a gap as several days. The Capture Delay menu has a drop down menu (highlighted) which allows selection of units of time. The box to the right allows selection of how many of each unit is required between each captured image. The finished video will run at 30 frames per second. As a result, the gap between shots can be calculated provided the length of the event being filmed and the desired length of the finished video are known. For example: a 4 day event condensed to a 2 minute video. Number of frames = number of seconds x 30. Therefore, 120 x30 = 3600 frames. Number of seconds in 4 days = 4 x 24 x 60 x 60 = 345,600. Seconds per photo = number of seconds / number of frames = 345,600 / 5760 Therefore, for a 2 minute video of a 4 day event, an image should be taken every 96 seconds.
4. The Still Frame Folder menu allows the user to select the folder that each captured image is stored in. The folder listed when the program is opened is the default folder created during installation. Should the user require a different folder for this, then it can be selected by clicking on the highlighted button and selecting in the window which appears. 5. Since all images in the folder will be incorporated into the final timelapse video, it is important before recording to clear the still frame folder of any images stored. This is achieved by clicking on the cleanup folder button (highlighted red). It is important that the ‘Keep computer awake’ option (green) is selected. Otherwise the computer may stop capturing when it enters energy saving or sleep modes.
6. At this stage, the user is ready to begin filming. Unfortunately, there is no way, with this software, to preview the field which will be captured with the camera. Therefore, the user must begin the filming process to see what is being viewed with the Veho VMS-001. When the user is happy with the settings, filming begins by clicking on the green ‘Start’ button (highlighted) 7. Once the start button is clicked, a second window will open with the camera field displayed. The user can adjust direction and focus until the desired field is achieved. Once the user is happy with the view, the film can be ended by clicking on the ‘Stop’ button (highlighted below) and steps 5 and 6 can be repeated to begin filming again.
8. Once the timelapse video is complete, click on the ‘stop’ button. The second window will close. Click on ‘Convert to Video’ (highlighted above, in red) and the AVI tool window will open. Make sure that the frame rate is set to 30 frames per second (green) and that the video quality slider is at the highest position (purple). This will make the video smoother. Once these settings are entered, the user can click start (yellow). 9. Once the video has been created successfully, a window will open and the finished .avi file will be ready for export. Double clicking the icon will open the video immediately in Windows Media Player.
There are various free apps available for mobile phones which will allow the use of the phone camera to make timelapse video. Examples we have used at SSERC are: ‘iMotion’ HD for iPhone, ‘TimeLapsePro’ for Windows phones and ‘Lapse It’ for Android phones. DM 24/06/2013