Engineering Drawing CVE 307
Engineering Drawing CVE 307. The Construction Process . Introduction

Engineering Drawing CVE 307
E N D
Presentation Transcript
The Construction Process • Introduction The person or group that wants a building erected and who will pay for the total cost of the building is referred to as the client. The client often knows in broad terms what he wants, he may often have an idea about its shape and appearance. It is the designer’s job to prepare drawings that will meet the clients requirements and those of the regulating authorities. In many instances this work will be performed entirely by an architect, but frequently it involves the design skills of a structural engineer.
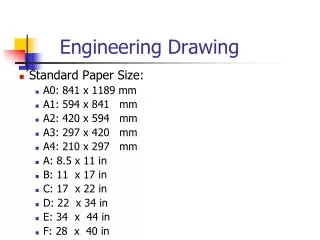
Basic Presentation Procedure • Scale • A sensible scale should be adopted for a general arrangement drawing. • With a suitable scale, the complexity of a building element could be easy to grasp e.g. 1:50 - For simple wall and slab detail • Grid lines These are used to identify the elements you are describing. The are usually not as thick as the border lines. a b c d e f 1 2 3 4
Plans, elevation and sections should be clearly defined • Sections through plans should be taking looking to the left and upwards • Reinforcement should be in heavy lines • Bars should be called up once only being on the plan or elevation • Bars should be called up separately for each unit and not repeated where a similar bar is used in another unit of the same diagram. • Bars should be referred to in their likely order of placing to make the steel reinforcement fixers job easy. • Each drawing should start from bar mark 1 • Covers should be shown on the section where it varies from one unit to another on a diagram.
Standard abbreviations should be used in calling up the reinforcement bars e.g. B – bottom, R- mild steel, Y – high yield, stgd.- staggered • Bars should be called up in the following manner. Number required/type of steel/diameter or size/bar mark/spacing required /location/ abbreviations e.g. 20Y1201-150T • In slabs distribution reinforcement is provided at right angle to the main reinforcement bars • In beams links are provided along the span even when not required for shear to act as stirrups, so as to make handling of reinforcement simpler to minimize shrinkage cracking and help maintain required concrete cover
Dimensions, Notes and Titles • Effective communication is basic in the construction industry and the designer must learn to make his requirements clear to all • Overall sheet planning is necessary before dimensions, notes and titles can be applied to a drawing • The purpose of dimensioning is to define size and location of the various materials and components • Overall readability, conciseness, completeness and accuracy must be foremost in any dimensioning system • Dimensions should be read across the sheet and are usually placed at the bottom, vertical dimensions must be readable from the right hand side. • Basically there are 3 dimension lines: the line closest to the building should describe its small elements e.g. door widths and window openings.
Dim., Notes and Titles contd. • Notational systems include a number of items: room names, identification of materials, reference marks for scheduling and titles for complete drawings and their parts. • It is a good practice to group notes that apply around the construction to which they refer. • The spacing between notes must be greater than the spacing between the individual lines • For greater legibility and neatness notes can be aligned at the left to present an even margin. • When notes contain nomenclature, it is important that the same terminology be used throughout.
Working or Construction Drawing • Communication among members of the design team must be open, free, continuous and complete • Working drawings are the graphical communication between the designer and the contractor • The working drawing must be clear and concise, its production should be aimed at an easy flow of information to the contractor on the job site. • They are legal documents that impose various obligations on the parties to the contract.
Floor Plans • All drawings derive at least some of their information from the floor plan • It represents a tremendous amount of the project designers time spent in analyzing and meeting the needs of the client • Some of the basic things that the designer engage in a good floor plan include • Traffic patterns • Working relationships and arrangement of rooms • Placing the window and door openings • Superimposing the layout of the structural members and locate innumerable components that go into making up a complete project. • Basically, the floor plan is a horizontal sectional view of the building.
Floor Plans contd. • Some of the items to be considered on the floor plan of a building project are: • All necessary dimensions • Window symbols and door swings • Stair symbols and notes • Window and door identification marks • Built in cabinets, shelves and rods in closets • All structural features • Slopes in floors • Correct symbols • It is important that the plan be accurately made, for so many other drawings are traced directly from it in part or whole.
Foundation Plans • The foundation system entail only a small part of the total project. It provides a firm, stable, fully designed base for the entire structure. • The foundation helps distribute both the dead weight and live loads imposed on it. • The foundation plan reflects the overall character of the building, for the buildings visible elements must be carried down and firmly attached to the earth underlying the structure. • The foundation plan is the basics of the design of the structural framework of the building. The grid is laid out for all columns extending through the building and applies as well to the footing foundations beneath the columns.
Framing Plans • The framing plan shows the layout of the supporting features such as bearing walls, columns, beams and girders. • The framing plan is meant to complement the architectural plans. These are strictly structural drawings intended for the location of all the structural members and features. • A building frame in wood or steel is shown with isolated structural supports (columns) and individual beams, joists, girders and purlins. • Framing plan must include all the building’s structural components, horizontal and sloped slabs, stairs and ramps and the framing members themselves. • Framing plan is usually drawn at the same scale as the floor plan. Commonly, if there is a system of columns a structural grid will be set up to mark the center lines of the columns both ways.
Roof Plans • This explains the overall configuration of the roof and the elements that rest on or penetrate the roof membrane. • Adequate provision should be made to cater for positive drainage and slope in all roof systems. Ponding on a roof forces the water to seek an opening through which it can leak into the building • The roof plan is drawn at the same scale as the floor plan. Chimneys, drains, skylight, stacks and the pattern of slopes built into the roof surface should be well enumerated
Building Sections and Elevations • The floor plan is a horizontally cut section that provides us with a layout of the rooms and the openings into them. • The elevations show the floor to floor heights in their correct dimensions • The sections generally fall into two classifications; longitudinal and traverse sections. The two-section complex, cross and longitudinal are important in any project, no matter how large or small • Basically they are oriented vertically to reveal information not shown on other drawings. They will usually show features that appear on other large scale details and in a sense are an index of these details • The concept of the building section is to cut the building with all details in place, to look in a particular direction as denoted by the designation and show everything in front of the cut line. • Architectural symbols must be used as in wall sections, a material that is cut must be marked by the appropriate symbol
Staircase • Stair is a conventional means of access between floors in building. The staircase should be constructed to provide ready, easy, comfortable and safe access up and down with steps that are neither laborious nor difficult to climb. • Flight • Steps • Treads and Risers • Nosing • Rise and going • Pitch • Headroom and clearance
Detailing Reinforced Concrete • Detailing Column bases • Foundations to support columns vary according to the nature of the ground, the disposition of the columns and the magnitude of the loading that they sustain • Detailing Columns • Columns are detailed in elevation with sufficient X-sections to show the arrangement of the longitudinal bars and the shape of the links. • Detailing Beams • Beams are usually rectangular in X-section. Their width is commonly the same as the column that support them. Beams are detailed in elevation with sufficient X-sections to illustrate the position of all the longitudinal bars and shape of the stirrup • Detailing Floor Slabs • Floor slabs are detailed in plan with sufficient sections to show the positioning of all reinforcement. Description of bars are given in full on the plan view and bar marks only are repeated in the sections.