Download
1 / 13
130 likes | 292 Views
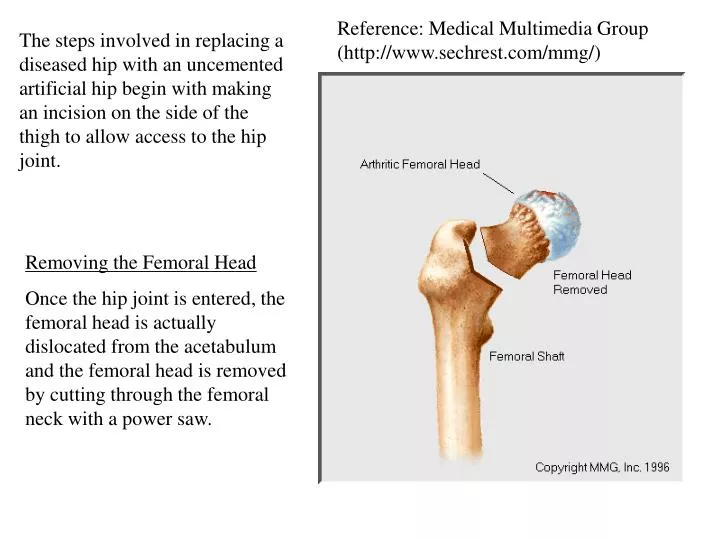
Reference: Medical Multimedia Group (http://www.sechrest.com/mmg/). The steps involved in replacing a diseased hip with an uncemented artificial hip begin with making an incision on the side of the thigh to allow access to the hip joint. Removing the Femoral Head

E N D
Reference: Medical Multimedia Group (http://www.sechrest.com/mmg/) The steps involved in replacing a diseased hip with an uncemented artificial hip begin with making an incision on the side of the thigh to allow access to the hip joint. Removing the Femoral Head Once the hip joint is entered, the femoral head is actually dislocated from the acetabulum and the femoral head is removed by cutting through the femoral neck with a power saw.
Reaming the Acetabulum • Attention is then turned towards the socket, where using a power drill and a special reamer, the cartilage is removed from the acetabulum and the bone is formed in a hemisperical shape to exactly fit the metal shell of the acetabular component.
Inserting the Acetabular Component • Once the right size and shape is determined for the acetabulum, the acetabular component is inserted into place. In the uncemented variety of artificial hip replacement, the metal shell is simply held in place by the tightness of the fit or by using screws to hold the metal shell in place. In the cemented variety, a special epoxy type cement is used to anchor the acetabular component to the bone.
Preparing the Femoral Canal • To begin replacing the femur, special rasps are used to shape the hollow femur to the exact shape of the metal stem of the femoral component.
Inserting the Femoral Stem • Once the size and shape are satisfactory, the stem is inserted into the femoral canal. Again, in the uncemented variety of femoral component the stem is held in place by the tightness of the fit into the bone (similar to the friction that holds a nail driven into a hole drilled into wooden board - with a slightly smaller diameter than the nail). In the cemented variety, the femoral canal is rasped to a size slightly larger than the femoral stem, and the epoxy type cement is used to bond the metal stem to the bone.
Attaching the Femoral Head • The metal ball that makes up the femoral head is attached.
The Completed Hip Replacement • And, voila!, you have a new bearing surface for the diseased hip.
The steps involved in replacing a diseased knee with an artificial knee begin with making an incision on the front of the knee to allow access to the knee joint. • Shaping the Distal Femoral Bone • Once the knee joint is entered, a special cutting jig is placed on the end of the femur. This jig is used to make sure that the bone is cut in the proper alignment to the leg's original angles - even if the arthritis has made you bowlegged or knock-kneed. The jig is used to cut several pieces of bone from the distal femur so that the artificial knee can replace the worn surfaces with a metal surface.
Preparing the Tibial Bone • Attention is then turned towards the lower bone, the tibia. The top of the tibia is cut using another of jig that ensures the alignment is satisfactory.
Preparing the Patella • The undersurface of the patella is removed.
Placing the Femoral Component • The metal femoral component is then placed on the femur. In the uncemented variety of femoral component, the prosthesis is held on the end of the bone by the fact that the end of the bone is tapered, and the metal prosthesis is cut so that it matches the taper almost exactly. Driving the metal component onto the end of the bone holds the component in place by friction. In the cemented variety, an epoxy cement is used to attach the metal prosthesis to the bone.
Placing the Tibial Component (metal tray) • The metal tray that will hold the plastic spacer is attached to the top of the tibia. The metal tray is either cemented into place, or held with screws if the component is of the uncemented variety. The screws are primarily used to hold the tibial tray in place until the bone grows into the porous coating. (The screws remain in place and are not removed.) • Placing the Tibial Component (plastic spacer) • The plastic spacer is then attached to the metal tray of the tibial component. If this component should wear out while the rest of the artifical knee is sound, it can be replaced - a so called retread.
Placing the Patellar Component • The patella button is usually cemented into place behind the patella. Completed total knee joint replacement