Download
1 / 18
180 likes | 202 Views
Learn Verilog synthesis and simulation using Xilinx tools for designing a 2-to-4 decoder with detailed step-by-step instructions and design constraints.

E N D
Xilinx and Nexys2 Tutorial Kartik Mohanram Dept. of Electrical and Computer Engineering Rice University, Houston, TX
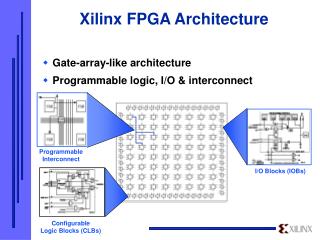
Verilog synthesis+simulation with Xilinx Xilinx Project Navigator Icon on your Desktop ELEC 326 Digital Logic Design 2
Open a new project called decoder2to4 Choose a working directory (C:\...\decoder2to4) and name the top level module there (decoder2to4) ELEC 326 Digital Logic Design 3
Device options, etc. The next step is to select the target device and its specs from the board (Spartan3E, xc3s500e, fg320); to specify Verilog as the input HDL language ELEC 326 Digital Logic Design 4
Adding new Verilog source Create a new top level module decoder2to4 in the project ELEC 326 Digital Logic Design 5
Initialize project directory ELEC 326 Digital Logic Design 6
Enter the source • Use bottom tabs to select the source file, key in the Verilog description, and save it Design constraints+actions: synthesis+implementation, bit-file generation, etc. ELEC 326 Digital Logic Design 7
2-to-4 decoder example • Use case statement • Note that output [3:0] y is changed to output reg [3:0] y • No Xilinx option to specify this directly • Hand-code as necessary ELEC 326 Digital Logic Design 8
User constraint file (UCF) • UCF file for I/O mapping • The UCF allows us to leverage the switches, LEDs, etc. on the board to interact with the implemented design (see documentation on 326 page too) • Add new source • Mapping visible on board • Sometime mis-marked • Cross-check with manual ELEC 326 Digital Logic Design 9
UCF generation ELEC 326 Digital Logic Design 10
Add I/O constraints • The mapping assigns switch 1 (available on pin G18) to input W[0], etc. These mappings are visible on the board and also part of the Nexys2 board documentation. ELEC 326 Digital Logic Design 11
Compile! • Select the decoder2to4 module and double-click the “Synthesize – XST” button. Note that Xilinx displays all allowed options for the selected file in the project. For example, selecting the io.ucf file does not provide options like synthesis, etc. since it really is not a Verilog module. • Synthesis will take some time. • If successful, you will see a green check-mark • Double-click “Generate Programming File” to generate the bit-file • You can expand the synthesis tab and look at the synthesis report, warnings, critical path delay, etc. • Errors and warnings • Heed them and you will learn as you go • Ask labbies ELEC 326 Digital Logic Design 12
Adding SSD signal • Add extra output ssd • Pulls all seven-segment display limbs up for the decoder, so that you don’t see a faint glow • Same limbs will find use in core of your SS module • UCF entries are handy ELEC 326 Digital Logic Design 13
UCF for complete design ELEC 326 Digital Logic Design 14
Generate programming file ELEC 326 Digital Logic Design 15
Programming the FPGA • Once the bit-stream is generated, we will configure the FPGA using the boundary-scan port • Boundary-scan and JTAG are features used for post-production test of ICs using very simple shift-register concepts and 4 I/O pins • The parallel-port connector lists these as TDI, TDO, TCLK, and TMS (test data in, …) • Can be used to configure FPGAs using the Adept software (icon below)
Programming the FPGA ELEC 326 Digital Logic Design 17
Programming the FPGA ELEC 326 Digital Logic Design 18