Controlling System Messages & Providing User Feedback in Oracle Forms
Learn how to suppress system messages, create custom alerts and messages, avoid user errors, and trap runtime errors in Oracle Forms.

Controlling System Messages & Providing User Feedback in Oracle Forms
E N D
Presentation Transcript
Creating Custom Forms Part B Eyad Alshareef
Lesson B Objectives After completing this lesson, you should be able to: • Suppress default system messages • Create alerts and messages to provide system feedback to users • Create applications that avoid user errors • Trap common runtime errors Eyad Alshareef
Controlling System Messages • Forms Services message line • Displays FRM- and ORA- messages • Classified according to • Severity • Whether or not they require user intervention • Suppress default system messages • Replace with custom messages • Set :SYSTEM.MESSAGE_LEVEL variable • In PRE-FORM trigger Eyad Alshareef
Oracle Error Message Severity Levels • 5: informative message (one record saved) • 10: informative message advising user of procedural error (cannot insert character ) • 20: condition that keeps trigger from working correctly • 25 condition that keeps form from working correctly • >25: extreme severity (out of memeory) Eyad Alshareef
Providing System Feedback • Important application design principle • Provide users with feedback about what is happening in application • Make applications forgiving • Allow users to undo unintended operations Eyad Alshareef
Suppressing Lower Level System Messages • Set :SYSTEM.MESSAGE_LEVEL variable to a higher level in PRE-FORM trigger :SYSTEM.MESSAGE_LEVEL := 25; Eyad Alshareef
Providing User Feedback in Forms • Message • Text in message line at bottom of form • Informational only; user doesn't have to respond • Alert • Dialog box • Allows user to choose different ways to proceed Eyad Alshareef
Messages • Syntax: MESSAGE(‘message text’); Message Eyad Alshareef
Custom Messages • Short text string that displayed on form message line • Up to 200 characters • Syntax: • MESSAGE('message_string'); Eyad Alshareef
Alerts • Form-level object • Object properties define alert appearance Message Title Style icon Buttons Eyad Alshareef
Alerts • Dialog box • Display text message longer than 200 characters • Displays one or more buttons • Allow user to select between alternatives that execute associated program statements • Top-level form object Eyad Alshareef
Alerts (continued) • Styles: • Note • Caution • Stop • Button Label property determines: • How many buttons appear on alert • Labels on buttons • Maximum 3 buttons Eyad Alshareef
Alerts (continued) • Create alert from Alert Navigation node • To declare/display alert: DECLARE alert_button NUMBER; BEGIN alert_button:= SHOW_ALERT('alert_name'); END; Eyad Alshareef
Example Alert Eyad Alshareef
Syntax to Display an Alert and Execute Alternate Commands Depending on the Button the User Clicked Eyad Alshareef
Avoiding User Errors • Help users avoid errors • Configure forms that validate input values • Programmatically disable form command buttons • Disable navigation for form text items containing values that users should not change Eyad Alshareef
Validating Form Input Values • Validate input values • Ensure that values meet specific preset requirements • Use • Text item validation properties • Form validation triggers • Validation unit • Represents largest chunk of data that user can enter before form validates all input values Eyad Alshareef
Text Item Validation Properties Eyad Alshareef
Validating Form Input Values (continued) • Item validation trigger • Item-level trigger • Associate with item’s WHEN-VALIDATE-ITEM event • Fires when item validated • As determined by form validation unit • If not valid • Raises built-in exception named FORM_TRIGGER_FAILURE Eyad Alshareef
Disabling Form Command Buttons to Avoid User Errors • Enable or disable button while form running: • SET_ITEM_PROPERTY('item_name', property_name, property_value); Eyad Alshareef
Validation Triggers • When Validate Item • It should be Item level trigger. • Executes when the item validation occurs depending on Validation Unit property. • E.g. : IF NOT :student.s_class IN (‘FR’,’SO’) THEN Message(‘Legal Values are FR and SO); RAISE FORM_TRIGGER_FAILURE; END IF; Eyad Alshareef
How To Disable Buttons • SET_ITEM_PROPERTY • E.g. : SET_ITEM_PROPERTY(‘Control.Delete’ , ENABLED, PROPERTY_FALSE); Eyad Alshareef
Disabling Text Item Navigation • Nonnavigable • User cannot press Tab key to place insertion point in text item • Set item’s Keyboard Navigable property to No • User can still click mouse pointer in text item to enter value • Create trigger that moves insertion point to another form item • WHEN-MOUSE-UP event Eyad Alshareef
Trapping Form Runtime Errors • ON-ERROR event occurs • Whenever ORA- or FRM- error occurs while form running • Create form-level trigger that corresponds to ON-ERROR event • Use decision control structure to handle different errors Eyad Alshareef
Forms Builder Built-in Procedures for Handling Errors Eyad Alshareef
Lesson C Objectives After completing this lesson, you should be able to: • Convert data blocks to control blocks • Link data blocks to control blocks • Create a form that has multiple canvases • Create tab canvases • Create stacked canvases Eyad Alshareef
Data Blocks vs. Control Blocks • Data block • Easy to create and use • Is associated with a single table, and reflects the table’s structure • Control block • Requires a lot of custom programming • Can contain items from many different tables • You can link data and control blocks to take advantages of the strengths of each Eyad Alshareef
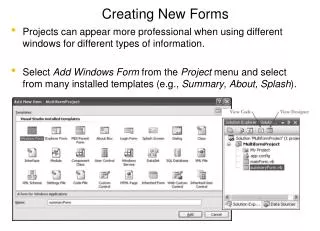
Converting a Data Block to a Control Block • Use Data Block and Layout Wizards to create data block form and form layout • Convert data block to control block • Add command buttons to control form processing • Simplify creation of control blocks Eyad Alshareef
Converting a Data Block to a Control Block • Create a data block and layout that contains most of the required text items • Convert the data block to a control block by changing the following block property: • Database Data Block = No • Then change the following text property: • Required = No Eyad Alshareef
Linking a Data Block to a Control Block • Create forms that link data blocks and control blocks to work together • Usually represent master-detail relationship Eyad Alshareef
Linking Data Blocks and Control Blocks • Create the control block as the master block • Create the data block as the detail block, but do not create a master-detail relationship • Create a master-detail relationship manually in the WHERE Clause property of the detail block: data_block_field = :control_block.text_item Eyad Alshareef
Creating the Data Block • Use Data Block Wizard and Layout Wizards • To create and configure data block • Must contain field that links it to control block • Create data block without master-detail relationship • Link two blocks later Eyad Alshareef
Linking the Control Block and the Data Block • Open detail data block’s Property Palette • Modify data block’s WHERE Clause property • General syntax: • fieldname := control_block.text_item_name Eyad Alshareef
Displaying and Refreshing the Data Block Values • Create a trigger to: • Place the insertion point in the data block GO_BLOCK(‘data_block_name’); • Flush the data block to make its data consistent with the master block and the database: EXECUTE_QUERY; Eyad Alshareef
Refreshing the Data Block Values • Add commands to: • Initially populate data block display • Periodically refresh data block records • Use the GO_BLOCK built-in: • To move form focus to data block • Then execute EXECUTE_QUERY built-in • Flushesblock • Makes information consistent with corresponding database data Eyad Alshareef
Creating Forms with Multiple Canvases • Good practice not to show too much information on user’s screen display • Single-form approach • Create one form with multiple canvases • Enables form to share data among different canvases • Impossible for multiple programmers to work simultaneously on different canvases of same application Eyad Alshareef
Creating a Form with Multiple Canvases • Users should be able to see all canvas text items without scrolling • For complex applications with many text items, divide application into multiple canvases Eyad Alshareef
Block Navigation Order • First block in Object Navigator Data Blocks list determines block items that first appear when form opens • Users can use the Tab key to navigate among different block items • Canvas that contains block items automatically appears Eyad Alshareef
Block Navigation Order Block order Canvas order doesn’t matter Eyad Alshareef
Working with Multiple Canvases and Data Blocks • Create form that contains multiple canvases • Create individual canvases • Specify to display specific block items on specific canvas • Create new data block • Select canvas name on which block items appear • On Layout Wizard Canvas page Eyad Alshareef
Working with Multiple Canvases and Data Blocks (continued) • Often forms that have multiple canvases also have multiple data blocks • Group items that appear on same canvas in single data block • To keep blocks small and manageable • Cannot create two items that have same name in same data block • Ensure that Forms Builder places new items in correct block Eyad Alshareef
Specifying the Block Navigation Order • Specify which canvas initially appears when user runs form • Canvas whose block items appear first under Data Blocks node in Object Navigator window • Order of canvases in Object Navigator Canvases list does not matter • Only order of data blocks Eyad Alshareef
Referencing Different Canvases, Form Blocks, and Block Items • All form items have Canvas property • Specifies name of canvas on which item appears • Form always displays canvas on which item with focus appears • Execute GO_ITEM built-in • Move form focus to item on target canvas • Good practice to include block name Eyad Alshareef
Tap Canvas Eyad Alshareef
Canvas • It is the surface that has the form items on it. • It has many types: • Content (The default) • Tab • Stacked • … • All canvases inside some window must have the property ‘Window’ has the name of the enclosing window. Eyad Alshareef
Tab Canvases • Multiple-page canvases that allow users to move among different canvas surfaces by clicking tabs Eyad Alshareef
Tab Canvas Components • Tab canvas • Collection of related tab pages • Tab pages • Surfaces that display form items • Tab labels • Identifier at top of tab page • A tab canvas lies on top of a content canvas Eyad Alshareef
Creating a Tab Canvas • Use the Tab Canvas tool on the Layout Editor tool palette to draw a tab canvas on an existing content canvas • By default, a new tab canvas has 2 tab pages • Create new tab pages as needed • Adjust tab page properties Eyad Alshareef
Important Tab Page Properties Name: how the page Is referenced in the form Label: Caption that appears on the associated tab Eyad Alshareef
Adjusting the Tab Page Order • Tab page that appears first is tab page whose block items appear first in the Object Navigator Block order Tab page order doesn’t matter Eyad Alshareef