Creating Web Page Forms: An Example of Form Input Elements
Learn how to design web forms with input boxes, dropdown lists, radio buttons, and more. Explore form control elements and form creation techniques. Implement text boxes, labels, and selection lists effectively.

Creating Web Page Forms: An Example of Form Input Elements
E N D
Presentation Transcript
Creating Web Page Forms Ahmad Al Kawam
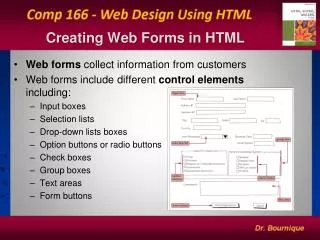
Input box First Name Last Name Address #1 Address #2 State Zip City Country Item Purchased Purchase Date Serial Number drop-down list box group box Network Operating System (check all that apply) Used For (check one) Netware Home Banyan Vines Business Windows Religious or Charitable Institution radio buttons IBM Lan Server Government check boxes PC/NFS Educational Institution text area Comments?: Send Registration Cancel form button Form Components and Elements
Form Control Elements • Control elements : • text boxes for text and numerical entries • selection lists for long lists of options, usually appearing in a drop-down list box • radio buttons, also called option buttons, to select a single option from a predefined list • check boxes to specify an item as either present or absent • groups boxes to organize form elements • text areas for extended entries that can include several lines of text • buttons that can be clicked to start processing the form • Each control element in which the user can enter information is called a field.
The <form> Tag • A single page can include several different forms, but you cannot nest one form inside another. • The general syntax of the <form> tag is: <form attributes> form elements and layout tags </form> • A single Web page can contain multiple forms, the <form> tag includes the name attribute. • The name attribute identifies each form on the page. • The name attribute is also needed for programs that retrieve values from the form.
Adding the <form> Tag The <form> tag includes attributes that control how the form is processed This figure shows the form name “reg.”
Completed Registration Form contact information product information usage information comments buttons
Working with Text Boxes • Text boxes are created using the <input> tag. • The general syntax is: <input type=“type” name=“name” id=“id”> • type specifies the type of input field • name and id attributes identifies the input field for the CGI script • To create a text box, you would enter the tag: <input type=“text”>
Creating a Text Box • To create a text box, use the following HTML code: <input name=“name” id=“id” value=“value” size=“value” maxlength=“value”> • name and id attributes identify the field • value - a default value to the text box • size - the width of the text box in number of characters • maxlength - the maximum number of characters allowed in the field
text box Text Boxes on the Form text description Text boxes are blank and do not contain any accompanying text, a text description needs to be inserted, such as “Last Name”, adjacent to each box so that the user knows what to enter.
Creating a Password Field • A password field is a text box in which the characters typed by the user are displayed as bullets or asterisks i.e. ****. • The syntax for creating a Password field is: <input type=“password”> • Using a password field should not be confused with having a secure connection. • The password itself is not encrypted. • The password field only acts as a mask for a field entry as it is entered.
Form Labels & selection lists • HTML allows you to formally link a label with an associated text element for scripting purposes. • The syntax for creating a form label is: <label for=“id”>label text</label> • id is the value of the id attribute for a field on the form • label text is the text of the label • you must bind the label to the id attribute of the field and not the name attribute
value of the id attribute for the first name field Creating a Label for the fname Field This figure shows a label for the fname field.
Using a Selection List Your selection list might look slightly different depending on the browser and browser version.
Creating a Selection List • A selection list is a list box from which a user selects a particular value or set of values. • Selection lists are good to use when there is a fixed set of possible responses. • Selection lists help prevent spelling mistakes and erroneous entries. • A selection list is created using the <select> tag. • The <option> tag is used to specify individual selection items.
selection list field name items in the selection list Creating a Selection List
size = "1" size = "4" size = "7" size = "9" Selection Lists with Different Size Values
Radio Buttons • Radio buttons display a list of choices from which a user makes a selection. • Only one radio button can be selected at a time. • The syntax to create a radio button is: <input type=“radio” name=“name” id=“id” value=“value”> • name - the field containing the radio button (required) • id - the specific option. Only required if you intend to use a field label with the radio button • value - if that radio button is selected by the user
Working with Check Boxes • A check box is either selected or not • Check boxes are created using the following syntax: <input type=“checkbox” name=“name” id=“id” value=“value”> • name and id - the check box • the value - the value that is sent to the CGI script when the check box is selected • Check boxes are not selected by default. • to do this, add the checked attribute to the <input> tag • <input type =“checkbox” checked = “checked”>
default text area text dimensions of text area resulting text area Creating a Text Area
Creating a Push Button • One type of button, called a push button, is created using the <input> tag as follows: <input type=“button” value=“text”> • text is the text that appears on the button • By themselves, push buttons perform no actions in the Web page. • To create an action, write a script or program that runs automatically when the button is clicked.
Creating Submit and Reset Buttons • A submit button is a button that submits the form to the CGI script for processing. • A reset button resets the form to its original (default) values. • The syntax for creating these two buttons is: <input type=“submit” value=“text”> <input type=“reset” value=“text”> • value attribute defines the text that appears on the button
Creating a Form Button The figure shows HTML tags for buttons that download a program, retrieves information, and resets the form to its original values.
Working with Form Attributes • After adding the elements to your form, you’ll need to specify where to send the form data and how to send it. Use the following attributes: <form action=“url”method=“type”enctype=“type”>… </form> • URL - the filename and location of the CGI script that process the form • Method - how your Web browser sends data to the CGI script • enctype - the format of the data stored in the form’s field
Specifying Where and Howto Send Form Data This figure shows the CGI script that processes the form is located at the URL http://www.langear.com/cgi/mailer (a fictional address) and uses the “post” method.
Using the “mailto” Action • Use the “mailto” action to send form information via e-mail without using a CGI script. • The syntax of the “mailto” action is: <form action=“mailto:e-mail_address” method=“post” enctype=“text/plain”> • e-mail_address is the e-mail address of the recipient of the form
Using the “mailto”Action Continued • Not all browsers support the “mailto” action. • for example, versions of Internet Explorer earlier than 4.0 and NetscapeNavigator3.0 do not • Another concern is that messages sent via the “mailto” action are not encrypted for privacy. • The recipient’s email address is revealed to the user.
Mail Message Created Using the “mailto” Action This figure shows an e-mail message that the “mailto” action generated for a registration form. The format of the mail message may look different depending on the browser or e-mail software.