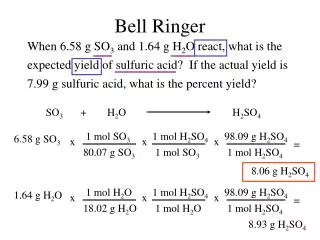
Bell Ringer Activity
Bell Ringer Activity. Signed safety wavers can go on my desk. S ummative supply check next class (14 points). Singed Safety Waver Binder 50 Sheets of Notebook Paper White Drafting Eraser Colored Markers or Pencils Ruler Pencil Write that in your agenda. Today’s Agenda.

Bell Ringer Activity
E N D
Presentation Transcript
Bell Ringer Activity • Signed safety wavers can go on my desk. • Summative supply check next class (14 points). • Singed Safety Waver • Binder • 50 Sheets of Notebook Paper • White Drafting Eraser • Colored Markers or Pencils • Ruler • Pencil • Write that in your agenda.
Today’s Agenda • Engineering Design Process PowerPoint • Textbook Reading • Worksheet Two • Introduce Tall Tee Tower Project
Design Process • Identify the Problem • Design Brief • Investigation • Research • Developing alternative solutions • Chosen Solution • Create a detailed drawing • Prototype • Testing & Evaluations
1) Identify the Problem • Clearly write down what the problem or need is.
2) Design Brief • Also called a design challenge • Introduces the problem • Describes what the designer (you) will do • Introduces what the solution will accomplish • States specifications • Should set limits • Help direct the design effort
3) Investigation • Learn more about the problem • Make a list of questions which you believe need to be answered • Research possible solutions
4) Research • Research past inventions too see if they could be improved to solve your current problem. • Research different materials that you could use to solve the problem. • Wood • Metal • Ceramic • Plastic
5) Developing Alternative Solutions • Several technical sketches in color • Each solutions should be workable but may vary: • Aesthetics • Cost • Materials • List the solutions strengths and weakness
6) Chosen Solution • Does it meet the criteria established in the design brief and specifications? • Somehow proven “better” than other considered solutions • Decision Matrix • Asking a sample of people
7) Create Detailed Drawing • All parts should be labeled • Should have a title box • Should include different types of lines: • Object lines • Hidden Lines • Dimension Lines • Extension Lines • Usually made in industry on computer software
8) Modeling & Prototyping • A model is a full-size or small-scale object, usually made from a different material then the final manufactured product. • A Prototype is the first product made; it is made from the final materials and it is made to the final dimensions. • You need to consider such things as: • Aesthetics • Ergonomics • Materials • Fastening or joining • Finishing • Safety Ergonomics: How something is designed or engineered to fit human needs or wants.
9) Testing & Evaluations Testing • List the possible ways in which your chosen solution may be tested • Test your product • Record the results
9) Testing & Evaluations Evaluating • Product evaluation • What are the strengths and weaknesses of the final design? • Did your final solution meet the design brief and the specifications? • How could the design be improved? • Group evaluation • Did your group use its time effectively? • What would you have done differentially ?
The Design Process 9. Test and evaluate. 1. Identify the problem or need. 2. Write a design brief. (What the product must do) 3. Investigation, you must consider function, appearance, materials, construction, Safety. 4. Research what is available and what has come before. 5. Develop and consider alternative solutions. (sketch ideas) 6. Choose a solution. (Why) 7. Make a detailed drawing of your chosen solution. 8. Make a model and prototype.
Textbook & Worksheet • Read pages 13-33 (17 minutes). • Answer questions on worksheet two. • Review answers. • Introduce Tall Tee Tower Project
Introduction to Tall Tee Tower Project • Introduce project handout
Technical Drawing Requirements A straight lined border box. (10 points) 2 boxes in the bottom right hand corner with you and your partners name, and the name of the drawing in them. (10 points) A drawing of your tower. (10 points) All of the parts are shown. (10 points) All of the different parts have names to identify them. (10 points) There are at least 3 dimensions showing the size of your tower. (10 points) Note: Using straight lines and a neat drawing is needed to receive the most points. Total Points = 60 points