Download
1 / 13
130 likes | 202 Views
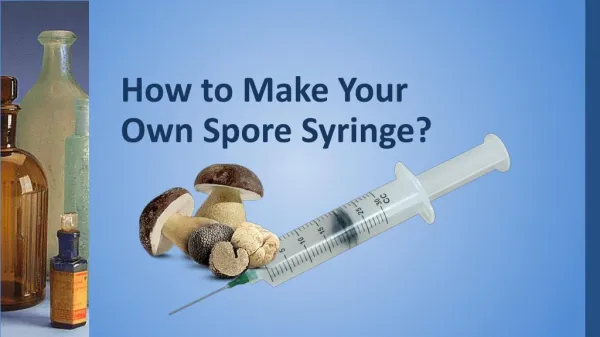
A spore syringe is undeniably the most important step in growing your own magic mushrooms. Making your own spore syringe at home is easy but you need to follow a series of steps to ensure the spore’s purity and effectiveness. A spore syringe is basically a medical syringe filled with magic mushroom spores suspended in sterile water.

E N D
What is a Spore Syringe? • A spore syringe is basically a medical syringe filled with magic mushroom spores suspended in sterile water. They store active spores for long periods of time. These syringes are used to inoculate substrates to grow your own mushrooms. • The sterile water suspension also hydrates the spores before the important step of inoculating the substrate. Spores need to be hydrated for at least 24 hours for a higher chance of success. Shrooms that are too dry won’t be useful at all.
Supplies to Make a Spore Syringe • It’s not enough to have a clean work space. When it comes to growing magic mushrooms and preparing a spore syringe, a sterile work space is important. Even a small contamination can ruin your cultivation. When a harmful organism, such as bacteria or mold, soils your colonies, it will cause a domino effect and spoil your mushrooms. Not taking the right precautions will lead to failure, lost investment, and wasted time. • As much as it is important to work fast when working with shrooms, it’s even more important to incorporate a clean technique into your methods. Make sure your working area is thoroughly cleaned, doesn’t have dust, and is in an isolated area in your house which is free from flying particles. Even dust can damage your young colony. Contaminants will compete with the mushrooms for nutrients, light, and moisture. Eventually, they will harm or kill off your mushroom colonies. • However, be careful. Most antiseptics are alcohol-based and flammable. Be extra careful when using disinfectants in an area with an open flame.
Supplies to Make a Spore Syringe The following supplies are needed: • A sterilized inoculation loop or scalpel • A pair of sterilized tweezers • A spore print (depending on the size and saturation of the spore print, you can make multiple syringes from one spore print) • Sterile syringe and needle • A small bottle or flask with a small opening • If sterile water is not available, you can use a pressure cooker to sterilize the water • Tinfoil ripped to cover the container • Sterile latex gloves • A sterile face mask
Steps in Making a Spore Syringe • Sterilize the water • Sterilize the flask or glass bottle • Sterilize the rest of the equipment • Fill the water with spores • Fill the sterile syringes with spores
#1 Sterilize the water • To produce sterile water, use a pressure cooker. The heat and pressure will destroy microbes which can contaminate your future grow and make sure your spore syringe won’t contaminate your colonies.
Sterilize the flask or glass bottle • Use a flask or a glass bottle with a narrow opening to reduce the chances of contamination or microbes getting inside it. Pour 30 mL of water into it. Use the tin foil to cover the flask’s opening and place it into the pressure cooker. • Make sure to close the lid of the pressure cooker properly and let it heat up until it has reached a pressure of 15 PSI. Maintain this pressure for at least 30 minutes then let it cool off thoroughly for at least 5 hours. If possible, let it cool overnight. • You now have sterilized water inside a flask. Be careful that it’s not too hot when the spores are introduced. Otherwise, they will not survive.
Sterilize the rest of the equipment • Now it’s time to sterilize the rest of your equipment. • If you’re reusing syringes and needles, you need to sterilize them too. Wrap them in tin foil and also put them in the pressure cooker at a pressure of 15 PSI for 30 minutes. • The scalpel and the pair of tweezers are prime candidates for sterilization because they can also contain microbes on them. It’s better to put in the extra effort of sterilizing them now than risk losing your mushrooms later on. • Use a Bunsen burner to heat the ends. Apply heat until they are glowing red from the heat. Afterwards, put them in a stand and make sure the ends are not in contact with anything. Let them cool off for 30 seconds before using them for the next step. Otherwise, your spores will become useless.
Fill the water with spores • Take the spore print out of its container. Using a scalpel that was just sterilized, scrape off the spores from the paper and into the sterilized flask with the sterile water. If the water still seems clear, just continue scraping some more spores off. You’ll know you have scraped off enough spores when you look into the flask and they are visibly floating or suspended. • As soon as you have enough spores in the water, close the flask with the tin foil. Make sure it stays sterile and uncontaminated.
Fill the sterile syringes with spores • Assemble the sterile syringes. Dip the tip of the syringe without the needle and pull the plunger back to suck in the water along with the spore suspensions. After filling a syringe, seal them using the needle and its cap. • Repeat the process until you have filled every syringe you have. When the syringes are filled with the spore suspension, store them at room temperature for 24 hours before using them to inoculate the substrate. This will hydrate the spores and make substrate inoculation possible. • If you won’t use the syringe right away, you can store them inside a refrigerator at a temperature of 2 to 4 degrees Centigrade. They have a lifespan of around 6 to 12 months. However, remember their viability will fade after a couple of months. The longer you keep them, the less potent they become.
Fill the sterile syringes with spores • When storing spore syringes, make sure they are labeled with the strain of mushrooms, and the date they were prepared. Keep them in an airtight Ziploc bag. • Once you are ready to use your shroom spores, inoculate your chosen substrate by inserting the needle halfway and pushing the plunger. With the mushroom spores syringe prepared through this method, you will need only 3mL of spore solution to colonize 1 liter of substrate. A 20mL syringe is enough to inoculate 6 different substrates. • After a few days, white patches will start growing on places where the spores were injected. It may take weeks for the whole substrate to be completely colonized. When the fruiting bodies appear, harvest them accordingly.
Fill the sterile syringes with spores • You can take this a step further and use their spore prints to create even more spore prints and spore syringes for future use. • Making your spore syringe and growing your own shrooms is easy but it will take time and a lot of effort to maintain a sterile working environment. • If you don’t have the finesse to grow your own magic mushrooms with your own spore syringe, a magic truffle grow kit may be the choice for you. • A magic truffle grow kit from Truffle Magic is guaranteed to produce psychedelic truffles in a short amount of time through a process that requires little to no effort!
www.trufflemagic.com Visit us: www.trufflemagic.com/blog/how-to-make-your-own-spore-syringe