Download
1 / 14
140 likes | 262 Views
Sending ESD non-essential EMAIL COMMUNICATIOnS. February 1 , 201 4. www.mailchimp.com. Click on the login link on the top right of the screen and enter the ESD credentials ( email Sherry if you need the credentials). Create a New Campaign.

E N D
Sending ESD non-essential EMAIL COMMUNICATIOnS • February1, 2014
www.mailchimp.com • Click on the login link on the top right of the screenand enter the ESD credentials (email Sherry if you need the credentials)
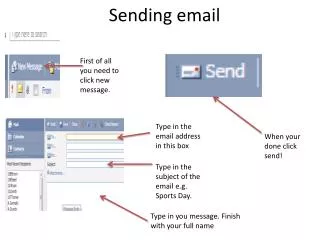
Create a New Campaign • Click on the red ‘Create Campaign’ button in the top left of the screen and choose ‘regular ol’ campaign’
Send to entire list • As of writing this, we only have one list (ESD Events). Leave this list selected and just click the ‘Send to Entire List’ blue button.
Campaign info • Campaign Name and Email Subject Should be the same or mostly similar. The other suggested defaults are listed. Leave everything else on the page as-is. Click ‘NEXT’ when you’re done.
Choose template • Choosean ESD events template
Enter event details • Click on each dashed area to add content for the particular event. At the bottom of the screen, you can send a test to your email account. Click on ‘next’ when you’re done.
plain text email • This is done for you by MailChimp automatically. Just click ‘next’ to proceed.
Review and send • Last chance for changes/edits!When you’re ready, click the red ‘Send Now’ button at the bottom of the page
Sending a Reminder Click ‘Campaigns’ from the top of the interface
Sending a Reminder Choose the ‘replicate’ link from the campaign you want to send a reminder for.
Sending a Reminder Click on the ‘edit’ button for the subject line
Sending a Reminder Add ‘REMINDER’ to the name of the campaign and the message subject line. Click ‘next’ through the remaining steps (while making any other corrections you need to).
Sending a Reminder Click ‘Send Now’ when you’re ready!