Download
1 / 10
100 likes | 287 Views
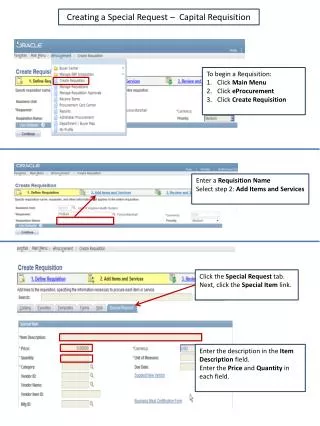
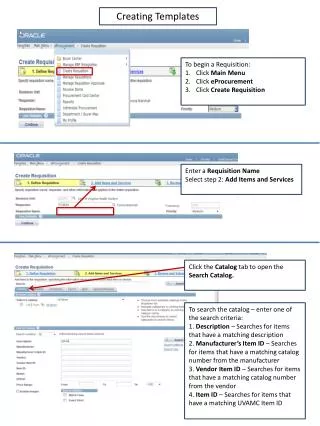
Creating Templates. To begin a Requisition: Click Main Menu Click eProcurement Click Create Requisition. Enter a Requisition Name Select step 2: Add Items and Services. Click the Catalog tab to open the Search Catalog. To search the catalog – enter one of the search criteria:

E N D
Creating Templates To begin a Requisition: Click Main Menu Click eProcurement Click Create Requisition Enter a Requisition Name Select step 2: Add Items and Services Click the Catalog tab to open the Search Catalog. • To search the catalog – enter one of the search criteria: • 1. Description– Searches for items • that have a matching description • 2. Manufacturer’s Item ID – Searches for items that have a matching catalog number from the manufacturer • 3. Vendor Item ID – Searches for items that have a matching catalog number from the vendor • 4. Item ID – Searches for items that have a matching UVAMC Item ID
Type in a brief description in the Description field, then click the Search button. Click on the Add button for the desired item. Repeat the same process until all items are selected. Select step 3. Review and Submit Click on the box at the beginning of each line or click on the Select All to select the items for the template. Click on the Add to Template(s) button. Fill in the Template Name and Description, then click on the OK button.
5. Reviewing and Tracking Requisition Approvals Once a requisition has been saved and submitted, you – as the requester – can review what approvals are required, as well as track which approvals have been received and which are pending. Manage Requisitions: Click Main Menu Click eProcurement Click Manage Requisitions The page will default to what has been submitted in the last 30 days. You can change the Search Requisitions criteria and press the Search button to see a different group of requisitions. Once you have located the requisition you wish to review: Click on the down arrow at Select Action. Select the View Approvals and click the Go button. This page is designed to provide you information in regards to requisition approvals. As soon as the requisition is submitted, the approval flow will appear.
6. Tracking Requisition and Purchase Orders A benefit of the PeopleSoft eProcurement system is the ability to track the status of your requisition, and all processing related to it. Reviewing the action list allows you to track when a purchase order has been issued as well as when items have been received, invoiced and paid. Manage Requisitions: Click Main Menu Click eProcurement Click Manage Requisitions Once you have located the requisition you wish to review: Click on the arrow located on the left, this will pull the Lifespan of the requisition. Icons that appear in color are actions that have taken place for the requisition. Icons that have underlines are linked to additional detail.
The Requisition icon is used to track requisition activity after a requisition has been saved & submitted. The Approval icon is used to review what approvals are required, as well as track which approvals have been received and which ones are pending. The Inventory icon is lit when at least one requisition line was sourced to the Medical Center Warehouse. The Purchase Orders icon is lit when the sourcing process has moved at least one requisition line to a purchase order for action by the Medical Center Procurement Buyer. The Change Request icon will always be grayed out, we are not using this functionality at this time. The Receiving icon is lit once receiving activity has occurred. The Invoice icon is lit once Medical Center Accounts Payable has entered an invoice into PeopleSoft. The Returns icon will always be grayed out, we are not using this functionality at this time. The Payment icon is lit once an invoice for at least one item on the requisition has been paid.
7. Updating an Existing Requisition After a requisition has been submitted, you – as the requester – can update it up to the point at which it is approved. Once the requisition has been approved, no changes can be made to the requisition. You will need to contact your Medical Center Procurement Buyer to request changes after approval. To begin Updating a Requisition: Click Main Menu Click eProcurement Click Manage Requisition Once you have located the requisition you wish to review: click on the down arrow at Select Action. Select Edit Requisition and then click the Go button. When the Edit Requisition and Go button are clicked, you will receive a reminder that Workflow is going to be reinitialized. Click OK.
The Edit Requisition page will open. Make any required changes – add or remove items, update quantity, etc. Once your changes are completed – type in the comments explaining what changes have been made to the requisition. The approver(s) for this requisition will see the comments to explain why they are required to reapprove this requisition. Click the Save & Submit button.
8. Canceling an Existing Requisition After a requisition has been submitted, you – as the requester – can cancel it up to the point at which it is approved. Once the requisition has been approved, it cannot be cancelled. You will need to contact your Medical Center Procurement Buyer to request the cancellation. To begin Updating a Requisition: Click Main Menu Click eProcurement Click Manage Requisition Once you have located the requisition you wish to cancel: click on the down arrow at Select Action. Select Cancel Requisition and then click the Go button. The Requisition Details page will open. Click on the Cancel Requisition button.
9. Reopening a Canceled Requisition To begin Updating a Requisition: Click Main Menu Click eProcurement Click Manage Requisition Once you have located the requisition you wish to reopen: click on the down arrow at Select Action. Select Re-Open Requisition and then click the Go button. Next, the Requisition Details page will open. Click on the Reopen Requisition button.
Once the reopened requisition is complete, you will be returned to the Manage Requisitions page where you will see the status of the requisition has been changed to Open. Click on the down arrow at Select action . Select Edit Requisition and then click the Go button. Make any required changes – add or remove items, update quantity, etc. Once your changes are complete – type in comments explaining what changes have been made to the requisition. The approver(s) for this requisition will see the comments to explain why they are required to reapprove this requisition. Click the Save & Submit button.