Organizing UITableView Data with Parallel Arrays in iOS Development
This guide discusses effective methods for organizing data in iOS applications using parallel arrays and custom models. It emphasizes utilizing a 1-D array for section headers and a 2-D array for row data, simplifying table view setup in your app. The tutorial covers creating a custom UIViewController subclass for iPhone detail views and implementing necessary methods for section and row selection. It aims to ensure proper data handling and avoid crashes by maintaining an organized structure for UITableView. Discover how to enhance your app's user experience through systematic data management.

Organizing UITableView Data with Parallel Arrays in iOS Development
E N D
Presentation Transcript
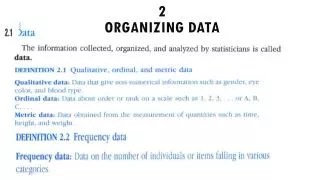
Organizing data • So far, we have hard coded the table data • We should have a model for that • For example 2 parallel arrays: • A 1-dim array of strings, the section headers • A 2-dim array of strings, the row headers
Organizing data • It is much easier to code all the previous methods setting up the table view with such data structures
2-dim array for the table data • You can use _objects (already coded) or use your own array instance variable • If array name is toc (i.e. table of contents), a 2-dim array of strings • # of sections = [toc count] • # of rows per section = [[toc objectAtIndex: section] count] • Need parallel single-dim array for section titles
Organizing data • For method setting text for all cells, use • [[toc objectAtIndex: indexPath.section] objectAtIndex: indexPath.row] • Be careful about the didSelect.. method • NSDate *object = _objects[indexPath.row]; • may CRASH your app if you used _objects and did not organize _objects as the template expects
Universal App • We may also want to have a different View Controller for the iPhone version (different dimensions) • We can keep the DetailViewController for the iPad version
Universal App • Add a New File, a subclass of UIViewController, name it IPhoneDetailViewController, with or without a XIB file • In the .h file, add instance variables section, row, subChapter, and the method setSection:Row:SubChapter: • Implement the method in the .m file
Universal App • In MasterViewController’s tableView:didSelectRowAtIndexPath: method, add an else block (iPhone scenario) • In it, instantiate an IPhoneDetailViewController, push it, call setSection:Row:SubChapter: • We also need to put something in the detail View, say a label with section, row and subChapter: we code an update method for that
UINavigationController • A UIViewController (the superclass of UITableViewController) has a UINavigationController property; it manages the presentation of hierarchical views • It is the navigation controller that pushes the detail view controller
In else block • // Create a IPhoneDetailViewController • IPhoneDetailViewController *ipdvc = [[IPhoneDetailViewController alloc] init]; • // Push it onto stack • [self.navigationController pushViewController: ipdvc animated:YES];
In else block • // call setSection:…. • [ipdvc setSection: indexPath.section Row:indexPath:row SubChapter: [[toc objectAtIndex: indexPath.section] objectAtIndex: indexPath.row]; • // update detail View • [ipdvc update];
Update method • // Create a label • CGRect frame = … • UILabel *label = … • // set label’s text and add it to the View • label.text = [NString stringWithFormat: @”section %d, row %d, %@”, section, row, subChapter]; • [self.view addSubview: label];
Undo the magic • When we run, we are still going to the existing View of the template (via the segue from the table View) • In Main_iPhone.storyboard, delete the segue between the master View and the detail View (no longer used)