Step by step Guide for Drywall Installation
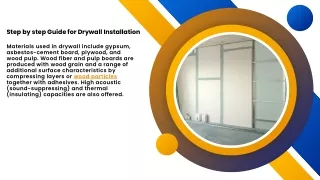
Materials used in drywalling include gypsum, asbestos-cement board, plywood, and wood pulp. Wood fiber and pulp boards are produced with wood grain and a range of additional surface characteristics by compressing layers or wood particles together with adhesives. High acoustic (sound-suppressing) and thermal (insulating) capacities are also offered. <br>

Step by step Guide for Drywall Installation
E N D
Presentation Transcript
Step by step Guide for Drywall Installation Materials used in drywall include gypsum, asbestos-cement board, plywood, and wood pulp. Wood fiber and pulp boards are produced with wood grain and a range of additional surface characteristics by compressing layers or wood particles together with adhesives. High acoustic (sound-suppressing) and thermal (insulating) capacities are also offered.
Windows and Doors Description If the sheet is covering an uninstalled window, cover it with drywall in the same manner that you did the outlet. If needed, later drill holes in the drywall and fasten drywall screws to the surrounding area. Furthermore, if the window is already installed, cut the drywall and remove the window trim before hanging the window. Place the sheet on the ground and indicate the spot where it meets the window edges to mark the cut. Moreover, to sketch out the top of the cut, measure from the ceiling to the top of the window.
Cut a Drywall Piece for the Corner To fit between the corner and the piece you just hung, cut a piece of drywall. undersize it, with a 1/4-inch space left in the corner. Attach the drywall using screws. Using your utility knife, create a V- groove where the panels meet (see inset); this will help to hide the junction when taping. Slightly
Row Bottom Featuring a Shorter Item To ensure that the seam in the top row is not immediately above the seam in the bottom row, start the bottom row with a shorter piece. Furthermore, after positioning the component, raise it with a panel lift, and fasten it firmly. However, install the longer piece after the smaller one is in place.
Use Metal Corner Beads to Guard Corners Use metal corner beads to shield the corners. When you fasten a bead that is a little long, it will kink. Moreover, use tin snips to trim the bead so that it is about 1/2 inch short to avoid this. Furthermore, tightly grip the bead on the ceiling. Moreover, nails should be used to secure the bead, with a 9-inch nail spacing, as screws would cause distortion.
Contact Us 9 q u i n t e t t e c l o s e B r a m p t o n O n t a r i o L 6 P 0 A 2 E m a i l : i n f o @ b u z z b u i l d e r s . c a P h o n e : + 1 7 7 8 - 7 2 3 - 2 5 2 5 C o n t e n t R e s o u r c e : h t t p s : / / b u z z b u i l d e r s c a . b l o g s p o t . c o m / 2 0 2 4 / 0 5 / s t e p - b y - s t e p - g u i d e - f o r - d r y w a l l . h t m l