Download
1 / 5
50 likes | 68 Views
Remember, proper installation is key to ensuring the safety and functionality of your overhead storage racks. If you encounter any difficulties or uncertainties during the process, consult a professional team of Rack your garage for assistance. By following these steps, you can transform your garage into a clutter-free zone with ample storage space.

E N D
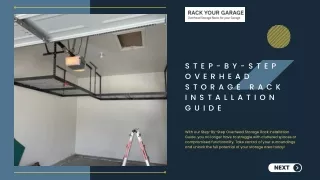
S T E P - B Y - S T E P O V E R H E A D S T O R A G E R A C K I N S T A L L A T I O N G U I D E With our Step-By-Step Overhead Storage Rack Installation Guide, you no longer have to struggle with cluttered spaces or compromised functionality. Take control of your surroundings and unlock the full potential of your storage area today! NEXT
How to install overhead stoarge racks Step 1: Determine Placement Step 3: Install Brackets The first step is to determine the ideal placement for your overhead storage racks. Measure your available ceiling space and consider factors such as clearance for vehicles, proximity to garage doors, and easy access to stored items. Mark the desired locations with a pencil. Following the manufacturer's instructions provided with your ceiling-mounted storage rack kit, install the brackets onto the ceiling joists. Use a power drill and screws provided in the kit to secure them firmly in place. Step 2: Locate Ceiling Joists Step 4: Attach Support Beams Using a stud finder, locate the ceiling joists in the areas where you plan to install the overhead storage racks. Mark these locations on the ceiling with a pencil. It is crucial to anchor the racks securely to the joists for maximum stability. Once the brackets are securely installed, attach the support beams to them. These beams will act as the base for the storage racks. Align the beams with the brackets and use the provided hardware to fasten them tightly. NEXT
How to install overhead stoarge racks Step 5: Check for Level Step 7: Test Stability Using a level, ensure that the support beams are perfectly level. This step is crucial to maintain stability and prevent any potential accidents or damage caused by an uneven installation. Make any necessary adjustments before proceeding. Once the overhead storage racks are securely installed, test their stability by applying gentle pressure. Confirm that they can support the weight capacity specified by the manufacturer without any signs of sagging or instability. Step 6: Secure Storage Racks Step 8: Organize and Enjoy With the support beams in place, it's time to secure the storage racks. Follow the manufacturer's instructions to attach the racks to the support beams using the provided hardware. Ensure that all connections are tightened properly to guarantee stability. Now that your overhead storage racks are installed, it's time to organize your belongings and enjoy your newly optimized garage space. Utilize bins, hooks, and other storage accessories to keep everything neatly organized and easily accessible. NEXT
Contact Us 801-923-6382 www.rackyourgarage.com harry@propertyproperty.us 299 Main St Suite 1300 PMB 92069, Salt Lake City, UT 84111, United States