Download
1 / 12
120 likes | 287 Views
f/stop, shutter speed, depth of field exercise. Materials. 35mm film camera with manual controls 50mm lens or zoom that has 50mm 1 roll of 24 or 36 exposure black & white film with ISO (film speed) of 100 (daytime film). Shutter Speed-Fast.

E N D
Materials 35mm film camera with manual controls 50mm lens or zoom that has 50mm 1 roll of 24 or 36 exposure black & white film with ISO (film speed) of 100 (daytime film)
Shutter Speed-Fast • Stand parallel to the street (on the sidewalk, not in the street) • Set your shutter speed to 1/1000. • Check your meter for correct exposure. Set the correct aperture. • Check your focus. • Photograph one or more cars holding the camera still. This should stop the motion of the car.
Shutter Speed - Slow • Stand in same position as fast shutter. • Set your shutter speed to 30 or 1/30. • Reset your aperture and check that you have the correct exposure. • Check your focus. • Hold the camera still. • The car should blurred.
Shutter Speed- Pan • Same position and same shutter speed (1/30) • You will move the camera, panning left to right or right to left, keeping the car near the center. • Check your focus. • The car should remain in focus while the background is blurred.
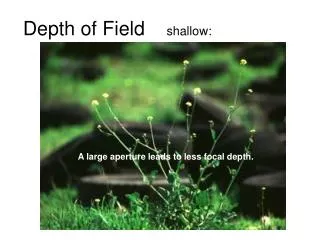
Photo a Person • Check your background. If you are not using a #8 filter, try to minimize the sky if you can. • Set your aperture as wide open as you can. • 2 or 2.8, or 3.5, or 4. This is the largest your lens can open. • Have your subject stand 5 feet away from you. • Check your meter, set the correct shutter speed. Focus the subject. If correct exposure is less the 1/60, you need more light. • The subject should be in focus while the background is blurred.
Person – far away f/4 Move your subject to 15 feet away. Use the same settings. Focus your subject. Some object near to you may be blurred, the background will be blurred, the subject should be in focus.
Same thing different aperture Stay in the same position, 15 feet away. Set your aperture to f/16 or f/22. Check your meter and reset shutter if necessary. Refocus. Almost everything should be in focus
Change Distance Bring your subject back to 5 feet away. Same aperture –f/16 or f/22. Reset your shutter, if needed. Refocus. Everything should be in focus.
Exposures Shoot at least two from each position. This should leave several exposure extra if you need them. Reshoot anything that you had difficulty shooting or understanding. Finish shooting the roll of film. Don’t use more than 1 roll of film unless absolutely necessary. When metering (your exposure), use a gray card if you have one.
What’s Due • 1 8x10 contact sheet. At least 20 of the 24 should be visible. That means your exposure/metering was correct. • 1 8x10 print of passing car (you chose which situation) • 1 8x10 print of a person (you chose which situation) • In each case, use your best print/exposure.