Download
1 / 14
140 likes | 223 Views
How?. Why?. Photosynthesis & e - transport. Pathway thinking. X1. X2. Following the Scientific Approach: Predicting. Alteration. On page 13-10, Step 6, change the target absorbance to 0.1 instead of the 0.2 specified in the manual Use about 4 spinach leaves, no need to weigh out 4g

E N D
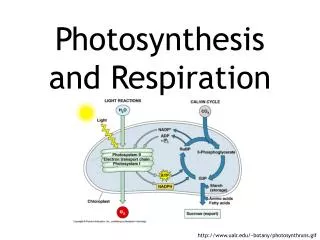
How? Why? Photosynthesis &e- transport • Pathway thinking
X1 X2 Following the Scientific Approach: Predicting
Alteration • On page 13-10, Step 6, change the target absorbance to 0.1 instead of the 0.2 specified in the manual • Use about 4 spinach leaves, no need to weigh out 4g • Spin extract in centrifuge at 3 min first spin and 5 min second spin (we do not have fast and slow centrifuges) keep on ice until ready to combine pellets. • Keep final chloroplast solution on ice until ready for further procedural items!! Ice bucket is fine for this
Technical aspects I • Where’s the photosynthetic stuff? • Round I: get rid of huge chunks of cellular debris, keep supernatant • Round II: acquire chloroplasts, keep pellet
Technical aspects II • When will dinner be ready? • At what point in time will the chloroplast-induced reduction have taken place, but the random reduction not yet have occurred at significant levels? • Record absorbance values at different time intervals during actual experiment
Technical aspects III • What does herbicide need to achieve to ‘do its thing’? • What’s happening to DCPIP sitting in the tube prior to the experiment starting? • What happens to results if tubes are not thoroughly mixed? • Is there a difference between 600 & 660 nm? Should you pay attention to which the protocol calls for when? • If you have a tube that’s supposed to be ‘dark’, where should it be most/all of the time?
Technical Aspects IV Your chloroplast preparation Dilute into acetone 1 3 Apply your calculated dilution to the preparation (dilute using buffer, not acetone!!!) 2 Read at 660 Your experimental material! Compare reading to 0.1 Dilute the original material by the ratio (actual reading/0.1)
In other words… • First dilute extract solution in acetone per manual specifications • Find out the dilution needed to obtain absorbance reading of 0.1 on spec at 660nm • Then, dilute ACTUAL extract used for experiment by amount determined from spec reading at 660nm to get to 0.1. You do not need to do the initial dilution used with acetone, only the dilution needed to reduce to 0.1 absorption. Ex. • Dilute ACTUAL extract used for experiment with sodium phosphate buffer or the leaves will die!
Thinking thoughts • Why is acetone used? • Why do you think the stock chloroplast solution must be diluted? • Why is the chlorophyll concentration an important factor?
Additional Important Points • Absorbance readings of actual experiment should be done at 600nm, you can change the spec wavelength at your station this week just don’t forget to! • Make sure to add DCPIP last to all tubes, remember light could be a contributing factor • Add all components to tubes in correct amounts first, add DCPIP last (make sure they all add up to 5mL) • Suggested: Water, buffer, herbicide first, extract second (keep chilled until needed), DCPIP last (keep in dark until needed)
Additional Important Points • Start all tubes under the lights at the same time! The one in the dark can be covered in foil or kept in a drawer • ALL tubes must be measured for absorbance every two minutes! Don’t forget a zero min absorbance reading • Can stop absorbance readings once reducing solutions stay at/around the same absorbance for more than 4 minutes (two readings)
More thoughts • Where should your tubes be relative to the lights? • Should you allow your contents to settle to the bottom of the tube? • Is it advantageous to have the tubes vertical this week?
Reports: Don’t Forget To Include… • Figure: Indicate both hypothesis on figure • Predictions: For each tube! What is the expected outcome? • Table: Purposes for each tube, why are you testing each tube and what will it prove? Why is it an experimental tube or a control? • Conclusions: why do your observations/results of eachcontrol tube support or reject the hypotheses proposed or the outcome of the experimental tube?
Homework Before 12/6