Download
1 / 12
120 likes | 379 Views
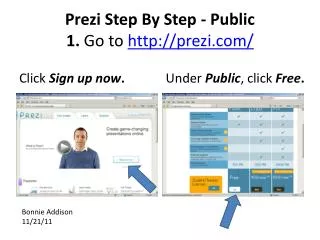
Prezi Step By Step - Public 1. Go to http://prezi.com/. Click Sign up now . Under Public , click Free . Bonnie Addison 11/21/11. 2. Fill out the form. For Last name , use your last initial only . Your Prezi will be Public for anyone to see.

E N D
Prezi Step By Step - Public1. Go to http://prezi.com/ ClickSign up now. Under Public, click Free. Bonnie Addison 11/21/11
2. Fill out the form. For Last name, use your lastinitialonly. Your Prezi will be Public for anyone to see. According to Wake County Policy, you cannotidentify yourself, your teacher, your school, or your school district.
3. Watch Learn Prezi now. More tutorials are in the Learn tab. Click Start using Prezi now.
5. Add Text:Think of Prezi As a Huge Canvas. • Choose Blank template. • Double click on canvas. • Type in text box. • Select alignment, color, & text style. • Click OK to save. • Click on text again & Zebra will appear.
6. Use the Zebra. • Center = Moves items • Double click center = Edits • Middle circle = Resizes • Outer circle = Rotates • Plus & minus signs = Resize entire canvas
7. Insert Images, Videos, Charts, & Files: Click Insert bubble & select.
8. Inserting Shapes: Click Shapes bubble & select.
9. Adding Frames to Group Items: Click Frame bubble, & select frame style.
10. Adding Paths: • Click Path bubble & select 1-2 Add bubble. • Click on each item to form path. • To change path, click on number or middle knob & drag to another item.
12. Showing & Sharing Your Prezi: Click Show button & click Full Screen. Paste your link on Your Wiki page!