Download
1 / 15
160 likes | 674 Views
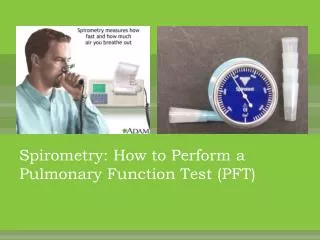
Spirometry : How to Perform a Pulmonary Function Test (PFT). Spirometry : PFTS. There are two types of Spirometry Tests that you will complete in this lab: . Spirotest Spirometry – Manual Test that requires you to record the volume of air exhaled.

E N D
Spirometry: PFTS There are two types of Spirometry Tests that you will complete in this lab: SpirotestSpirometry – Manual Test that requires you to record the volume of air exhaled 2. Automatic/Computerized Spirometry – Computerized spirometer measures the volume of air exhaled
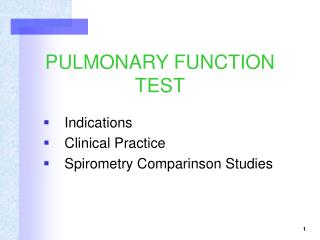
1. SpirotestSpirometry Front, clear cover with metrics to measure lung capacity (rotatable) Disposable mouthpiece
1. SpirotestSpirometry • Rotate the front, clear cover with all the numbers on it that is attached to the silver metal ring • Turn this front piece so that the needle is set to 0 cm3 line – This is your starting point (see figure above) • You have now set it to zero
1. SpirotestSpirometry 1. Inhale as much as you can 2. Then with your mouth sealed tightly round the mouthpiece and your nose sealed shut... 3......BLOW....AS HARD AND AS LONG AS YOU CAN! Note: The air comes out of the spirometer via several small holes on the side of the spirometer. Be sure and not cover them up while blowing out.
1. SpirotestSpirometry • The needle will move which is a measure the volume of air exhaled • Record the volume of air by seeing what number (volume of air in milliliters/cm3) the needle now points to. • Repeat as necessary using the varies conditions to measure pulmonary functions
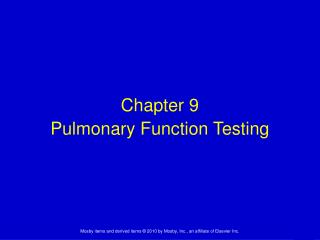
2. Automatic Spirometry Mouth Piece Nose Piece Printer – Hooked up to the spirometer. Prints out the results from the spirometer Spirometer
2. Automatic Spirometry Before you do anything, an important warning.The green, disposable filter fits tightly into the black ring on the spirometer. When you remove the green, disposable filter to throw it away, MAKE SURE YOU DO NOT REMOVE THE BLACK RING from the spirometer!. This black ring is the turbine. It is NOT disposable and irreplaceable.So be careful!
2. Automatic Spirometry Step 1: To Turn On: Press and hold for 2 seconds the far right button with the left pointing arrow. To Turn Off: Press and hold the far left button with the circle/bar on it. Step 2: Once it is turned on (powered up), the company/model info (SB Office 1.4) displays temporarily. Do nothing. It will then display: "CONFIGURATION ?”, followed by “Version 1.4 Free Memory” information, and then display date, time, and “B.T.P.S.” For all displays do nothing and it will disappear. Step 3: Finally, it will then display: "New Patient?” (see picture above) Quickly press the middle button ()
2. Automatic Spirometry • Step 4: • Go ahead and enter your information for the following: • Age • Height in inches • Weight in pounds • Sex/Gender: ♀ - Female;♂ - Male Note: To change any value, press either the up-pointing triangle button (on the right) or the down-pointing triangle (on the left) of the center button Once you have set the proper number/value, enter it and move to the next data on the right by pushing the far right button (left-pointing arrow)
2. Automatic Spirometry Step 5: The final number on this screen is the patient number. Remember this number so you can go back and find your data at a later time. Step 6: The next screen asks "CAUCAS"=caucasian; "AFRUSA"=african/american; "MEXUSA"=hispanic/hispanic-american; "OTHER"=other ethnicity.The next screen has three choices: FVC; DATA; or a rectangle with horizontal lines across it -this is their symbol for a printer to print you data.To move between the choices on this screen, keep hitting the middle button.If you want to choose FVC, select it and press the far right button, the arrow key.
2. Automatic Spirometry Step 6:It will then ask you to blow: "INSPIRE Fully and EXPIRE Fast!". DO IT, BLOW AS HARD AND AS LONG AS YOU POSSIBLY CAN!
2. Automatic Spirometry Step 7: To print out your report, move to the screen that displays: "FVC DATAPush the center button to move the cursor to the far right icon, the (this is the printer icon)Before you push the left pointing arrow (the enter button), make sure it is set for the proper patient number.The patient number is displayed in the upper left (Example: 007).To move to other patient numbers, simply press either the up or down triangle buttons.Then push the enter button, the left pointing arrow on the far right.You will have to wait a few seconds, but it should print.
2. Automatic Spirometry Printout should look something like this…
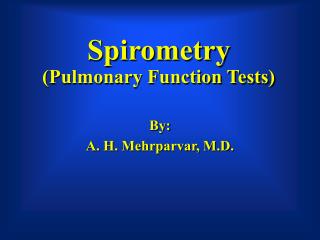
Pathology X-Ray of lungs of 86 year old female admitted acutely short of breath Female had fine inspiratorycrepitations (soft fine crackling sound heard in the lungs through the stethoscope. Crepitations are not normally heard in healthy lungs) to the mid-zones bilaterally