Download
1 / 5
50 likes | 175 Views
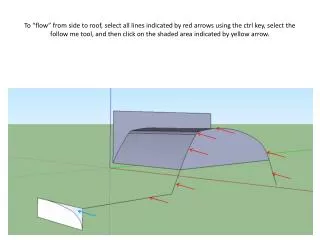
Master the process of creating smooth 3D models by following our step-by-step guide. Start by selecting lines indicated by red arrows using the Ctrl key, then use the "Follow Me" tool on the shaded area marked by yellow. Draw a rectangle and adjust its position to intersect and trim faces for a clean finish. Remember to limit the complexity of curves and keep large body pieces to a maximum of 5 or 6. A few key tips: keep shapes smaller around tight curves, and prioritize simplicity for better readability and faster execution.

E N D
To “flow” from side to roof, select all lines indicated by red arrows using the ctrl key, select the follow me tool, and then click on the shaded area indicated by yellow arrow.
Draw a rectangle, move it up, intersect faces, and trim away…
After selecting everything, right click, and soften/smooth. Area in circle results from bend that was too sharp…
A few hints… • Limit the complexity of curves and follows. • Maximum number of large body pieces to 5 or 6 (hood, body, trunk, and fenders) • If you are following around a tight curve, make the extrusion shape smaller than the curve or it will never be smoothed out. • Simpler is better, read easier and faster.