Download

1 / 10
100 likes | 310 Views
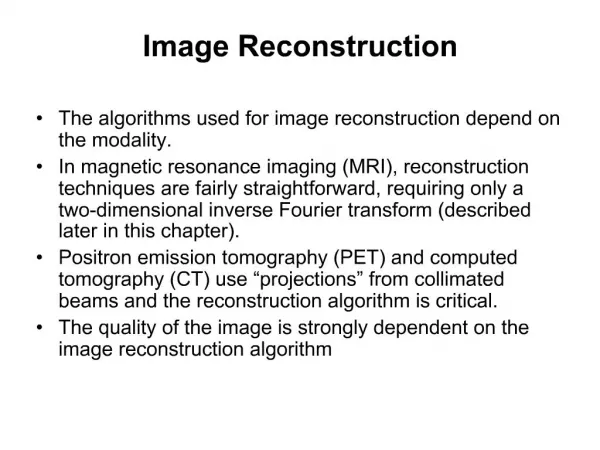
Tiled data Image reconstruction and correction. Team members: Krishna Makkena Lowkya pothineni Bharath kayati. Problem: Tiled data Image reconstruction and correction. Goal: To create plugin for ImageJ for tiled image stitching and image correction.

E N D
Tiled data Image reconstruction and correction Team members: Krishna Makkena Lowkyapothineni Bharathkayati
Problem: Tiled data Image reconstruction and correction. • Goal: To create plugin for ImageJ for tiled image stitching and image correction. • Assumptions: All Input image tiles will be of same dimensions • Input : OIB image sequences
Algorithm: • Convert OIB image file to TIFF image sequences, using XYZTC stack order. This can be done using LOCI plugin > BIO-Formats Importer and BIO-Formats Exporter. • Now stitch the Z stack of image slices using our image stitching program. (The Z index for the two images that are getting stitched must be same). Apply this for all 3 channels. • Brightness correction in the stitched images (number of stitched images will be equal to number of slices in Z stack). This can be done Image histogram normalization • Build the 3d image from all these stitched, brightness corrected images.
Step 1 in algorithm: • Install ImageJ • Copy LOCI_TOOlS.jar to IMAGEJ/PLUGINS folder • Restart IMAGEJ
Step 2: Image stiTch algorithm (Our own algoRITHM with brute force methods) • Input for this algorithm will be two images that are to be stitched. • Run the second image length wise and breadth wise over the first image to identify the optimal intersecting distance in length and breadth. (for example OIB_0_img_XYZ_0_C_0.tiff and OIB_1_img_XYZ_0_C_0.tiff from each of OIB file with same Z index). • Stitch the images. • Repeat the same with Stitched image and next image from OIB_3 and with same Z index as of previous stiched files.
W Sample input images Image (a) Image (b) Resultant output image obtained after stitching Image (c)
Step 3: Histogram normalization • This algorithm is used for image brightness correction.
Completed Work till now: • STEP A: Using LOCI tool plugin. • STEP B: Own algorithm---completed. But needs to run manually for each set of image that require stitching. • STEP C: Algorithm completed. • STEP D: We’ll use 3d viewer for viewing the Z index stitched and brightness corrected slices.
Pending Work: • STEP B: • Need to automate image sequence loading and automatically run for all images of same Z index. • Convert this code to Plugin for ImageJ.