Download
1 / 9
90 likes | 283 Views
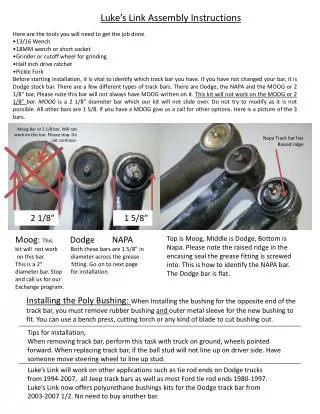
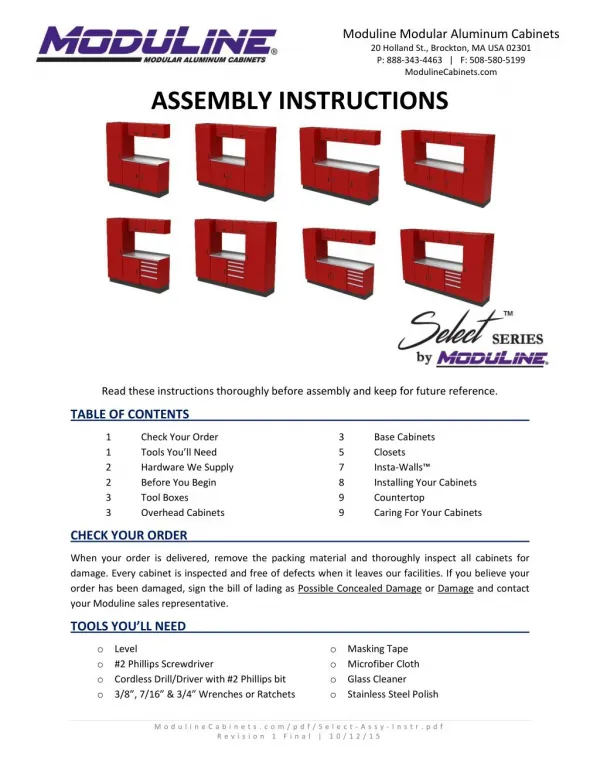
When your order is delivered, remove the packing material and thoroughly inspect all cabinets for damage. Every cabinet is inspected and free of defects when it leaves our facilities. Read these assembly instructions thoroughly before assembly and keep for future reference. For information, visit: https://www.modulinecabinets.com/select-garage-shop-cabinets/

E N D
Moduline Modular Aluminum Cabinets 20 Holland St., Brockton, MA USA 02301 P: 888-343-4463 | F: 508-580-5199 ModulineCabinets.com ASSEMBLY INSTRUCTIONS Read these instructions thoroughly before assembly and keep for future reference. TABLE OF CONTENTS 1 1 2 2 3 3 Check Your Order Tools You’ll Need Hardware We Supply Before You Begin Tool Boxes Overhead Cabinets 3 5 7 8 9 9 Base Cabinets Closets Insta-Walls™ Installing Your Cabinets Countertop Caring For Your Cabinets CHECK YOUR ORDER When your order is delivered, remove the packing material and thoroughly inspect all cabinets for damage. Every cabinet is inspected and free of defects when it leaves our facilities. If you believe your order has been damaged, sign the bill of lading as Possible Concealed Damage or Damage and contact your Moduline sales representative. TOOLS YOU’LL NEED oLevel o#2 Phillips Screwdriver oCordless Drill/Driver with #2 Phillips bit o3/8”, 7/16” & 3/4” Wrenches or Ratchets oMasking Tape oMicrofiber Cloth oGlass Cleaner oStainless Steel Polish M o d u l i n e C a b i n e t s . c o m / p d f / S e l e c t - A s s y - I n s t r . p d f R e v i s i o n 1 F i n a l | 1 0 / 1 2 / 1 5
HARDWARE WE SUPPLY A.8-32 x 5/16” Flat-head Screws & Nuts B.10-24 x 3/8” Self-Tapping Screws C.10-32 x 1” Pan-head Screws & Nuts D.¼-20 x 1/2” Hex Nuts & bolts E.¼-20 x 3/4” Hex Nuts & bolts F.¼-20 Cage Nuts 1” Wide Double-Sided Tape Horseshoe Shims for Assembling Toe Kicks for Assembling Base Cabinets & Closets for Attaching Toe Kicks for Installing Shelves for Insta-Walls & Joining Cabinets for Insta-Walls for Installing Countertops for Leveling Cabinets BEFORE YOU BEGIN A B C E D F WARNING: HEAVY OBJECTS. Lifting can cause muscle strain or back injury. LIFT WITH 2 PEOPLE. Unbox your cabinets and set them aside, out of the way. We recommend reusing the cardboard packaging to protect the floor from damage as you move your cabinets around. Do not remove the protective vinyl from your cabinets until you’ve finished assembling them. You’ll have to peel it back in places to assemble the base cabinets and closets, and when you join the cabinets together, but leave it on where possible to safeguard against accidental scratches. No construction is going to be perfectly level and you’ll need to shim your cabinets to keep them square. Use a level to identify the high point in the floor where your cabinets will eventually go. You should plan to start here when joining your cabinets together to make shimming them easier. If you’re not using Moduline Insta-Walls to support your cabinets, you must secure them to a wall. Locate and mark the center of your wall studs. You can locate your studs with a stud finder, but don’t trust it to determine the centerline. Instead, using a thin nail or drill with a small bit, make holes around where you think each edge of the stud is. Repeat this until you hone in on the exact edge of the stud. This will require several holes spaced close together. Once you’ve found the edges, you can mark the center of the stud. Continue this process to locate all wall studs behind your cabinets. 2 | P a g e
TOOL BOXES Tool boxes are shipped fully assembled. To access the mounting holes you need to remove the drawers. With a drawer fully open, hold down the release levers located on the inside of both slides (see right) and pull the drawer out of the tool box. Set the drawers aside, out of the way, and reinsert them once installation is complete. OVERHEAD CABINETS Overhead cabinets are shipped fully assembled. BASE CABINETS Base cabinets require some assembly. Peel back protective vinyl from contact surfaces as you go. For ease of access to mounting holes, cabinets are assembled upside-down and flipped once finished. DO NOT overtighten self-tapping screws. They will strip the holes. Moduline Select Series cabinets are assembled quickly and easily with self-tapping screws. Start your driver on a low clutch setting and increase it as necessary until screws install properly. Battery charge affects your driver’s power, so make sure to reset your clutch each time you change batteries. If a hole does strip, replace the screw with a #10 nut and bolt (not provided). Assembly Steps: 1. Stand the door assembly upside-down on its flat top. Attach both sides with (2) ¼-20 bolts [D] to help temporarily align the mounting holes while driving in the self-tapping screws. Fasten each side with (4) 10-24 self- tapping screws [B], then remove the bolts. D B 3 | P a g e
2. Put the counter braces down between the sides and fasten each with (4) 10-24 self- tapping screws [B]. B 3. Assemble the toe kick with (8) 8-32 flat-head screws [A]. A 4. Put the toe kick on top of the cabinet and fasten it with (6) 10-32 screws [C]. Leave these a little loose for shimming later. Now flip the cabinet upright, but hold the door so it can’t swing open to prevent the cabinet from falling over. Wait to install the shelves until after the cabinets are joined together. C 4 | P a g e
CLOSETS Closets require some assembly. Peel back protective vinyl from contact surfaces as you go. For ease of access to mounting holes, cabinets are assembled upside-down and flipped once finished. DO NOT overtighten self-tapping screws. They will strip the holes. Moduline Select Series cabinets are assembled quickly and easily with self-tapping screws. Start your driver on a low clutch setting and increase it as necessary until screws install properly. Battery charge affects your driver’s power, so make sure to reset your clutch each time you change batteries. If a hole does strip, replace the screw with a #10 nut and bolt (not provided). Assembly Steps: 1. Stand the door assembly upside-down on its flat top. Attach both sides with (3) ¼-20 bolts [D] to help temporarily align the mounting holes while driving in the self-tapping screws. Fasten each side with (6) 10-24 self-tapping screws [B], then remove the bolts. D B 5 | P a g e
2. Put the closet top down between the sides and fasten with (11) 10-24 self-tapping screws [B]. B 3. Assemble the toe kick with (8) 8-32 flat-head screws [A]. A 4. Put the toe kick on top of the closet and fasten it with (6) 10-32 x 1” screws [C]. Leave these a little loose for shimming later. Now flip the closet upright, but hold the door so it can’t swing open to prevent the cabinet from falling over. Wait to install the shelves until after the cabinets are joined together. C 6 | P a g e
INSTA-WALLS™ Moduline Insta-Walls are shipped in 1’ wide sections. Wall stiffeners provide additional strength above the counter. Line the sections up against a wall. Insert wall stiffeners into the channels in the back of each wall section and fasten the sections together with (8) ¼-20 bolts [E]. F E Cage nuts [F] are packed separately. They allow you to mount your cabinets without needing access to the back of the Insta-Walls. Put the cage nuts in the square holes on the back of the Insta-Walls as necessary for each component (see above). Overheads use (5), bases and tool boxes use (8) and closets use (10). You won't have enough cage nuts to put them in every hole. E Cabinets with Insta-Walls can be freestanding. However, for additional stability you may still want to anchor them to a wall. Moduline adjustable wall-anchor brackets can accommodate spaces up to 10” from the wall. 7 | P a g e
One bracket has a pre-formed “Z” shaped end as shown. This end will fit inside the Insta-Wall channel. Bend the other end at the desired length. For spaces of 5” or more you will need to bolt two brackets together. Install the brackets in the top hole of the Insta-wall using (1) ¼-20 bolt [E]. Locate them at least two sections (2’) in from the ends so they’re concealed. Use as many brackets as is necessary to adequately secure your cabinets to the wall. Fasten the bracket to the wall using appropriate fasteners. Due to the uniqueness of each installation, Moduline does not provide mounting hardware. INSTALLING YOUR CABINETS Use masking tape to cover areas that could get scratched during assembly. Attach your cabinets to the Insta-Wall with ¼-20 bolts [E]. Start with a closet, then the bases and tool boxes, then install the countertop, then the overhead cabinets, and finally install the other closet. 4 4 3 1 5 1 3 3 2 2 2 1 Bolt neighboring cabinets together as you go. Mounting holes are pre- punched, but you’ll need to transfer one front hole from base cabinets, tool boxes or overheads to any adjacent closet. Check that each cabinet is level as it’s installed. Shim as necessary using the supplied horseshoe shims. Loosen the toe kick and insert shims between it and the cabinet until level. Bolting the cabinets together can pull them out of square, so you may need to adjust the shims at the end. It’s a good idea to shim the cabinets so that they tilt slightly back, especially if you aren’t anchoring them to a wall. 8 | P a g e
COUNTERTOP Dry fit the countertop to make sure you like how it fits before using any adhesive. Cover any exposed cabinet surfaces that could be scratched moving the countertop into position, especially closet sides. It’s easy to accidentally damage your cabinets when trying to install a countertop between two closets. If you have closets at both ends of your combo, wait to install one closet until after the countertop and overheads are installed. Apply double-sided tape to the tops of base cabinets and tool boxes. Remove the backing from the tape to expose the adhesive. Spray the tape with glass cleaner. This will temporarily reduce the stickiness of the tape to make installation easier. Set the countertop straight down into place. Apply even pressure to the countertop to smooth it out. Shortly after the countertop is installed the glass cleaner will dry and the tape will form a solid bond. CARING FOR YOUR CABINETS Remove any remaining protective vinyl once installation is complete. A little maintenance will keep your cabinets looking brand new. To clean the cabinets and remove fingerprints use glass cleaner and a microfiber cloth. To clean the countertops wipe with a microfiber cloth and a solution of water and a few drops of dish soap. Dry thoroughly. Use stainless steel cleaner to remove fingerprints and make the countertop shine. Avoid using the following on your cabinets: Abrasive Cleaners Chemical Solvents Strong Detergents Cleaners with Bleach Furniture Polish 9 | P a g e