
Luke’s Link Assembly Instructions
Luke’s Link Assembly Instructions. Here are the tools you will need to get the job done. 13/16 Wench 18MM wench or short socket Grinder or cutoff wheel for grinding Half inch drive ratchet Pickle Fork

Luke’s Link Assembly Instructions
E N D
Presentation Transcript
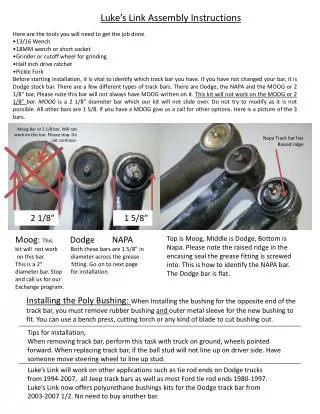
Luke’s Link Assembly Instructions • Here are the tools you will need to get the job done. • 13/16 Wench • 18MM wench or short socket • Grinder or cutoff wheel for grinding • Half inch drive ratchet • Pickle Fork • Before starting installation, it is vital to identify which track bar you have. If you have not changed your bar, it is Dodge stock bar. There are a few different types of track bars. There are Dodge, the NAPA and the MOOG or 2 1/8” bar, Please note this bar will not always have MOOG written on it. This kit will not work on the MOOG or 2 1/8” bar. MOOG is a 2 1/8” diameter bar which our kit will not slide over. Do not try to modify as it is not possible. All other bars are 1 5/8. If you have a MOOG give us a call for other options. Here is a picture of the 3 bars. • Moog Bar or 2 1/8 bar, Will not work on this bar. Please stop. Do not continue. Napa Track bar has Raised ridge • 2 1/8” • 1 5/8” • Moog: This Dodge NAPA • kit will not work Both these bars are 1 5/8” in • on this bar. diameter across the grease This is a 2” fitting. Go on to next page diameter bar. Stop for installation. • and call us for our • Exchange program. • Top is Moog, Middle is Dodge, Bottom is Napa. Please note the raised ridge in the encasing seal the grease fitting is screwed into. This is how to identify the NAPA bar. The Dodge bar is flat. • Installing the Poly Bushing: When Installing the bushing for the opposite end of the track bar, you must remove rubber bushing and outer metal sleeve for the new bushing to fit. You can use a bench press, cutting torch or any kind of blade to cut bushing out. • Tips for installation, • When removing track bar, perform this task with truck on ground, wheels pointed forward. When replacing track bar, if the ball stud will not line up on driver side. Have someone move steering wheel to line up stud. • Luke’s Link will work on other applications such as tie rod ends on Dodge trucks from 1994-2007, all Jeep track bars as well as most Ford tie rod ends 1980-1997. Luke’s Link now offers polyurethane bushings kits for the Dodge track bar from 2003-2007 1/2. No need to buy another bar.
Installation Instructions for Luke’s Link Track Bar and Tie Rod End Kit Step 1: Removal of the track bar. Using a 13/16 Wrench remove the castle nut. Next, separate ball stud from frame of truck. Remove dust boot, you will not reuse this. Using a pickle fork is the easiest method. Using a 18MM wrench, remove bushing end side of track bar. Step 3A: Removal of ball stud from NAPA track bar. Use a 1 1/4 “ hole saw to remove the plate. Do not remove any portion from the top edge. Set the saw inside the lip of the outer edge and drill until through plate. Remove all parts and throw away. In some cases the cap won’t slide over the outside. It is OK to grind a little off the outside or top of the end so cap will slide over. Step 2:Remove track bar from truck and secure in vice as shown. At this time remove grease zerk. Step 3B: Go to step 6. Step 4: Remove ball stud from Dodge track bar using a hand grinder or cut off saw. Grind incasing seal (outer lip of grease fitting) just until outer edge of plug is visible. The outer edge is designated by broken line as shown in next picture. Step 3: Removing Ball stud from track bar. Please identify which track bar you have. See front page to identify. If it is the Dodge bar, please go to Step 4, if you have a NAPA bar continue on to step 3A. This is very important. Failure to do this could cause problems in installation. Do not continue if you have a 2” or MOOG bar. Call us for our exchange program.