Download

1 / 34
340 likes | 744 Views
Army Corp of Engineers Cisco IP Phone End User Training Presented by World Wide Technology Objectives Provide an overview of Voice over IP & IP Telephony Provide an introduction to the Cisco IP Phone Describe the features and operations of the Cisco IP Phones Basic Information Audio

E N D
Army Corp of Engineers Cisco IP Phone End User Training Presented by World Wide Technology
Objectives • Provide an overview of Voice over IP & IP Telephony • Provide an introduction to the Cisco IP Phone • Describe the features and operations of the Cisco IP Phones • Basic • Information • Audio • Browser
Voice over IP/IP Telephony • Voice over IP(VOIP) and IP Telephony(IPT) are methods for using your established Data network to transport telephone calls • It allows ACOE to leverage the complex networks installed and provide a more centralized, easy to maintain telephone system across the enterprise
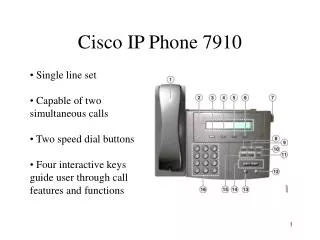
Cisco IP Phone Overview • They may be configured with multiple line appearances or speed dial buttons • Through the use of soft key driven menus, multiple user actions (call hold, transfer, conference, etc.) may be performed • Users may use either handset, full-duplex speakerphone, or dedicated headsets during conversations
Cisco IP Phone 7912G • The Cisco IP Phone 7912G includes the following elements: • Handset • LCD Display • 4 Soft Keys • Standard Dial Pad • Volume Button • Navigation Button • Hold Button • Menu Button • Monitor Mode (Speaker Only, NO MIC)
Cisco IP Phone 7941G • The Cisco IP Phone 7941G includes the following elements: • Handset • LCD Display • 2 Line Appearance Buttons • Speed Dial Buttons (optional) • 4 Soft Keys • Standard Dial Pad • Scroll Key • 4 Mode Buttons • Information (“?”) Button • Headset, Mute and Speaker Control Buttons
Cisco IP Phone 7961G • The Cisco IP Phone 7961G includes the following elements: • Handset • LCD Display • 6 Line Appearance Buttons • Speed Dial Buttons (optional) • 4 Soft Keys • Standard Dial Pad • Scroll Key • 4 Mode Buttons • Information (“?”) Button • Headset, Mute and Speaker Control Buttons
Cisco IP Phone 7971G • The Cisco IP Phone 7971G includes the following elements: • Handset • Color LCD Display • 8 Line Appearance Buttons • Speed Dial Buttons (optional) • 5 Soft Keys • Standard Dial Pad • Scroll Key • 4 Mode Buttons • Information (“?”) Button • Headset, Mute and Speaker Control Buttons
Adjusting the Footstand • While looking at the phone, push and hold the button on the upper portion of the right side of the phone • Adjust the height, as desired, and release the button • There are nine stages of height adjustment available
Using the Handset Cradle Hook • Remove the Handset from the cradle • Remove the Handset Cradle Hook from the earpiece cradle using an upward sliding motion • Rotate the Handset Cradle Hook 180° and reinsert using a downward sliding motion • Replace the Handset in the cradle
Placing a Call Use any of the following methods to place a call: • Lift the Handset and dial the number • Press the Primary Line Extension button and dial a number • Press the Speaker button and dial a number • Press the Headset button and dial a number • Press the NewCall soft key and dial a number • Press a Speed Dial button • Enter the number on the Dial Pad and press the Dial soft key Note: Calls placed using these methods will be made using the Primary Line Extension.
Answering a Call Use any of the following methods to answer an incoming call: • Lift the Handset • Press the Answer soft key • Press the Speaker button • Press the Headset button • Press the ringing Line button
Ending a Call Use any of the following methods to end a call: • Hang up the Handset • Press the EndCall soft key • Press the Speaker button • Press the Headset button
Soft Features • Putting a Call on Hold • Placing a Conference Call • Transferring a Call • Redialing a Number • Forwarding All Calls • Using Call Pickup
Putting a Call on Hold • During a call, press the Hold soft key • To return to the call, press the Resume soft key Note: • If you have multiple lines and want to see the Caller ID for a holding call, press the ? button followed by the appropriate Line button. • Putting a call on hold generates Tone on Hold; for this reason, avoid placing a conference call on hold.
Placing a Conference Call (Ad-Hoc Conference) • During a call, press the More soft key and then the Confrn soft key; this opens a new line while placing the current party (or parties) on hold • Place a call to another party • When the call connects, press Confrn again to add this party to the call • Repeat the first three steps to add additional participants Note: • To end a conference call, all but one party must hang up. • Once the conference call initiator disconnects, no additional parties may be added.
Transferring a Call • To transfer an active call to another phone, press the Trnsfer soft key; this automatically puts the call on hold • Dial the number to which you want to transfer the call • Press the Trnsfer soft key again to completed the transfer; you can do so before once the call begins to ring (blind transfer), or you can wait for the recipient to answer (announced transfer) • Hang up to end your participation in the call Note: If the party refuses the call (announced transfer), press the Resume soft key to return to the original call.
Redialing a Number • Lift the handset and press the Redial soft key • You can also press the Redial soft key without lifting the handset to place the call from the speakerphone
Using Call Park You can park an active call and then retrieve it from another phone within your Cluster: • During an active call, press the More soft key until you see the Park tab • Press the Park soft key to park the call; the LCD displays the number where the call is parked • Before you hang up, make a note of the call park number • To retrieve the parked call, go to any phone and dial the call park number
Accessing Help Features Use any of the following methods to access Online Help from your phone: • Press the ? button and then press any key to display context-based help for that key • Press the ? button twice quickly, during an active call, to display network statistics for the active call
Using Call History • Press the Directories button to display the Directory menu • Use the Navigation button to highlight Missed Calls, Received Calls, or Placed Calls • Press the Select soft key; the selected directory menu opens • To place a call from the directory, highlight the desired number and press the Dial soft key, or simply lift the handset Note: If you decide not to place the call, press the Exit soft key twice to return to the main menu.
Changing the LCD Contrast • Press the Settings button • Highlight the Contrast option and press the Select soft key • Press the Up or Down soft key to adjust the contrast • Press the OK soft key to accept and save your changes
Accessing Voice Mail • Press the Messages button • Follow the voice instructions; the system will ask to perform the following tasks, after you have entered your password: • Record your name • Record a greeting that outside callers hear when you do not answer your phone • Set a password (longer passwords are more secure)
Accessing Voice Mail (in the office) • The red light on your handset lights up when you have a voice mail message. The LCD also indicates that you have voice mail. • Press the Messages button and follow the voice instructions • The system will prompt for your password • Use the menu prompts to manage your messages • Note: The red light is visible on your handset while the handset is in the cradle; when the handset is removed from the cradle, it will be visible in the cradle hook depression. The light will extinguish when all new voice mail messages have been retrieved.
Accessing Voice Mail(outside the office)1.800.626.8449 or 910.251.4527 • Dial the Toll Free office telephone number and wait for the Greeting or • Dial your own directory number and wait for your greeting • Press the “*” key and follow the prompts • The system will prompt for your user id, which is the eight-digit number on the top of your telephone display • The system will prompt for your password • Use the menu prompts to manage your messages
Transferring directly to Voicemail • Press *4XXX to transfer directly into the persons voicemail
During Message Summary or Review [1] Restart Summary [2] Save [3] Delete [4] Slow playback [5] Change volume* [6] Fast playback [7] Rewind message [8] Pause/resume [9] Fast forward [#] Fast-forward to end [#] [#] Skip message, save as is Summary: Basic Message Manipulation • After Message • [1] Replay Message • [2] Save • [3] Delete • [4] Reply • [1] Reply to all • [2] Call the subscriber* • [5] Forward message • [6] Save as new • [7] Rewind message • [8] Deliver e-mail or fax to fax machine* • [9] Play message properties • [#] Save as is
Viewing Information Services • Press the Services button • Press the Navigation button to select the desired service • Press the Select soft key to display the information; you can press the Update soft key to refresh the screen with the latest information • Press the Exit soft key to return to the Services menu; press the Services button to return to the main menu
Audio Features • Changing the Ringer Sound • Adjusting the Ringer Volume • Adjusting the Handset, Speaker, and Headset Volume • Muting a Call
Changing the Ringer Sound • Press the Settings button • Press the Navigation button to select Ring Type from the Settings menu • Press the Select soft key to display a list of Ring Types • Press the Navigation button to scroll through the options • Press the Play soft key to hear a sample Ring Types • Press Select and then press OK to apply the ring type to your phone • Press Exit to return to the main menu
Adjusting the Ringer Volume • While the phone is idle, press the Volume button once to hear a sample of the current volume level • Continue to press the Volume button to adjust the volume level Note: The new ringer volume level is automatically preserved until the next time you change it.
Adjusting the Handset, Speakerphone, and Headset Volume • During an active call, press the Volume button to increase or decrease the volume of your handset, speakerphone, or headset • To save the volume setting, press the Save soft key Note: Adjusting (and saving) the volume level during a call only affects the currently active voice receiver. In other words, press the Volume button when you are using the handset, you will change only the handset volume, not the speaker or headset volume.
Muting a Call • Press the Mute button • To disengage mute, press Mute again Note: If you are using mute along with the speakerphone, lifting the handset will disengage mute.