Download
1 / 4
40 likes | 62 Views
This includes 2009 and newer MTX m3 and MTX Sport motorcycle carriers<br>Visit Now: - https://www.mototote.com/document-library.html<br>

E N D
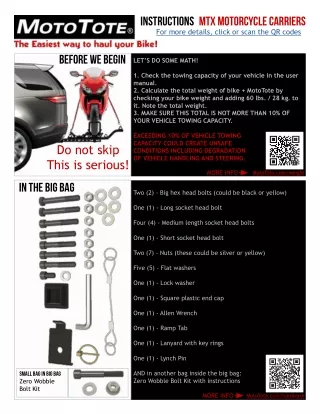
INSTRUCTIONS MTX motorcycle Carriers For more details, click or scan the QR codes before we begin LET’S DO SOME MATH! 1. Check the towing capacity of your vehicle in the user manual. 2. Calculate the total weight of bike + MotoTote by checking your bike weight and adding 60 lbs. / 28 kg. to it. Note the total weight. 3. MAKE SURE THIS TOTAL IS NOT MORE THAN 10% OF YOUR VEHICLE TOWING CAPACITY. EXCEEDING 10% OF VEHICLE TOWING CAPACITY COULD CREATE UNSAFE CONDITIONS INCLUDING DEGRADATION OF VEHICLE HANDLING AND STEERING. Do not skip This is serious! MORE INFO MotoTote.com/weight in the BIG bag Two (2) - Big hex head bolts (could be black or yellow) One (1) - Long socket head bolt Four (4) - Medium length socket head bolts One (1) - Short socket head bolt Two (7) - Nuts (these could be silver or yellow) Five (5) - Flat washers One (1) - Lock washer One (1) - Square plastic end cap One (1) - Allen Wrench One (1) - Ramp Tab One (1) - Lanyard with key rings One (1) - Lynch Pin AND in another bag inside the big bag: Zero Wobble Bolt Kit with instructions small bag in big bag Zero Wobble Bolt Kit MORE INFO MotoTote.com/hardware
attach mtx platform to square tube 1 Big hex head bolts, nuts & four washers Put light holes outward if using lights. Close the gaps! Attach the MTX Platform to the square tube with the two big hex head bolts, two nuts, and four washers. attach components to mtx platform Short socket head bolt with lock washer 2 Tighten until gaps close, metal is clamped together and the connection is solid with no movement. MORE INFO MotoTote.com/platform Tire track Tie-down arm Two medium socket head bolts with nuts Two medium socket head bolts with nuts Wheel stop Tie-down arm Attach the front tie-down arm and wheel stop with two medium bolts. Put the tire track on top with two medium bolts through the rear tie-down arm and small bolt on top. Tighten nuts on the four medium bolts until there is no rattling. MORE INFO MotoTote.com/mtxs Short socket head bolt with lock washer Tire track Tie-down arm Two medium socket head bolts with nuts Two medium socket head bolts with nuts Wheel stop Tie-down arm Attach the rear tie-down arm and tire track first. Put the front wheel stop in desired position, then back stop on top of everything with bolts through the front tie-down arm. Tighten nuts on the four medium bolts until there is no rattling. MORE INFO MotoTote.com/mtx3
3 4 ramp tab Loading ramp Attach the Ramp Tab at the third hole from MTX Platform with the long socket head bolt, nut, and washer. Stow the loading ramp with the lynch pin as shown. Attach the lanyard to the lynch pin and ramp with key rings as shown. MORE INFO MotoTote.com/ramp 5 Attach to hitch NO WASHER. BOLT HEAD MUST RECESS INTO THE HITCH PIN HOLE AND SEAT TIGHTLY AGAINST THE FACE OF THE MOTOTOTE SQUARE TUBE INSIDE HITCH. Secure to hitch with the Zero Wobble Bolt. DO NOT PUT WASHER ON THE HEAD OF THE BOLT! The head of the bolt MUST recess into the hitch pin hole of the receiver and seat against the MotoTote square tube of the inside the receiver. 6 MORE INFO MotoTote.com/hitch LOAD THE BIKE Hang a tie down on each handle bar before loading. Attach the loading ramp to the tire track with the tabs. Push the bike up the loading ramp, tilting the bike toward you while pushing so that you can lean into it with your body weight. MORE INFO MotoTote.com/load
secure the bike 7 One tie down at rear, over or through tire Two tie downs at front Use two tie-downs to secure the front of the bike to the two front tie-down loops. Tighten until the front suspension is compressed about half way. Secure the rear tire with a third tie down so that it can’t “jump” out of the track. MORE INFO MotoTote.com/secure Do’s and don’ts Inspect the MotoTote before every use for damage or defects. Inspect the tie downs for fray or wear. Replace any questionable tie-down. Use quality tie-downs made for motorcycles. Secure the ends of the tie downs so they don’t hang free. Check and double check your tie-down job. MotoTote’s don’t fail, tie-down jobs do. Don’t use the MotoTote if damaged or defective. Don’t use the MotoTote for other than intended use as described in these Instructions. Don’t haul more weight (bike and carrier combined) 10% of the towing capacity of your vehicle. Don’t load with the bike engine running. Don’t modify or change the MotoTote If you need assistance please contact us at support@mototote.com or in the US call 888-333-4621 One Year Limited Warranty For one year from the date of retail purchase, MotoTote LLC will, at its option, repair or replace any part or parts found to be defective in material or workmanship. This covers products which have been operated in accordance with these instructions, and which have not been subject to misuse, abuse, commercial use, neglect, accident, improper mainte- nance, alterations or modificatins. Warranty service is available, with proof of purchase, through MotoTote LLC by con- tacting us at (888) 333-4621 or support@mototote.com. Copyright 2018 MotoTote LLC. All rights reserved MotoTote is a registered trademark of MotoTote LLC. Revised 08-03-2018