Download

1 / 109
1.1k likes | 1.35k Views
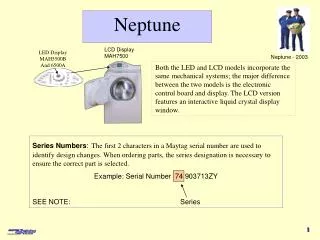
Neptune. LCD Display MAH7500. LED Display MAH5500B And 6500A . Both the LED and LCD models incorporate the same mechanical systems; the major difference between the two models is the electronic control board and display. The LCD version features an interactive liquid crystal display window.

E N D
Neptune LCD Display MAH7500 LED Display MAH5500B And 6500A Both the LED and LCD models incorporate the same mechanical systems; the major difference between the two models is the electronic control board and display. The LCD version features an interactive liquid crystal display window. Series Numbers:The first 2 characters in a Maytag serial number are used to identify design changes. When ordering parts, the series designation is necessary to ensure the correct part is selected. Example: Serial Number 74 903713ZY SEE NOTE: Series
Floor stability and proper leveling are extremely important for any Neptune installation, if the floor is not sturdy enough to support the washer properly, or the machine is not properly leveled, the vibration detection system will not allow the machine to reach it’s top spin speed. Installation Notes
Unpacking Cut two shipping straps Remove straps and cardboard
Use large flat blade screwdriver to remove two shipping staples. One end of the staple is embedded in the crate and the other end hooks into the washer
Cut Top Strap The top strap is a one piece strap, cut either side of the buckle and pull the strap completely out
Cutting Lower Straps The lower strap is actually two separate straps. The straps loop around the tub on the left and right sides of the machine. Make sure to cut both sides of buckle and separate straps when you pull them out.
Warning! Failure to remove the shipping straps completely can result in the straps becoming entangled in the motor and pulley assembly. This can result in odor complaints or failure of the spinner to rotate at designed speed.
Drain Hose Installation Important installation notes attached to drain hose
Door Reversal Hinge Screws Remove Two Hinge Screws And Remove Door Remove Two Hinge Covers
Changing Hinges Remove four painted screws covering hinge holes on door Install hinge covers on opposite side Remove screws securing hinges Install hinges on opposite side of door
Hanging Door Install door Install painted screws in opposite hinge holes Install hinge screws Check operation of door
Component Location Electronic Control 5500B-6500A-LED 7500A-LCD Component Location Neptune 5500B-6500A-7500A Heater 6500A & 7500A
Removing Console To remove console, remove two ¼” screws, one on each side of cabinet
With the two lower screws removed, tilt the console forward and remove four screws holding the metal cover to the console
Removing Door Remove the two hinge screws and remove door
Removing Inner Door Panel Screws To remove inner door panel, remove screws on three sides of door
Vent Tube and Balance Assembly Inlet Balance assembly Vent tube Outlet
Check Valve Check valve assembly
Removing Front Panel Grasp the right and left sides of front panel. Rotate the posts away from the door opening and pull out Lift the front panel off the bottom clips and remove
Component Identification Boot Drain Heater Drain Pump Motor Motor Controller Unbalance Switch
Wiring Harnesses Remove the three wiring harnesses
Removing Motor Controller To remove motor controller: remove two 5/16” screws
Remove Housing Lift motor controller housing assembly and remove
Pressure Switch Drain pump Pump motor
Pressure Switch Pressure switch is mounted on top of drain pump. It’s covered with a plastic bag. Bag removed
Removing Switch Removing out of balance switch
Heating Element Thermistor terminals Heater terminals
Removing Heater To remove heater: Remove heater and thermistor wires Loosen 10mm nut
View of gasket Nut Tightening the 10mm nut causes lower plate to compress the rubber gasket and seal against the tub housing
Dispenser Dispenser outlet to tub Bleach reservoir Fabric softener Siphon tubes
Dispenser Dispenser cover must be removed to raise top Remove four Phillips head screws
Door Release Cord Removing siphon reservoir allows easier access to release cord To release door lock–pull line to left while pulling on the door
Release Top Remove Two Screws to Pop Top
Components under top Fill Valves Balance Weight Dispenser Valves Inertial Unbalance Switch Recirculating Hose Boot Cable Door Lock Assembly Side Displacement Switch
Inlet Hose Water inlet hose from dispenser assembly to tub
Inlet water valves Thermistor - Resistance decreases with temperature rise
Caution on rear panel Remove four screws to remove rear access panel
Pump and Strut Suspension strut Pressure Switch, drain pump and motor Sump Drain View from rear with access panel removed
Motor and Strut Tub drive pulley Drive belt Suspension strut Drive motor Ribbed motor pulley View from rear with access panel removed
Removing Motor 1. Roll off Drive Belt 2. Remove Bolt
Allow the mounting pin to drop out of the motor isolator as you pull the motor out from the front of the machine