Download
1 / 18
190 likes | 218 Views
Watershed Delineation 2 easy techniques. Daniele Baker Jason Godeaux. Option 1: Delineating Watersheds with ArcHydro. Installing ArcHydro. Download Arc Hydro here: http:// downloads.esri.com/ArcHydro/ Navigate through folders to get to the correct version:

E N D
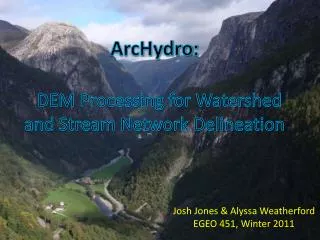
Watershed Delineation2 easy techniques Daniele Baker Jason Godeaux
Installing ArcHydro • Download Arc Hydro here: http://downloads.esri.com/ArcHydro/ • Navigate through folders to get to the correct version: • Once downloaded, click .exe file to install • Open ArcGIS. Right click anywhere on the menu bar to show available tools and select ‘Arc Hydro Tools’ to turn on the ArcHydro toolbar. 1. Click ArcHydro 3. Find your version of ArcGIS 2. Click setup 6. Click to download 5. Select the most recent version 4. Select the most recent version
Delineating Watershed with ArcHydro using EPA Web Service • Does not require ArcGIS Spatial Analyst extension • Generates an approximated watershed using the NHD+ Catchments. • When you select a pour point, the tool appends the NHD+ catchments upstream of that point, including the catchment containing the point. • That means the approximated watershed may extend downstream of your pour point. • You can edit the watershed manually.
Delineating Watershed with ArcHydro using EPA Web Service • Load the layers you need to find your pour point • Click on this button on the ArcHydro toolbar • Fill in the prompt to name the two layers. • Move the cursor to your pour point and click • The watershed will appear in red when done. • Move your pour point and delineate again until your watershed is as close as possible. • Select ‘Yes’ to save your watershed.
Delineating Watershed with ArcHydro using Point or Batch Delineate • ArcHydro can also delineate the exact watershed using two options • ‘Point’ delineates one point at a time. Requires ArcGIS spatial analyst. • ‘Batch point’ delineates many watersheds at once. Does not require spatial analyst. • Both require the following data files: • If you need this level of detail email me at Daniele.baker@tceq.texas.gov and we can send you the files and the tutorial
Option 2: Delineating Watersheds with NHDPlus Data Obtain NHDPlus data from http://www.horizon-systems.com/NHDPlus/NHDPlusV2_data.php Pick the area of interest Download NHDSnapshot and NHDPlusCatchment
Setting up NHDPlus Data • Unzip files to a folder. • Create a new personal geodatabase. • In ArcCatalog, right-click on the folder, go to New, File Geodatabase. • Right-click on your new File Geodatabase, go to New, Feature Dataset. • The next screen prompts you to choose a coordinate system. Click then click “import". In the NHDPlusxx\NHDSnapshot\Hydrography directory search for the nhdflowline.shp and add it. • Click through till finished.
Setting up NHDPlus Data • Import shapefile to geodatabase • Right click on nhdflowline.shp in the NHDPlusxx\NHDSnapshot \Hydrography directory • Select import and import it to your new Feature Dataset in your new File Geodatabase
Setting up NHDPlus Data • Use the SQL button to build an Expression as shown to the right. • The expression should read: "FLOWDIR" = ‘With Digitized’ Click on Get Unique Values in order to select ‘With Digitized’. Click OK.
Setting up NHDPlus Data • Returning to the Feature Class to Feature Class dialog, scroll down in the Field Map box and right click ENABLED and select properties. Change the name to ENABLED_CHAR. Click OK.
Build Geometric Network • Right click on the feature dataset that you made above • Click new, Geometric Network. • Proceed through the Build Geographic Network Wizard, taking all the defaults. The geometric network called hydrography_net will be created.
Add Data to Map • Add hydrography_net and Catchments to your map. • Open the toolbox and go to Data Management Tools, Geometric Network, Set Flow Direction. • Set the geometric network to hydrography_net and the flow option to WITH_DIGITIZED_DIRECTION • Add Utility Network Analyst toolbar • Right click in the toolbar area and select Utility Network Analyst
Find Watershed • In the Utility Network Analyst toolbar • Select analysis, options • Click the selection button • Zoom to water body of interest and use the flag tool to place a marker. • Set the toolbar to Find Upstream Accumulation • Click the solve button to get results
Find Watershed • Go to Selection, Select by Location • Select Catchment as Target Layer, check Use Selected Features box, and click apply • Go to toolbox, Data Management Tools, Generalization, Dissolve • Select Catchment and select a place to save the results
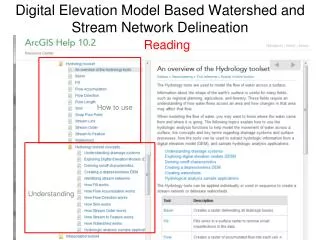
Find Watershed • Once data is setup, you only need to follow the last steps. • NHDPlus also has additional information that can be added • Catchment characteristics • Cumulative drainage area characteristics • Flow direction, flow accumulation and elevation grids • Flowline min/max elevations and slopes • Flow volume & velocity estimates for each flowline in the stream network • Catchment attributes and network accumulated attributes • These can be added to the data set using the tutorials found on the NHDPlus website http://www.horizon-systems.com/NHDPlus/NHDPlusV2_documentation.php
The Future of Watershed Delineation • USGS StreamStats • StreamStats is a Web application that incorporates a GIS to provide users with access to an assortment of analytical tools that are useful for a variety of water-resources planning and management purposes, and for engineering and design purposes. • Not available in Texas yet • https://streamstatsags.cr.usgs.gov/streamstats/ • EPA Model My Watershed • Model My Watershed allows users to learn how land use and soil together determine whether rainfall infiltrates into the soil, runs off into streams, or is evaporated and transpired by plants. This Internet tool is intended to provide an easy-to-use professional-grade modeling package to inform land use decisions, support conservation practices, and enhance watershed education. • Watershed delineation not available in Texas. • Data at USGS HUC code level 12 is available • https://app.wikiwatershed.org/