Download
1 / 16
170 likes | 519 Views
Introduction to Musculoskeletal System. Created By: . Introduction. A. Muscles, bones, joints, connective tissues, blood vessels, and nerves make up musculoskeletal system. B. Injuries may show same signs and symptoms-typically pain, swelling, and deformity.

E N D
Introduction to Musculoskeletal System Created By:
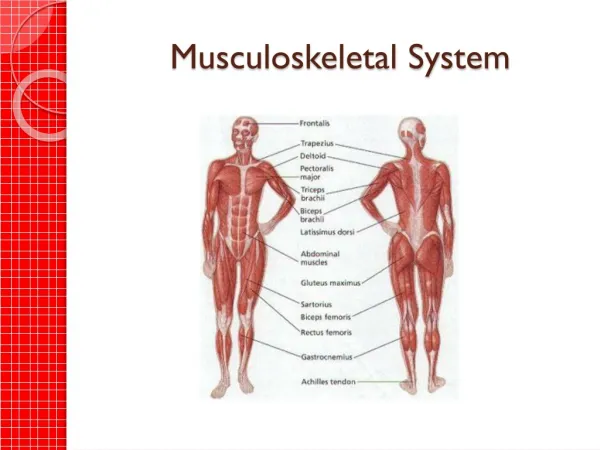
Introduction • A. Muscles, bones, joints, connective tissues, blood vessels, and nerves make up musculoskeletal system. • B. Injuries may show same signs and symptoms-typically pain, swelling, and deformity. • C. Not necessary for First Responders to determine exact type of injury but will classify injuries to extremities as painful, swollen, deformed (PSD) extremities. • D. Such injuries are usually the result of trauma.
Functions • 1. Bones support body and give it form and rigid structure for attachment of muscles. • 2. Muscles attached to skeleton by ligaments permit motion at most places where bones join together (joints). • 3. Protects body organs • a. Skull protects brain. • b. Rib cage protects heart and lungs. • c. Lower ribs protect much of liver and spleen. • d. Spinal vertebrae protect spinal cord. • 4. Some bones function in blood cell production
Main parts • 1. Axial skeleton-all bones forming upright axis of body (skull, backbone, breastbone, and ribs) • 2.Appendicular skeleton-all bones forming upper and lower extremities (collarbones, shoulder blades, bones of arms, wrists, hands, and bones of the pelvis, legs, ankles, and feet) • a. Upper extremity • 1) Shoulder girdle-upper extremities are attached to shoulder girdle-formed largely by the shoulder blade (scapula) and collarbone (clavicle). • 2) Arm (shoulder to elbow)-one bone: humerus • 3) Forearm (elbow to wrist)-two bones: radius on thumb side and ulna on little finger side • 4) Hand-many bones including those of wrist and fingers • b. Lower extremity • 1) Pelvis-bony ring formed by sacrum and two pelvic bones • 2) Hip joint-lower extremity attached to pelvis at hip joint • 3) Upper leg (thigh)-one bone: femur; longest, heaviest, and strongest bone of body. Femur fractures are serious. • 4) Lower leg-two bones: tibia in front and fibula in back • 5) Foot-many bones • 6) Kneecap-one bone: patella
Injuries to Extremities Created By:
Causes and Types of Injuries • Causes: • 1. Direct force • 2. Indirect force • 3. Twisting force • 4. Aging and disease • Types: • 1. Painful, swollen, deformed injuries to extremities caused by trauma • 2. Closed-no break in skin; soft-tissue damage with internal bleeding; few or no • external signs of injury • 3. Open-soft-tissue damage is evident; bone may tear through skin. • 4. Fractures occur any time a bone is broken, chipped, cracked, or splintered. • 5. Dislocation-pushing or pulling of a bone end partially or completely from a joint • 6. Sprain-partially torn ligament, usually result of twisting force • 7. Strain-overstretching or tearing of a muscle, usually result of overexerting or overworking the muscle • 8. Angulated fracture-fracture causes bone or joint to take an unnatural shape
Signs and Symptoms of injuries to the bones and joints • 1. Main signs and symptoms • a. Pain-nerves are pressed by swelling and broken bone ends. • b. Swelling-blood from ruptured vessels collects inside the tissues. • c. Deformity-limb appears different in size or shape when compared to other limb. • 2. Other common signs and symptoms • a. Loss of use, or a locked joint • b. Numbness or tingling sensation • c. Loss of distal pulse • d. Slow capillary refill • e. Grating • f. Sound of breaking • g. Exposed bone
Total Patient Care • 1. Perform scene size-up. • 2. It is necessary to care for injuries in certain order: • a. Airway, breathing, circulation, major bleeding, and shock • b. Spinal injuries • c. Skull injuries • d. Pelvic injuries • e. Thigh injuries • f. Rib cage or chest injuries • g. Extremity injuries with no distal pulse • h. Injuries to arm, lower leg, and individual ribs • 3. Patient care steps • a. Perform initial assessment before you focus on a particular injury. • 1) Manage life-threatening problems first. • 2) Prioritize and manage other injuries. • b. Expose injury site. • 1) Dress open wounds. • 2) Check distal pulse, sensation, motor function. • c. Immobilize extremity. • d. Apply cold pack to help control bleeding and reduce swelling. • e. Care for shock-give oxygen per local protocols. • f. Maintain body temperature.
Splinting Created By:
Introduction • A. Purpose-immobilize and stabilize painful, swollen, deformed (PSD) extremities • B. Why splint? • 1. To reduce pain • 2. To reduce further possible injuries to soft tissues • 3. To reduce and control bleeding • 4. To relieve pressure against vessels • 5. To prevent closed injuries from becoming open injuries • C. Types of splints • 1. Soft • 2. Rigid
Sling and Swathe • 1. Descriptions • a. Sling-triangular bandage that supports shoulder and arm • b. Swathe-triangular bandage folded to 4-6 inches; used to hold arm against side of chest • c. Cravat-triangular bandage folded to 3-4 inches; used to tie splints in place • 2. Uses-immobilization, support, elevation • a. Shoulder girdle injuries • b. Upper arm injuries • c. Elbow injuries • d. Lower arm injuries • e. Wrist, hand, finger injuries • f. Fractured ribs • 3. Application • a. Sling • b. Swathe
First Responder Responsibilities • 1. Do only what you have been trained to do. • 2. Care for life-threatening injuries first. • 3. DO NOT move patient to splint unless you have appropriate help. • 4. If mechanism of injury or signs and symptoms indicate the need, use following splinting techniques where appropriate: • a. Sling and swathe (soft splint) • b. Rigid splints for injuries to forearm, wrist, thigh, lower leg • c. Soft or rigid splints for injuries to upper arm, elbow, wrist, hand • d. Soft splints for ankle, foot • e. Splint when in doubt.
Rules for Splinting • 1. Reassure patient and explain what you will do. • 2. Splint before moving patient unless environment is threatening. • 3. Expose injury site. • 4. Control all serious bleeding, but do not apply pressure over injury site. • 5. Dress open wounds. • 6. Check for distal pulse, sensation, and motor function before and after splinting. • 7. Have all splinting materials ready, and use a padded splint for comfort. • 8. Attempt to realign an angulated limb or reposition it to regain a pulse. • 9. Apply gentle manual traction, and secure splint firmly. • 10. Immobilize injured extremity and joints above and below injury site. • 11. Secure splint from distal to proximal end of extremity, leaving fingertips and toes exposed. • 12. Elevate extremity if there are no spinal injuries. • 13. Provide care for shock.
Applying Manual Traction • 1. DO NOT apply manual traction if injury involves major joints- shoulder, elbow,wrist, hand, pelvis, hip, knee, ankle, foot. • 2. Once applied, manual traction must be maintained until splint is firmly secured. One rescuer applies manual traction and maintains it. Another rescuer applies and secures splint.
Straightening Angulated Fractures • 1. DO NOT attempt to straighten open angulated fractures. • 2. DO NOT attempt to straighten angulated fractures or dislocations of wrist and shoulder. • 3. DO NOT attempt to straighten angulated fractures of shoulder, pelvis, hip, thigh, wrist, hand, foot, or a joint immediately above or below injury site. • 4. Straighten closed angulated fractures of elbow, knee, and ankle if there is no distal pulse. DO NOT apply manual traction. Align for splinting. • 5. Make only one attempt to straighten angulations. Stop if limb offers resistance or if patient complains of pain.
Types of Splints • 1. Commercial splints • 2. Inflatable splints • 3. Improvised emergency splints