Download
1 / 19
190 likes | 298 Views
Introduction to NXT-G Programming. Tony Ayad September 2012. Outline. Basic Programming Agenda (Introductory Workshop) NXT Controller (aka: the “brick”) Building "Blocks" The NXT-G Interface The MOVE and MOTOR Blocks. NXT Controller – The robot’s “brain” aka: the “Brick”.

E N D
Introduction to NXT-GProgramming Tony Ayad September 2012
Outline • Basic Programming Agenda (Introductory Workshop) • NXT Controller (aka: the “brick”) • Building "Blocks" • The NXT-G Interface • The MOVEand MOTOR Blocks NXT Programming - Tony Ayad
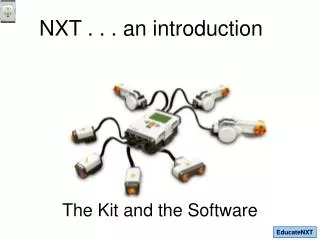
NXT Controller – The robot’s “brain” aka: the “Brick” The USB port is used to connect to The PC so you can download the Programs into NXT Controller 3 Outputports used for the motors USB A C B Name Icons representing menu options Use this button to turn onthe NXT and select the shown option SELECT menu option (right) SELECT menu option (left) Menu Level Back (off) 4 sensor Inputports used to attach sensors 1 2 3 4 Touch Sensor Light Sensor NXT Programming - Tony Ayad
FLL Robot Configuration • For FLL Competition you are allowed: • 1 NXT Brick • Up to 3 motors; two for moving; the third is the arm • Light sensors, touch sensors, Ultra Sonic Sensor • However, you only have 4 ports on the NXT! • You can use as many LEGO pieces as you need • You may NOT use ANYTHING that is not made by LEGO • Instructing the robot to move and turn is accomplished by the NXT Motors which rotate in a predetermined direction. • All examples used in this document assume the robot configuration and motor is mounted as shown. Clockwise B - Motor C - Motor NXT Programming - Tony Ayad
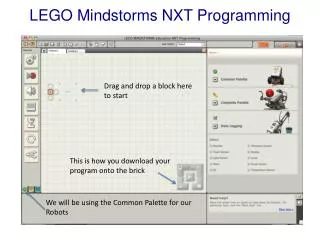
Programming The Robot • Instructions are placed on the “Sequence” beam • The commands are executed in a row. So, command 1 in this picture happens first, and command 3 happens last. Programming Block? It is a specific step or command the robot will perform. NXT-G Programming - Tony Ayad
Programming Commands • NXT-G programming language hasseveral type of commands and they are called “BLOCKS”. NXT Programming - Tony Ayad
Mindstorms Interface Program name Programming Palette menu. Each option has aset of program blocks; move the mouse over it to see the available blocks Your Program. You can add and configure “blocks” to instruct actions such as moving forward or turning Sequence beam is where the blocks are placed and it is in the order in which they will be run. Program BLOCK: a programming instruction for the robot Brick controller used to download programs to the NXT brick Palette selector NXT Programming - Tony Ayad
Mindstorms Interface Comment tool allow you to create new comment boxes Pointer tool to select objects by clicking the mouse Pan tool to move the display or you can use the left or right arrows to move the display NXT Programming - Tony Ayad
Steps to add a Programming Block 1. Click and hold block with left mouse button to drag it 2. Drag the block to place it on the sequence beam 3. When you see the white bar,release the mouse (this is thelocation for placing the block) 4. Update the options of the selected block in its control panel Control Panel NXT Programming - Tony Ayad
Your First Program • Click on the new program icon • Drag and drop MOVE block on the sequence beam • Enter the MOVE block options • Click on the download button and wait for the beep • On the NXT, press the Orange button • My Files • Software Files • Untitled-1 • Press the orange button twice to run NXT Programming - Tony Ayad
Where are the programs stored? • Once you install the Mindstorms software, it will create a “Lego Creations” and other subdirectory in your Documents Folder as shown. • All the programs will be created in the “Default” Folder • All My Block will be created in the “Blocks” folder NXT Programming - Tony Ayad
Robot Actions The arm is used to manipulate objects (use the A port always) • For First Lego League, the NXT robot usually has two Motors to control the movement of the robot: • Move Forward or Back (mostly using the MOVE block) • Turn Left or Right, using either the left or right motors (always use the MOTOR block) • Spin Left or Right using both motors which are moving in opposite direction (always use the MOTOR block). • The Arm is usually the third motor which is used to manipulate mission models by scooping, pushing, pulling or turning actions. NXT Programming - Tony Ayad
NXT Motors and control BLOCKS • NXT Motors have a built-in rotation Sensors that continuously measures and monitors the number of degrees / rotations where it is moving forward or backwards. • You can manipulate the motors using the MOTORand MOVE • MOVEBLOCK • Controls 2 motors • Synchronize motor movement to ensure robot moves straight • Automatically corrects errors • Applies power gradually (accelerate) • Slows down (decelerate) • MOTOR BLOCK • Controls one motor • No Synchronization • No Acceleration NXT Programming - Tony Ayad
The MOVE Block – explained Power: Amount of power to use to control the motor. The default is 75%. Duration: used to specify the interval in: Degrees, time (seconds), or rotation where one rotation = 360 degrees. Port: Select motors to move. These correspond to the ports on the NXT brick Control Panel Steering: instructs the robot to apply more power to one of the motors to control turns. NOTE: This is useful for rotating the robot in place, or when you wish to make turn in a “tight” turns. BEWARE that using steering may not be consistent at low power!!! IT IS UNRELIABLE AND AVOID USING IT. Next Action: instructs the motor to either brake or coast at the end of the action. NOTE: “brake” will provide a more accurate travel distance, while coast will cause motor/robot to “roll” to a stop as the power is cut off and therefore overshoot the target. Direction: the direction in which you want to turn the motor (forward or back). NXT Programming - Tony Ayad
The MOTOR block • The MOTOR block controls a single motor with slightly different configuration options than the MOVE block. • The MOTOR block is ideal for controlling the robot’s arm, and for controlled turns Power: Increases power if resistance is met Port: Select motor WAIT: check the box so other blocks in the program can proceed while the motor completes its action Action: there are three options Constant: power is consistent for the duration Ramp UP: slowly increase speed until desired power is reached Ramp Down: slowly decrease speed until it reaches zero power. NXT Programming - Tony Ayad
Geometry and Math Fun way to see that what is learned in school can be applied to the FIRST LEGO League’s robots. Note: it may be a stretch for younger teams that have not covered these concepts in school. C = π x Diameter NXT Programming - Tony Ayad
Inches to Motor Degrees • The Circumference of the robot’s wheel determines the number of inches it will travel in 1 rotation (360ᵒ) • Circumference of wheel = π x Diameter • Degrees traveled per inch = 360 / circumference of wheel 3.2 inches • Circumference of wheel = π x Diameter = 3.14 x 3.2 = 10.0 inches • Degrees traveled per inch = 360 / 10.0 = 36 motor degrees 1 Rotation = 10 inches 2.2 inches • Circumference of wheel = π x Diameter = 3.14 x 2.2 = 6.9 inches • Degrees traveled per inch = 360 / 6.9 = 52 motor degrees 1 Rotation = 7 inches 1.2 inches • Circumference of wheel = π x Diameter = 3.14 x 1.2 = 3.8 inches • Degrees traveled per inch = 360 / 3.8 = 95 motor degrees 1 Rotation = 3.8 inches You can use a ruler or measuring tape to plan mission… NXT Programming - Tony Ayad
Programming Process • Analysis and Planning Steps • Define the problem • Brainstorm solution and select one • KEEP IT SIMPLE! • Plan and create a flowchart and take measurements • Programming suggestions • Divide the program into small pieces • Program one pieces at a time • Example: Move the robot to black line • Once the step is consistently repeatable, go to the next • Whenever possible reuse repeatable combination of blocks using MYBLOCK • Ask for help • http://forums.usfirst.org/forumdisplay.php?f=24 • The questions should be generic and not specific to strategy NXT Programming - Tony Ayad
Tips • For moving straight, the MOVE block has a built-in PID to synchronize the movement of “B” & “C” motors. If one motor falls behind, the MOVE block compensate by applying more power to that motor. The MOVE block is ideal for moving the robot straight. • For driving the robot, use the B & C motor ports; the A port should be used for the robot’s arm. • Using full motor power (100%) may cause erratic robot movement, use 75% or less. • Conversely, too little power (below 25%) may cause the robot to stall. • Brake at the end of each MOVE block to take advantage of the PID which self corrects to achieve more precise moves. • Using Degrees is a more accurate way to move motors; using time, will be inconsistent when the batteries become weak • The MOVE block also keeps track of “errors” that accumulate in multiple blocks and adjusts itself. • Use the brake option and also use the RESET block. • REMEMBER: the tradeoff between speed and accuracy! • Watch battery voltage • If you are using the rechargeable Lithium Ion battery, stop programming and recharge it when it falls below 7.8 – the highest voltage is 8.3. • If you use Alkaline batteries, replace them at 7.8 – their highest voltage is 9.4 NXT Programming - Tony Ayad