Download
1 / 27
290 likes | 311 Views
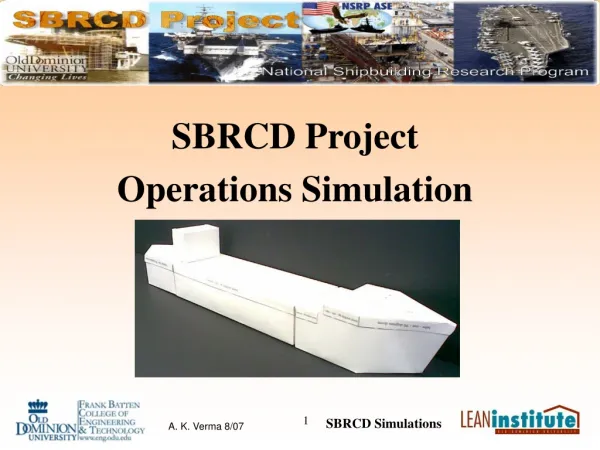
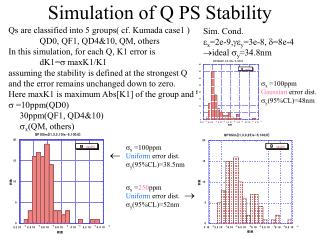
SBRCD Project Ship Stability Simulation. Contents of The Kit. Water Tank Foam Model Weights (15 Washers) Marker Ruler Student Handouts Work Sheets. Things Needed. Calculator Salt ( 1 cup per group). Ship Stability Simulation.

E N D
SBRCD Project Ship Stability Simulation
Contents of The Kit • Water Tank • Foam Model • Weights • (15 Washers) • Marker • Ruler • Student Handouts • Work Sheets
Things Needed • Calculator • Salt ( 1 cup per group)
Ship Stability Simulation General Guidelines: • This simulation will demonstrate the effect of center of gravity and center of buoyancy on ship’s stability. • This activity requires 2 class periods. • At the end of simulation activity please wipe off sketcher marks ( with paper napkins) on the foam model. • First we look at the terminology related to ships which will be helpful while performing simulation activity.
Terminology • Center of Buoyancy (CB): It is the center of mass of the immersed part of ship or floating body. • Center of Gravity (CG): It is the point on the body where all the weight of the body can be considered to be concentrated. • Both of these are shown in the following slide as points B and G respectively.
Terminology • Displacement of ship = Weight of the displaced water. • Draft: Vertical distance measured from waterline to keel (deepest point of ship). • Reserve Buoyancy: Volume of watertight portion above waterline. • Freeboard: Vertical distance from waterline to main deck. These are illustrated in the next slide
Archimedes Principle A ship sinks until the weight of the water displaced by the underwater volume is equal to the weight of the ship Force of Gravity: G = mship *g = Wship Force of Buoyancy: B = water * Vdisplaced Day 1 simulation activity uses this principle.
Part –A, Locating Center of Buoyancy (CB) • Use the foam ship model with X-Y grid printed on the top surface. • Fill the tank up to the mark and place the model in the tank. • Place the weights (3 washers) at different locations on the grid, locate the position where model remains level with respect to the water line, indicating the position of center of buoyancy in X- Y plane. • Mark the location by drawing circle inside the washer with a sketcher (Draw lightly).
Part –A, Steps in Locating the Center of Buoyancy (CB) Model not level with waterline 1. Fill the tank with water till the marked line. Place the model in the tank. 2. Place the weights at different locations and check the level of model from all sides.
Day 1: Part –A, Steps in Locating the Center of Buoyancy (CB) (Contd.) Model level with waterline 3. Location of washer indicates the position of CB when model is level . 4. Draw a circle inside the washer to mark the position.
Day 1: Part- A, Locating Center of Buoyancy (CB) (Contd.) • Take the foam model out of water and mark the center of the circle as the center of buoyancy (CB). (Use a sketcher only to mark CB) • Record the X & Y coordinates of CB. Note the coordinates on the worksheet to one decimal place. (Use a ruler to measure the location of CB) • Each grid is a 1cm x 1cm square.
5. Mark the center of circle as CB. 6. Note down X-Y coordinates, do not draw lines on the grid.
Day 1: Part-B, Finding Weight of the Displaced Water • In this activity we place weights (washers) at the location of CB on the model until the water line is at the top surface of the model. (Water should not cover the top surface.) • At this point the weight of the washers is equal to the weight of the displaced water. (Weight of the foam model is very small) • Count the washers needed and multiply by the weight of each washer to obtain total weight. • This is the weight of the water displaced by the model. • Next, we calculate the weight of the displaced water analytically.
Water Level Weights are placed on the foam model such that the model is submerged completely except the top surface.
Volume of Water Displaced Water Level V Draft = Thickness V=Volume of Displaced Water Rear View of the Foam Model
Work Sheet 1. h1 = cm, h2 = cm, b1 = cm 2. A1 = 0.5 * h1 * b1 = sq.cm 3. A2 = h2 * b1 = sq. cm 4. Area = A =A1 + A2 = sq. cm 5. Thickness = cm 6. Thus, Volume(V) of water displaced by the model : V = A * Thickness = cu. cm 7. Convert units from cu. cm. to cu. m. h1 A1 A2 h2 b1
Work Sheet ( Contd.) 8. Weight of water displaced by the model ( Density of water = 1000 kg/m3 ) = Volume * Density of water = kg 9. Coordinates of Center of Buoyancy: XB = cm, YB = cm 10. Number of washers required to submerge the model = N = (Weight of each washer = 0.32 kg) 11. Weight of washers = N * 0.32 = kg (Compare the answers for weight of washers and the weight of displaced water. Are they equal ? )
Effect of Salinity of Water • Previous activity is repeated for the saline water. • A salt packet containing two cups of salt is provided in the kit along with a cup which can be used for stirring the water. • Make sure the salt has dissolved evenly. • Place the model in the salt water. • Place the same amount of weight used in the previous section on the model (at CB). • Note the change in the draft.
Day 2: Effect of Salinity of Water Water Level Draft Draft in Fresh Water Draft in Saline Water
Level difference in red lines indicate the draft change Day 2: Effect of Salinity Water Line 1. Fill water till marked line. Mix salt in water. 2. Observe the change in draft.
Draft Comparison – Effect of Salinity Salt Water Fresh Water In salt water, the buoyancy is higher than the fresh water
Assessment The students will be assessed based on following 5 criteria: • Was the water filled to accurate level? • Was the center of buoyancy correctly marked? • Is the volume of displaced water correctly calculated? • Is the weight of displaced water correctly calculated? • Was the understanding of the effect of salinity on buoyancy adequate?
Wrap Up • Wipe off sketcher marks with paper towel.(Do not use eraser.) • Drain water from the tank and wipe off the tank completely. • Put the handouts back into the box. • Put the other parts back in the box.