Download
1 / 13
140 likes | 514 Views
Dimensioning . Chapter 15 of Text. Objectives. Learn the basic rules for good dimensioning Be able to correctly dimension engineering drawings Note: There are many rules and guidelines for proper dimensioning. This module will highlight the main topics covered in Chapter 15 of the text.

E N D
Dimensioning Chapter 15 of Text Dimensioning
Objectives • Learn the basic rules for good dimensioning • Be able to correctly dimension engineering drawings • Note: There are many rules and guidelines for proper dimensioning. This module will highlight the main topics covered in Chapter 15 of the text. Dimensioning
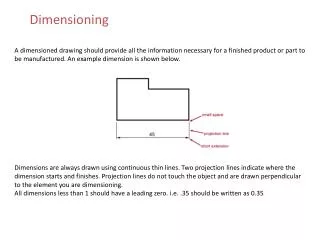
Basic Dimensioning Dimensioning is used to define an object so that it could be manufactured and must: • Define the overall size of the part in all 3 dimensions. • Define the size and location of the features of the part in all 3 dimensions. Dimensioning
Basic Dimensioning .75 .75 2 2 .25 1 2 2 Overall Size Features Size and Location Dimensioning
Basic Dimensioning .5 .5 1 1 R1 R1 Ø1 Overall Size Features Size and Location Dimensioning
Baseline versus Chain Dimensioning • There are many ways to use dimensions to locate features. • Baseline • Chain (Both techniques are acceptable, however baseline dimensions are preferred.) Baseline Dimensioning Chain Dimensioning Dimensioning
Rule 1: Appropriate View Each dimension should be placed in a descriptive or characteristic view without dimensioning to hidden lines Dimensioning
Rule 2: Clarity Dimensions should be located outside the boundaries of the object whenever possible and should be spaced far enough apart to be read clearly Dimensioning
Rule 3: Location of Dimensions • Dimensions that are shared between two views should be located between those views Dimensioning
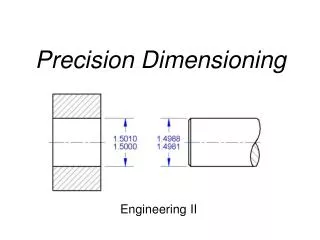
Rule 4: Cylinders • Positive cylinder (e.g. a rod) – dimension in a view where the side of the cylinder appears as a rectangle. • Negative cylinder (e.g. a hole) – dimension in the view where the cylinder appears as a circle. • A diameter symbol is always required before a numerical value. Dimensioning
Rule 5: Amount of Dimensions • Do not over-dimension or under-dimension an object Dimensioning
Circles and Arcs • Hole and Arc Details • Circular features of 360° - include ø the diameter symbolfollowed by a numerical value, e.g. ø5.0 • Circular features of < 360° - include R the radius symbolfollowed by a numerical value, e.g. R5.0 • A centermark represents the center of an arc or circle and is used for dimensioning feature locations • Centerlines are used in the view where the circular feature appears as a rectangle Symmetry When symmetry is used to reduce complexity a note must be added Options include: Symmetrical from left to right, front to back, top to bottom Dimensioning
Dimensioning • Use this time to practice proper dimensioning. • In class assignment Dimensioning