Download
1 / 31
310 likes | 329 Views
Wrapped Animal Drawings Using Cross Contour Lines. Drawing and Painting 2. Step 1. Find an image of an animal Can be found in a magazine, book, or the internet Image should be about the size of an index card or bigger

E N D
Wrapped Animal DrawingsUsing Cross Contour Lines Drawing and Painting 2
Step 1 • Find an image of an animal • Can be found in a magazine, book, or the internet • Image should be about the size of an index card or bigger • Image should be preferably of an animal’s head, or upper half of their body • Find an image with the animal’s mouth open • The animal should take up about ¾ of the page to create an interesting composition
Step 2 • Grid your image using 1” x 1” squares
Step 3 • Grid your white paper. • I would suggest enlarging your image. • For example, if your original photograph had 1” x 1” squares, I would suggest creating 2” x 2” squares, or even 3” x 3” squares
Step 4 • Copy the image exactly as shown from the photograph onto your white paper • Be sure to copy exactly what you see, box by box • Use a LIGHT pencil • Create a CONTOUR line drawing
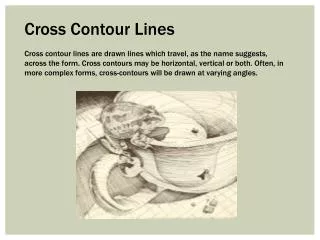
Step 5 • Create CROSS CONTOUR lines through your piece • These will act as the “ribbons” in which wrap around your animal • Take into consideration the space between each ribbon • Suggestion: Make the ribbons, then go back and erase your some to show how they overlap
Step 6 • Once approved, outline your entire drawing in sharpie marker • Outline the ribbons, and the entire animal
Step 7 • Using pencils, shade the ribbons which wrap your animal • Take into consideration the different types of pencils • Take into consideration the value changes as the ribbons overlap
Step 8 • Shade the mouth and eyes last, using colored pencil • To make them look realistic, consider adding a strong highlight or reflection!
Step 9 • Using sharpie, go back into the spaces between the ribbons, and color solid black between
Extra Things to Consider • The bigger the space between the ribbons, the more black will be added • Therefore, it will create more of a shaded area, or an area going back into space
Requirements • Approved portrait of an animal • Complete an accurate line drawing that uses 3/4’s of the page • Must “wrap” your animal with contour line ribbons of varying lengths and widths • Shade using pencils • Complete eyes and mouth with colored pencils to make them realistic • Complete rubric and questions for a grade