Download
1 / 10
100 likes | 193 Views
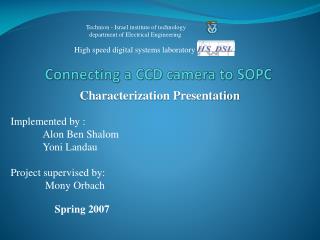
Technion - Israel institute of technology department of Electrical Engineering. Connecting a CCD camera to SOPC. High speed digital systems laboratory. A single semester Project Mid Semester Presentation. Implemented by : Alon Ben Shalom Yoni Landau Project supervised by:

E N D
Technion - Israel institute of technology department of Electrical Engineering Connecting a CCD camera to SOPC High speed digital systems laboratory A single semester Project Mid Semester Presentation Implemented by : Alon Ben Shalom Yoni Landau Project supervised by: Mony Orbach Spring 2007
Agenda • Project Goals • Block Diagram • Tasks accomplished • Stages of the project • Schedule
Project Goals • Capture a single frame and forward it to • BRAM using Virtex II PRO. • Retrieve data from BRAM to PC Please note that project goal was changed: We believe that it is possible to store one frame in BRAM as originally stated (instead of storing the data in SDRAM) There is no need for voltage transformation, both the XUP and camera work with same standard (TTL)
Data to/from adapter (from there to the camera) Data to/from adapter (from there to XUP) Block Diagram Adapter Vertex II PRO ov5017 M4088 XUP External power supply
M4088 is a ¼ ” Monochrome digital camera The M4088 digital camera is based on OV5017 CCD chip manufactured by OmniVision. Chip Interface : M4088 camera module. M4088
Tasks accomplished • Counter Implementation • Design of a custom IPIF that contains a 32bit register connected to OBP BUS. • Implementation of C code that initializes the register to a certain value and increase the value by 1 in a loop. • BRAM control • Write to memory • Read from memory
Pseudo code and animation Initialize the register Read the value in the register Add 1 Save result in the register If not done go to step 2
Actual EDK scheme Processor OBP2PLB BRIDGE Our IP OPB PLB
Stages of the Project • Dive in spec of Virtex II pro & CCD camera • Get familiar with development tools (EDK , VHDL…) • Submit mid term report • Design the interface Connector (much less resource since we don’t need to convert voltage) • Understand how to control the low speed connectors (timing, voltage) • Write VHDL and C code • Integrate all components to achieve a working system • Submit final report
Schedule • 12-26/6 • Understand how to control the low speed connectors in pin resolution • Create a pin to pin diagram • 27/6 – 10/7 • Build an interface connection between camera & SOPC (in background) • Implement main VHDL and C code • 11/7 – 2/8 • Debug HW/SW – making all players work out together