Download
1 / 38
380 likes | 497 Views
The Four Lifts. Strength and Conditioning Fall Semester. Bench Press Info. The person lies on his or her back, lowers a weight to chest level, and then pushes it back up until the arms a fully extended (straight). Upper body exercises that focuses on the pectoralis major muscle.

E N D
The Four Lifts Strength and Conditioning Fall Semester
Bench Press Info • The person lies on his or her back, lowers a weight to chest level, and then pushes it back up until the arms a fully extended (straight). • Upper body exercises that focuses on the pectoralis major muscle. • It is one of the three lifts in the sport of powerlifting.
Bench Press • Lie back on a flat bench. Using a medium width grip (a grip that creates a 90-degree angle in the middle of the movement between the forearms and the upper arms), lift the bar from the rack and hold it straight over you with your arms locked. This will be your starting position. • From the starting position, breathe in and begin coming down slowly until the bar touches your middle chest.
Bench Press • After a brief pause, push the bar back to the starting position as you breathe out. Focus on pushing the bar using your chest muscles. Lock your arms and squeeze your chest in the contracted position at the top of the motion, hold for a second and then start coming down slowly again. Tip: Ideally, lowering the weight should take about twice as long as raising it.
Bench Press • Repeat the movement for the prescribed amount of repetitions. • When you are done, place the bar back in the rack.
Caution • If you are new at this exercise, it is advised that you use a spotter. If no spotter is available, then be conservative with the amount of weight used. • Also, beware of letting the bar drift too far forward. You want the bar to touch your middle chest and nowhere else. • Don't bounce the weight off your chest. You should be in full control of the barbell at all times.
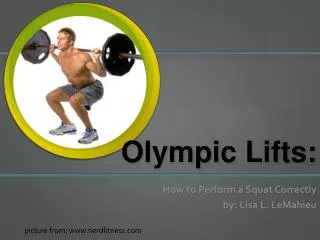
Squat Info • The movement starts from a standing position with a bar braced across the upper back. The person initiates the squat by moving their hips back and bending their knees and hips to lower the torso to the floor and then returning to the upright position. • Primary muscles involved glutes, quads, and hamstrings. • This is one of three lifts in powerlifting.
Squat • This exercise is best performed inside a squat rack for safety purposes. To begin, first set the bar on a rack to just below shoulder level. Once the correct height is chosen and the bar is loaded, step under the bar and place the back of your shoulders (slightly below the neck) across it. • Hold on to the bar using both arms at each side and lift it off the rack by first pushing with your legs and at the same time straightening your torso.
Squat • Step away from the rack and position your legs using a shoulder width medium stance with the toes slightly pointed out. Keep your head up at all times and also maintain a straight back. This will be your starting position. (Note: For the purposes of this discussion we will use the medium stance described above which targets overall development; however you can choose any of the three stances discussed in the foot stances section).
Squat • Begin to slowly lower the bar by bending the knees and hips as you maintain a straight posture with the head up. Continue down until the angle between the upper leg and the calves becomes slightly less than 90-degrees. Inhale as you perform this portion of the movement. Tip: If you performed the exercise correctly, the front of the knees should make an imaginary straight line with the toes that is perpendicular to the front. If your knees are past that imaginary line (if they are past your toes) then you are placing undue stress on the knee and the exercise has been performed incorrectly
Squat • Begin to raise the bar as you exhale by pushing the floor with the heel of your foot as you straighten the legs again and go back to the starting position • Repeat for the recommended amount of repetitions.
Caution • This is not an exercise to be taken lightly. If you have back issues, substitute it with the dumbbell squat variation or a leg press instead. If you have a healthy back, ensure perfect form and never slouch the back forward as this can cause back injury. Be cautious as well with the weight used; in case of doubt, use less weight rather than more. The squat is a very safe exercise but only if performed properly.
Phase 1: Starting Position • Stand with your feet slightly wider than shoulder width apart and toes pointing out slightly. • Squat down and grasp bar with a closed, pronated grip. Your hands should be slightly wider than shoulder width apart outside knees with elbows fully extended. • Place the bar about 1 inch in front of your shins and over the balls of your feet.
Phase 1 • Your back should be flat or slightly arched, your chest held up and out and your shoulder blades should be retracted. • Keep your head in a neutral position (in line with vertebral column and not tilted or rotated) with your eyes focused straight ahead. Inhale during this phase.
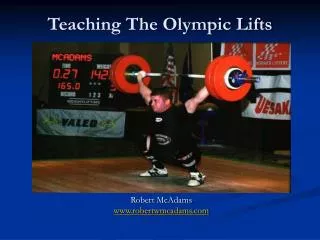
Phase 2: First Pull Phase • Lift the bar from the floor by forcefully extending the hips and the knees as you exhale. Tip: The upper torso should maintain the same angle. Do not bend at the waist yet and do not let the hips rise before the shoulders (this would have the effect of pushing the glutes in the air and stretching the hamstrings.
Phase 2 • Keep elbows fully extended with the head in a neutral position and the shoulders over the bar. • As the bar raises keep it as close to the shins as possible.
Phase 3: Transition or Scoop • As the bar passes the knees, thrust your hips forward and slightly bend the knees to avoid locking them. Tip: At this point your thighs should be against the bar. • Keep the back flat or slightly arched, elbows fully extended and your head neutral. Tip: You will hold your breath until the next phase.
Phase 4: Second Pull Phase • Inhale and then forcefully and quickly extend your hips and knees and stand on your toes. • Keep the bar as close to your body as possible. Tip: Your back should be flat with the elbows pointed out to the sides and your head in a neutral position. Also, keep your shoulders over the bar and arms straight as long as possible.
Phase 4 • When your lower body joints are fully extended, shrug the shoulders upward rapidly without letting the elbows flex yet. Exhale during this portion of the movement. • As the shoulders reach their highest elevation flex your elbows to begin pulling your body under the bar
Phase 4 • Continue to pull the arms as high and as long as possible. Tip: Due to the explosive nature of this phase, your torso will be erect or with an arched back, your head will be tilted back slightly and your feet may lose contact with the floor.
Phase 5: Catch Phase • After the lower body has fully extended and the bar reaches near maximal height, pull your body under the bar and rotate the arms around and under the bar. • Simultaneously, flex the hips and knees into a quarter squat position
Phase 5 • Once the arms are under the bar, inhale and then lift your elbows to position the upper arms parallel to the floor. Rack the bar across the front of your collar bones and front shoulder muscles. • Catch the bar with an erect and tight torso, a neutral head position and flat feet. Exhale during this movement. • Stand up by extending the hips and knees to a fully erect position.
Phase 6: Downward Movement • Lower the bar by gradually reducing the muscular tension of the arms to allow a controlled descent of the bar to the thighs. Inhale during this movement. • Simultaneously flex the hips and knees to cushion the impact of the bar on the thighs. • Squat down with the elbows fully extended until the bar touches the floor.
Incline Bench Info • Focuses on the anterior deltoid muscles.
Incline Bench Press • Lie back on an incline bench. Using a medium-width grip (a grip that creates a 90-degree angle in the middle of the movement between the forearms and the upper arms), lift the bar from the rack and hold it straight over you with your arms locked. This will be your starting position
Incline Bench Press • As you breathe in, come down slowly until you feel the bar on you upper chest.
Incline Bench Press • After a second pause, bring the bar back to the starting position as you breathe out and push the bar using your chest muscles. Lock your arms in the contracted position, squeeze your chest, hold for a second and then start coming down slowly again. Tip: it should take at least twice as long to go down than to come up.
Incline Bench Press • Repeat the movement for the prescribed amount of repetitions • When you are done, place the bar back in the rack.
Caution • If you are new at this exercise, it is advised that you use a spotter. If no spotter is available, then be conservative with the amount of weight used. Also, beware of letting the bar drift too far forward. You want the bar to fall on your upper chest and nowhere else.
Spotting • Spotting is the act of supporting another person during a particular exercise, with an emphasis on allowing the participant to lift or push more he could normally do safely. • Correct spotting involves knowing when to intervene and assist with a lift, and encouraging a training partner to push beyond the point in which they would normally 'rack' the weight (return it to its stationary position)
Reason For A Spotter • Ensure proper technique of the lifter. • Protection from dropping the bar • Protection from straining too much during the lift. • Protecting the weight lifting equipment. • Protection for other weightlifters in the vicinity.
Safe Spotting Technique • Communication between lifter and spotter. • Understanding of proper weight lifting technique and weight lifting in general. • Understanding of weight lifting equipment • Possessing adequate strength to help the lifter if needed.