Download
1 / 22
230 likes | 293 Views
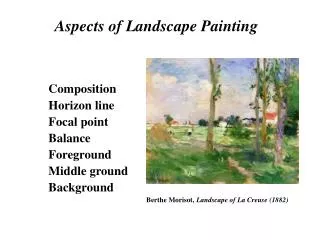
WATERCOLOUR PAINTING TECHNIQUES and DEVELOPING YOUR LANDSCAPE PIECE. WHAT IS WATERCOLOUR PAINTING?. *Painting is done on watercolour papers. * A method of painting that mixes pigments with water. * Used in China as early as the 3rd century.

E N D
WATERCOLOUR PAINTING TECHNIQUES and DEVELOPING YOUR LANDSCAPE PIECE
WHAT IS WATERCOLOUR PAINTING? *Painting is done on watercolour papers * A method of painting that mixes pigments with water. * Used in China as early as the 3rd century. * The method used today was developed in England in the 18th century.
TWO THINGS TO REMEMBER ABOUT WATERCOLOUR PAINTING ARE: 1) It is always unpredictable…you never know what you’ll end up with! 2) Dark paint is always laid over light, so you need to preplan your image.
WET ON DRY WET-ON-DRY TECHNIQUE • The “Classic” technique • Watercolour paint applied to a DRY surface. • Each new wash is laid over paint that has already dried. • Colours are built up in washes, with highlights left as white paper.
WET ON WET WET-ON-WET TECHNIQUE: • Apply watercolour paint to WET paper. • Paint is applied BEFORE the next colour has dried, so that they run together and create soft edges. • Paper surface must be damp to start and stay damp through the entire process.
WASH / VARIGEATED WASH WASH / VARIGEATED WASH • A thin layer of paint that is laid over the entire paper surface, or a portion of it. • Can be applied with a brush or a sponge. • Must be applied quickly • Paint is premixed and ready to use before you start the wash. • One colour is used. • A varigeated wash uses more than one colour. Colours bleed into one another. • Paint is applied to WET paper which makes the colours bleed together.
GRADATED WASH GRADATED WASH • A wash that shifts from dark to light in one colour. • Applied the same as a wash, with more water added to your paint for each line of wash that is laid down.
DRY BRUSH DRY BRUSH • Start with a light wash. • Use a dry brush to add more saturated and bolder colour.
LIFTEING WET PAINT LIFTING WET WATERCOLOUR PAINT Wad up some facial tissues and use them as a negative painting tool. Facial tissues are absorbent and leave a softer-edged impression. Use gentle pressing and twisting, or a dabbing motion. If you try to scrub with a facial tissue, most will fall apart and soil your washes. Excellent for clouds, soft lighting effects, and puddle control as you paint.
LIFTING DRY WATERCOLOUR PAINT LIFTING DRY PAINT Any of your regular watercolor brushes can be used to lift dry watercolor paint. Use clear water with a gentle scrubbing motion, blotting carefully with a drier brush or tissue as you go. Using soft hair brushes creates a softer edge but is less effective at loosening the dried paint from the paper. This method offers greater control in the areas you are lightening.
SPRAY TEXTURE SPRAY TEXTURE • A technique applied over washes using an old toothbrush. • Only the area to be spattered is left uncovered during this process; all other areas of the work are protected with newsprint.
TISSUE PAPER WATERCOLOUR TEXTURES TISSUE PAPER The surface should be wet and saturated with watercolor paint in strong colors. Being careful to cover the entire area, positioned the tissue over the wash and gentle pressed down with my palms. Do not press the tissue entirely flat, allowing the crinkles and creases to do their job.
BUILDING UP Begins by laying wash all over the paper, leaving empty ONLY spaces that you want to remain white. *Lay other washes over select areas to intensify colours.
Done after a background has been built up. Once all built-up washes are dry, you intensify and add details to your work by putting darker washes and individual brushstrokes overtop. OVERPAINTING
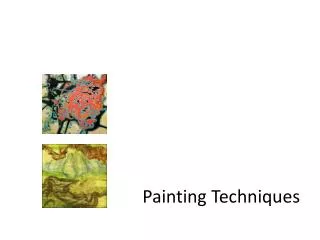
WET-IN-WET WET-ON-DRY DRY BRUSH GRADATED WASH LIFTING WET PAINT WASH / VARIGEATED WASH LIFTING DRY PAINT TISSUE PAPER SPRAY TEXTURE
HOW TO… https://www.youtube.com/watch?v=PaYGCKM8OLw&index=5&list=PLBqlzCEZSxOawhdLZVC_PgyBmEqKFcK2I