Download
1 / 7
70 likes | 263 Views
Tutorial on Dimensioning . Standard Grade and Higher Graphic Communication. © J Lewis 2004. General Principles. A drawing should provide a complete set of sizes for making a component. Dimensions provide information on a drawing such as - Angles Diameters Lengths Positions.

E N D
Tutorial on Dimensioning Standard Grade and Higher Graphic Communication © J Lewis 2004
General Principles • A drawing should provide a complete set of sizes for making a component. • Dimensions provide information on a drawing such as - • Angles • Diameters • Lengths • Positions © J Lewis 2004
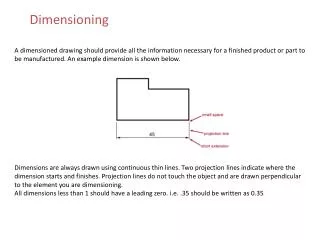
British Standards - AutoCad A - The drawing outline should be drawn with 0.7mm thickness. B - Dimension and projection lines are thin continuous lines 0.35mm thick. C - All dimension lines are clearly placed outside the outline of the drawing. D - The projection lines should not touch the drawing but a small gap should be left. E - The projection lines should continue past the dimension line. F - Arrowheads should be triangular and of uniform size and shape and filled in. G - Arrowheads must touch the projection line to which they refer.
H - Begin by dimensioning the view which gives the clearest understanding of the component shape. I - Place dimensions outside the shape of the component wherever possible. J - Position the shortest dimension nearest to the component to prevent dimension lines crossing. K - Use a similar spacing between dimension lines to ensure a neat diagram.
L - Measure horizontal sizes from left to right and write the distance on top of the dimension line. Angled sizes are shown in a similar manner to horizontal sizes. M - Measure vertical sizes from bottom to top and write the distance vertically to the left of the dimension line. N - Small sizes are shown with the arrows placed outside. O - Place the largest sizes on the outside of the dimensional grid. P - Sizes from a datum line are logically set out. Homework – Now add six dimensions to one of your drawings for your teacher to check. This kind of question comes up in the exam almost every year.
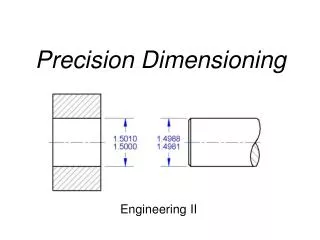
Dimensioning Circles Dimension circles as shown. Holes are always dimensioned as diameters.
Dimensioning Angles Dimension angles as shown.