Download
1 / 70
710 likes | 880 Views
02- AC Theory. The intent of this presentation is to present enough information to provide the reader with a fundamental knowledge of Alternating Current and to better understand basic Michelin system and equipment operations. Module 3: Alternating Current. Electromagnetism

E N D
The intent of this presentation is to present enough information to provide the reader with a fundamental knowledge of Alternating Current and to better understand basic Michelin system and equipment operations.
Module 3: Alternating Current Electromagnetism In 1819 a Danish scientist named Oersted discovered a relation between magnetism and electric current. He found that an electric current flowing through a conductor produced a magnetic field around that conductor. Below we see that iron filings in a definite pattern of concentric rings around the conductor show the magnetic field of the current in the wire.
Module 3: Alternating Current Electromagnetism Every section of the wire has this magnetic field of force around it in a plane perpendicular to the wire. The strength of the magnetic field around a conductor carrying current depends on the magnitude of the current. A high current will produce many lines of force extending far from the wire, while a low current will produce only a few lines close to the wire.
Module 3: Alternating Current Electromagnetism Left-Hand Rule for a Single Conductor The left-hand rule is a convenient way to determine the relationship between the flow of current in a conductor (wire) and the direction of the magnetic lines of force around the conductor. Grasp the current-carrying wire in the left hand, wrapping the four fingers around the wire and extending the thumb along the wire. If the thumb points along the wire in the direction of current flow, the fingers will be pointed in the direction of the lines of force around the conductor.
Module 3: Alternating Current Electromagnetism Illustrating a Magnetic Field around a Single Conductor It is difficult to show current flow in a third dimension without introducing two new symbols. To illustrate current flowing toward you, or out of the page, the point of the arrow is often represented by a dot. For current flowing away from you, or into the page, a cross represents the tail of the arrow. The magnetic field around a single conductor does not have a north or South Pole, but it does have a direction. Note the direction of the magnetic and the symbols for current flow in the illustrations below:
Module 3: Alternating Current Electromagnetism Magnetic Fields Aiding or Canceling In the illustration below the magnetic fields are shown for two parallel conductors with opposite directions of current. By applying the left-hand rule for conductors, you determine the clockwise direction of the field of the conductor on the left and counterclockwise field direction of the conductor on the right. Because the magnetic lines between the conductors are in the same direction, the fields repel each other and tend to cancel their effect.
Module 3: Alternating Current Electromagnetism In the illustration below the magnetic fields are shown for two parallel conductors with currents flowing in the same direction. By applying the left-hand rule for conductors, you determine the clockwise direction of the field of the conductor on the left and the conductor on the right. Because the magnetic lines between the conductors are in the opposite direction, the fields attract each other and aid in their effect.
Module 3: Alternating Current Electromagnetism Magnetic Fields and Polarity of a Coil Bending a straight conductor into the form of a single loop has two results. First, the magnetic field lines are denser inside the loop, although the total number of lines is the same as for the straight conductor. Second, all the lines inside the loop are aiding in the same direction. A coil of wire is formed when there is more than one loop or turn. To determine the magnetic polarity of a coil, use the left-hand rule for a coil. If the coil is grasped with the fingers of the left hand curled in the direction of current flow through the coil, the thumb points to the North Pole of the magnetic field created by the coil. This is illustrated on the following page.
Module 3: Alternating Current Electromagnetism If the direction of the current flow is changed as below, you can see that the polarity of the magnetic field changes. You could also wrap the conductors the opposite direction to change the polarity of the magnetic field. .
Module 3: Alternating Current Electromagnetism Strength of an Electromagnetic Field The strength, or intensity, of a coil's magnetic field depends on a number of factors. The major factors are listed below. 1. The number of turns of the conductor 2. The amount of current flow through the coil 3. The ratio of the coil's length to its width 4. The type of material in the core
Module 3: Alternating Current Electromagnetism Strength of an Electromagnetic Field The strength, or intensity, of a coil's magnetic field depends on a number of factors. The major factors are listed below. 1. The number of turns of the conductor 2. The amount of current flow through the coil 3. The ratio of the coil's length to its width 4. The type of material in the core Electromagnetic Applications If a bar of iron or soft steel is placed in the magnetic field of a coil, the bar will become magnetized. If the magnetic field is strong enough, the bar will be drawn into the coil until it is approximately centered within the magnetic field. This attraction and centering effect is termed as solenoid action.
Module 3: Alternating Current Electromagnetism Electromagnetism is basic to the operation of many common electrical and electronic devices. Electromagnetic coils are used in contactors, relays, and solenoid valves. These devices use this solenoid action concept. The solenoid is a coil of wire with a moveable iron core. When a soft iron core is placed near one end of an energized coil, the lines of force are concentrated through the iron core. The magnetic attraction pulls the core into the center of the coil as shown below. When the coil is de-energized, the electromagnetic field collapses and there is no longer a magnetic force holding the core inside the coil. A spring attached to one end of this iron core will pull it back out of the coil to its initial position. The movement of the core in response to the magnetic pull of the coil provides us with a mechanical movement we can use. This type of movement is known as solenoid action. This mechanical movement can be used to close a valve, close a set of open contacts, or open a set of closed contacts.
Module 3: Alternating Current Electromagnetism The relay circuit shown below is a basic illustration of the operation of a control relay.
Module 3: Alternating Current Electromagnetic Induction In 1831 Michael Faraday discovered the principle of electromagnetic induction. It states that if a conductor cuts across lines of magnetic force, or if lines of force cut across a conductor, a voltage is induced across the ends of the conductor. Consider a magnet with its lines of force extending from its north pole to its south pole as below. A conductor C, which can be moved between the poles, is connected to a sensitive voltmeter called a galvanometer G. When the conductor is not moving, the galvanometer shows zero volts. If the conductor is moving outside the magnetic field at position 1, the galvanometer will still show zero. When the conductor is moved to the left to position 2, it cuts across the lines of magnetic force and the galvanometer pointer will deflect to B. This indicates that a voltage was induced across the conductor because lines of force were cut. In position 3, the galvanometer pointer swings back to zero because no lines of force are being cut. Now reverse the direction of the conductor by moving it right through the lines of force back to position 1. During this movement, the pointer will deflect to A, showing that a voltage has again been induced across the conductor, but in the opposite direction. If the conductor is held stationary in the middle of the field of force at position 2, the galvanometer reads zero. If the conductor is moved up or down parallel to the lines of force so that none is cut, no voltage will be induced.
Module 3: Alternating Current Electromagnetic Induction In summary, when a conductor cuts lines of force or lines of force cut a conductor, a voltage is induced across the conductor. There must be relative motion between the conductor and the lines of force in order to induce a voltage. Changing the direction of cutting will change the direction of the induced voltage.
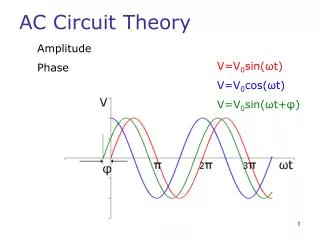
Module 3: Alternating Current Introduction to Alternating Current The majority of electrical energy is produced in large power stations and is transmitted throughout the country on long distribution lines. Using a D.C. voltage source would be difficult and costly. The batteries and the conductors would have to be very big. All voltages would have to be essentially the same. However, by using an Alternating Current (A.C.), power may be transmitted much more simply and efficiently. Therefore, A.C. generation and transmission has become a standard practice throughout the world. Generating an Alternating Voltage An A.C. voltage is one that continually changes in magnitude and periodically reverses in polarity. The time axis or line is a horizontal line across the center. The vertical axis shows the changes in magnitude by the variations of the voltage.
Module 3: Alternating Current Introduction to Alternating Current In its simplest form the A.C. generator consists of a loop of wire rotating around an axis within a magnetic field. The magnetic field is produced between the pole faces of two permanent magnets. As the loop of wire rotates, the conductor is cutting lines of force of the magnetic field. Then by electro-magnetic induction a current is induced into the conductor. In reality this loop of wire would be a winding. The ends of the winding are connected to slip rings mounted on the shaft of the armature. The slip rings rotate with the armature. Brushes make contact with the slip rings enabling an external circuit to be connected as a load. Let's consider a cross sectional view of the armature loop as it is situated between the two magnetic poles. We can now use the left-hand generator rule to evaluate the currents induced into the armature and understand how this voltage is generated. First, we know that some mechanical force, such as a water wheel, steam turbine, or other driving mechanisms is rotating the generator shaft.
Module 3: Alternating Current Introduction to Alternating Current Use the illustration on the next page to evaluate the voltage being generated from the induced current. One side of the conductor loop is shaded so we can evaluate it as it moves in time. The horizontal line is related to time. Since this time is very small for one revolution of this conductor loop, we will relate the movement to the degrees of a circle. We will use the quadrants of the circle starting with quadrant one moving counter clockwise through quadrant two, then three and four. At the instant the loop starts to rotate in this counter clockwise direction, the conductor is moving parallel to the lines of force and no lines are being cut. Therefore, the current induced in the conductor is zero. As the rotation continues, the conductor starts to cut the lines of force at varying angles. As a result the magnitude of the induced current will vary. The maximum cutting rate is reached when the conductor is traveling at right angles to the lines of force. At this point the induced current will be at a maximum which generates the maximum voltage. As you can see from the illustration on the next page, the point that this maximum induced current and generated voltage is achieved is when the conductor is at 90° to the lines of force.
Module 3: Alternating Current Introduction to Alternating Current
N N + Voltage + Voltage 0 0 0 0 0 0 90 120 150 180 0 0 t(time) t(time) - Voltage - Voltage S S Module 3: Alternating Current 0 0 0 0 180 210 240 270 Introduction to Alternating Current As the conductor continues to rotate between 90° and 180°, the magnitude of the voltage will decrease back to zero.
N + Voltage t (time) 0 270 0 0 - Voltage S 0 0 0 300 330 360 Module 3: Alternating Current Introduction to Alternating Current As the conductor continues to rotate between 270° and 360°, the magnitude of the voltage will decrease back to zero. After one complete revolution of the loop, the cycle will continue to repeat itself. The voltage induced (or generated) is continually changing in magnitude, as well as, direction. This graphical representation of this continually changing voltage has produced a sine wave. For each pair of magnetic poles, one cycle of alternating current and voltage will be induced into the loop every revolution. The number of cycles in a given period of time, usually one second, is termed as the frequency. This waveform of voltage is sinusoidal.
Module 3: Alternating Current Introduction to Alternating Current AC Voltage Generation Summary A simple generation consists of a conductor loop turning in a magnetic field, cutting across the magnetic lines of force. A current is induced into the loop causing a voltage across the loop. The sine wave output is the result of one side of the generator loop cutting lines of force. In the first half of rotation, this produces a positive voltage and in the second half of rotation produces a negative voltage. This completes one cycle of AC generation.
Module 3: Alternating Current Definitions of an A.C. Sine Wave Instantaneous Voltage Value Now that we have generated this A.C. sine wave, we will look at the instantaneous voltage values and how they relate to time. Given that the conductor is rotating at a steady speed, we know that the sine wave will repeat after each revolution. We now need to be able to calculate the instantaneous value for the voltage at any time or degrees of this revolution. We know that the maximum number of flux lines is being cut at 90° and this is the maximum value of voltage generated. Let's assume that the 10 volt level is the maximum value being generated for the sake of these calculations. Since the lines of flux being cut at 30° are much less, we know that the voltage is also much less. How do we determine this value? The illustration on the next page represents the first part of the generation of the sine wave. We can use it to help us determine the instantaneous values for voltage.
Module 3: Alternating Current Definitions of an A.C. Sine Wave Instantaneous Voltage Value Using the laws of geometry, we know that the length of a radius of a circle is the same at 30° and 90°. The radius for 90° is equal to the maximum voltage (VMax). We now can draw a triangle and use trigonometry to solve for the instantaneous voltage value at 30°. VMax will be the hypotenuse, Vi will be the opposite side, and the angle at the center will be used for the sin function calculations. When we substitute the value of 10 volts for VMax and 30° for the angle and solve the equation as below: This instantaneous voltage relationship can be used for any value of degrees through the cycle. If we were to plot the instantaneous voltage values for each 30° increment, the result would be a sinusoidal waveform.
N + Voltage 0 0 0 0 0 30 60 90 t (time) - Voltage S Module 3: Alternating Current V Max V Max Definitions of an A.C. Sine Wave V Max V inst. 0 30
Module 3: Alternating Current Definitions of an A.C. Sine Wave Peak Voltage Value The peak value of voltage (Vpk) is the maximum value of voltage. It applies to the positive or negative peak and is sometimes called VMax. The peak-to-peak value of voltage (Vpk-pk) is double the peak value.
Module 3: Alternating Current Definitions of an A.C. Sine Wave Average Voltage Value The average value of voltage is the arithmetic average of all values in a sine wave for one half-cycle. The half-cycle is used for the average because over a full cycle the average value is zero. If we calculated all the instantaneous voltage values for any given half-wave of the sine wave, added all the values and divided the result by the number of calculations, we would derive the average value of voltage for that half-cycle. The average voltage value is used when the rectification of an A.C. voltage is necessary. If we assume the sine wave above has a maximum instantaneous voltage of 170 volts. The relationship established to derive the average value is as follows:
Module 3: Alternating Current Definitions of an A.C. Sine Wave Effective Voltage Value If one A.C. rms ampere passes through a resistance of 1 ohm, the rms voltage drop across the resistor is one volt rms. Therefore, the rms voltage is 0.707 of the instantaneous maximum voltage and is called the effective voltage. The conventional A.C. voltmeter measures this effective value of voltage. The same relationship exists between maximum and effective volts as between maximum and effective current. In all A.C. calculations, the V without a subscript will equal the Vrms value unless otherwise specified as with VMax or VPk.
Module 3: Alternating Current Definitions of an A.C. Sine Wave
Module 3: Alternating Current Definitions of an A.C. Sine Wave Instantaneous Current Value The instantaneous current value is calculated just as the instantaneous voltage was calculated. This instantaneous current relationship can be used for any value of degrees through the cycle. If we were to plot the instantaneous current values for each 30° increment, the result would be a sinusoidal waveform.
Module 3: Alternating Current Definitions of an A.C. Sine Wave Effective Current Value To derive the effective current value of an A.C. sine wave, we will use the sine wave shown above with an instantaneous maximum current of 10 amps. This waveform represents the induced current generated for a given circuit. If the current waveform is considered for one complete cycle, the average value would be zero since the negative alternation is equal to the positive alternation. If a typical D.C. ammeter were used to measure the current of this circuit, it would indicate zero. Therefore, to measure the alternating current, an A.C. ammeter that measures the effective value of current should be used.
Module 3: Alternating Current Definitions of an A.C. Sine Wave Effective Current Value The effective value of alternating current is based on its heating effect and not on the average value of the sine wave. An alternating current with an effective value of ten amperes is that current that will produce heat in a given resistance at the same rate, as does ten amperes of direct current. In D.C. theory, it is shown that the heating effect directly relates to the square of the current for a given resistance (P = I2R). The unit of measure of Power is watts and relates directly to heat. To derive the effective current value of the sine wave with an IMax of 10 amps, we would first decide the interval of time for our calculations. This interval of time could be 1° or any interval small enough to give us a very accurate calculation. We will use 15° increments in this derivation, since we are not going into detail for all the calculations.
Module 3: Alternating Current Definitions of an A.C. Sine Wave Effective Current Value We can calculate the instantaneous current values for each of the 15° increments starting with 0° up to 360°. Once we've calculated the instantaneous currents for each increment, we will square each value which relates to the heating effect. Then we can take the average of all those values. Finally, we will get the square root of the average value of the squared instantaneous values. This value is called the effective value or root-mean-square (rms) value. Root-mean-square current is the abbreviation of the square root of the mean of the square of the instantaneous values. A conventional A.C. ammeter measures the rms value of current. In all A.C. calculations, the I without a subscript will equal the Irms value unless otherwise specified as with IMax or IPk. The relationship of effective (rms) and maximum current is:
Module 3: Alternating Current Definitions of an A.C. Sine Wave Effective Current Value
Module 3: Alternating Current Frequency and Period The number of cycles per second is called frequency. It is indicated by the symbol f and is expressed in hertz (Hz). One cycle per second equals one hertz. Thus 60 cycles per second equals 60Hz. The amount of time for the completion of 1 cycle is the period. It is indicated by the symbol T for time and is expressed in seconds (s). Frequency and period are reciprocals of each other. If 60 cycles per second equals 60Hz, how much time does it take for one cycle to happen? How much time does it take for one-half of a cycle?
Module 3: Alternating Current Phase Relationships In phase relationship The waveforms below show that the voltage and current are at minimum and maximum values at the same time. These waveforms are said to be in phase with each other. The phase angle (q) between two waveforms of the same frequency is the angular difference at a given instant of time. When two waveforms are in phase, the phase angle (q) is zero. In AC circuit analysis, all waveforms will have a phase angle (q) relationship with 0° being the simplest.
Module 3: Alternating Current Phase Relationships Vectors To compare phase angles or phases of alternating voltages and currents, it is more convenient to use vector diagrams corresponding to the voltage and current waveforms. A vector quantity is one that has magnitude, as well as, direction. A vector is represented graphically, by an arrow type line segment whose length is proportional to the magnitude of the vector. The arrow points in the direction of the vector quantity. The length of the arrow in a vector diagram indicates the magnitude of the alternating voltage or current. The angle of the arrow with respect to the horizontal axis indicates the phase angle. One waveform is chosen as the reference. Then the second waveform can be compared with the reference by means of the angle between the vector arrows. Generally, the reference vector is horizontal, corresponding to 0°. The angles would then be measured in a counterclockwise direction. The following vector diagram shows the relationship between voltage and current from the previous waveforms. Since the voltage and current are in phase with each other, the vectors are in the same direction but have different magnitudes. The magnitudes are not to scale but do relate the difference in their value.
Module 3: Alternating Current Phase Relationships Vectors The following vector diagram shows the relationship between voltage and current from the previous waveforms. Since the voltage and current are in phase with each other, the vectors are in the same direction but have different magnitudes. The magnitudes are not to scale but do relate the difference in their value.
Module 3: Alternating Current Phase Relationships Resistance in AC Circuits In an AC circuit with only resistance, the current variations are in phase with the applied voltage. The vector diagram would be represented just as above. This in phase relationship between V and I means that such an AC circuit can be analyzed by the same methods used for DC circuits. Therefore, Ohm's laws for DC circuits are applicable also to AC circuits with resistance only. The calculations in AC circuits are generally in rms values, unless otherwise specified. For the series circuit below, let's look at the vector relationship between the applied voltage (VT) and the total current (IT). VT = 110 volts and R1 = 10Ω, find: IT
Module 3: Alternating Current Phase Relationships Out of phase relationship As mentioned previously, the phase angle (q) between two waveforms of the same frequency is the angular difference at a given instant of time. When two waveforms are in phase, the phase angle (q) is zero. When two waveforms are out of phase, the phase angle (q) is some value less than or greater than zero. As shown in the example below, the phase angle between waves V and I is 90°. The horizontal axis is shown in angular units of time, measured in degrees. Voltage waveform V starts at 0° at a value of 0 volts and reaches maximum value at 90°. Current waveform (I) is at 0 amps at 90° and a maximum value at 180°. Using 0° as a reference point to start, the voltage waveform is said to lead the current waveform. In this case the voltage leads the current by 90°.
Module 3: Alternating Current Phase Relationships Out of phase relationship The vector diagram for the out of phase condition is also illustrated below. As you can see the voltage and current are not happening at the same time with this out of phase condition. The relationship between voltage and current now has to be evaluated using the phase angle (q). In the next section, we will understand more about what causes this out of phase condition.
Module 3: Alternating Current • 3. Given: RT= 50Ω • Vi = 100V @ 75˚ • Find: IT= • 1. Given: RT= 100Ω • VT= 75V • Find: Ii @ 64˚ = Written Exercises . • 4. Given: RT= 45Ω • IT= 2A • Find: Vi @ 295˚ = • 2. Given: Vi= 75V @ 65˚ • Ii= 1.5A @ 50˚ • Find: RT=
Module 3: Alternating Current Reactance and Impedance Concepts Inductance in AC Inductance is the characteristic of an electrical circuit that opposes the starting, stopping, or changing of current flow. The above statement is of such importance to the study of inductance that it bears repeating in a simplified form. Inductance is the characteristic of an electrical conductor or circuit, which opposes a CHANGE in current flow. Michael Faraday started to experiment with electricity around 1805 while working as an apprentice bookbinder. It was in 1831 that Faraday performed experiments on magnetically coupled coils. A voltage was induced in one of the coils due to a magnetic field created by current flow in the other coil. From this experiment came the induction coil. In performing this experiment Faraday also invented the first transformer, but since alternating current had not yet been discovered the transformer had few practical applications. Two months later, based on these experiments, Faraday constructed the first direct current generator. At the same time Faraday was doing his work in England, Joseph Henry was working independently along the same lines in New York. The discovery of the property of self-induction of a coil was actually made by Henry a little in advance of Faraday and it is in honor of Joseph Henry that the unit of inductance is called the henry.
Module 3: Alternating Current Reactance and Impedance Concepts Inductance in AC Unit of Inductance The unit for measuring inductance (L) is the henry (h). The henry is a large unit of inductance and is used with relatively large inductors. The unit employed with small inductors is the milli-henry, mh. For still smaller inductors the unit of inductance is the micro-henry, h. Self-Inductance Even a perfectly straight length of conductor has some inductance. As previously explained, current in a conductor always produces a magnetic field surrounding, or linking with, the conductor. If the current changes in the conductor, then magnetic field around the conductor also changes. Then an emf is induced in the conductor. This emf is called a Self-Induced emf because it is induced in the conductor carrying the current. The direction of the induced emf has a definite relation to the direction in which the field that induces the emf varies. When the current in a circuit is increasing, the flux linking with the circuit is increasing. This flux cuts across the conductor and induces an emf in the conductor in such a direction as to oppose the increase in current and flux. This emf is sometimes referred to as counter-electro-motive-force (Cemf) or back emf. Likewise, when the current is decreasing, an emf is induced in the opposite direction and opposes the decrease in current. These effects are summarized by Lenz's Law, which states that the induced emf in any circuit is always in a direction to oppose the effect that produced it.
Module 3: Alternating Current Reactance and Impedance Concepts Self-Inductance Shaping a conductor so that the electromagnetic field around each portion of the conductor cuts across some other portion of the same conductor increases the inductance (as illustrated on the next page). A length of conductor is looped so those two portions of the conductor lie adjacent and parallel to each other. This conductor is in the form of a coil or inductor. When an alternating voltage is applied to the loops of the conductor and a current starts to flow through the conductor loops, a concentric magnetic field starts to expand around all portions of the looped conductor. With increasing current, the field expands outward, cutting across a portion of the adjacent conductor. The resultant induced emf in that conductor opposes the main current. The direction of this induced voltage and current may be determined by applying the Left-Hand-Rule for Generators. To do this we will reference the middle conductor and evaluate what effects the expanding magnetic field around the left conductor has on relative motion, flux, and direction of the induced current in the middle conductor.
F B I Module 3: Alternating Current Reactance and Impedance Concepts Self-Inductance In applying this rule we will need to use the thumb, the index finger and the middle finger. The thumb of the left hand points in the direction a conductor is moved through a magnetic field (F - relative motion). With the conductor stationary, the magnetic field is expanding or moving. This would be the same as if the conductor were moving in the opposite direction. The index finger points in the direction of the magnetic field from North to South (B). The middle finger will now indicate the direction of the induced or generated current (I). Direction of the Current through the Conductor The relationship of the direction of the generated current flow in a conductor and the direction of the relative motion of that conductor in the magnetic field may be briefly described as the Left hand Generator Rule:
F B I Module 3: Alternating Current Reactance and Impedance Concepts Self-Inductance As shown below, the thumb of the left hand is pointing up and represents the direction of the relative motion of the conductor. The forefinger points out at a ninety-degree angle to the thumb and gives the direction of the magnetic field. The middle finger is also at ninety-degree angle to the forefinger and gives the direction of the generated or induced current into the conductor. This rule does not explain anything directly. It is merely one of the ways of determining one of the directions when the other two are known. F = Direction of the Relative Motion B= Direction of the Magnetic Field I= Direction of the Current
Module 3: Alternating Current Reactance and Impedance Concepts
Module 3: Alternating Current Reactance and Impedance Concepts Inductive Reactance of a Coil When an AC voltage is applied across a coil: The AC voltage will produce an alternating current. When a current flows in a conductor, magnetic flux lines are produced around the conductor. Large currents produce many lines of flux and small currents produce only a few lines of flux. As the current changes, the number of lines of flux will change. The magnetic field will expand and contract as the current increases and decreases. As the magnetic field expands and contracts around one conductor, these lines of flux cut across the conductors which form the turns of the coil. When a conductor cuts lines of magnetic flux, a voltage and current is induced in the conductor.