Download
1 / 63
630 likes | 715 Views
Link-Images. Understanding Links. Absolute Links: URL is an absolute link—it’s the complete, unique address for a single page. Ex: use absolute links when you want to link to a page on another Web site.

E N D
Understanding Links • Absolute Links: • URL is an absolute link—it’s the complete, unique address for a single page. Ex: • use absolute links when you want to link to a page on another Web site. • Document-Relative Links: to create a link from one Web page to another within the same Web site. http://www.mwu.edu/course/info.html#majors
Adding a Link • Browsing for a File: • To create a link from one page to another on your own Web site, use the Property inspector’s “Browse for File” button
Adding a Link • In the document window, select the text or image you want to use for the link. • In the Property inspector, click the folder icon—that’s the “Browse for File” button, Or, choose Modify ➝ Make Link, or press Ctrl+L • Navigate to and select the file you want the link to open. • Make sure the correct type of link—Document or Site Root—is selected from the “Relative to” menu.
Adding a Link • Using the Point-to-File Tool: • You can also create links in Dreamweaver by dragging from the Property inspector to the Files panel
Adding a Link • Typing the URL or Path • In the document window, select the text or image you want to make into a link. • In the Property inspector, type the URL or path to the file into the Link field • Using the Hyperlink Object: • The Hyperlink object on the • Common category of the Insert panel lets you insert a link with many optional properties
Adding a Link • Choose Insert ➝ Hyperlink or click the chain icon on the Insert bar
Adding an Email Link • Under the Insert panel’s Common category, click the Email link icon, which looks like an envelope
Linking Within a Web Page • Creating a Named Anchor: • In the document window, click where you want to insert the named anchor • Choose Insert ➝ Named Anchor. • Type the name of the anchor in the Insert Named Anchor dialog box->OK
Linking Within a Web Page • Linking to an Anchor or ID: • In the document window, select the text or image you want to make into a link. • In the Property inspector’s Link field, type #, followed by the anchor or ID name.
Modifying a Link • Select the text link or picture link. • In the Property inspector and locate a different Web page in your site, or type a complete URL to point to another page outside your site. • The destination of the link changes to the new URL, path, or anchor.
Removing a Link • Select the text link or picture link • Modify ➝ Remove Link. • Or delete the text in the Link field of the Property inspector
Styling Links • Each link can be in one of four different modes: Link, visited, Hover, active. • The Page Properties window lets you change the color for each of these different link states.
Styling Links • CSS and Links • Using the CSS Styles panel to create styles for links gives you access to many more formatting options besides font, color, and size. • To format the general look of all links, create a tag style for the <a> tag
Styling Links • To control how a link looks for the different states, Dreamweaver lets you select one of four pseudo-classes, each of which refer to a different type of link. • In new Css Rule windows • Select Compound from the Selector Type menu
Styling Links • Dreamweaver CS4 provides a powerful and easy navigation building tool-> the Spry Menu Bar. • Each menu button can even support two levels of pop-up submenus
Styling Links • Adding a Menu • In the document window, click where you want to insert the menu. • Click the Insert Spry menu button on the Layout category of the Insert panel
Creating a Navigation Menu • Adding a Menu • In the document window, click where you want to insert the menu. • Click the Insert Spry menu button on the Layout category of the Insert panel
Creating a Navigation Menu • Depending on the type of menu you want, choose either the Horizontal or Vertical button and then click OK. • You can change and add links using the Property inspector
Adding, Editing, Removing Links • A Spry menu supports up to three levels of menus. • The main navigation buttons always appear on the page. • Each of those main buttons can have its own pop-up menu which only appears when a visitor mouse over the particular button. Each button on the second level of menus, can have another pop-up menu.
Adding, Editing, Removing Links • To edit one of the main navigation buttons: • Select the button’s label in the left-hand column of the Property inspector. • In the Text box, change the label to the text you want to appear on the navigation button • Then add a link by using the “Browse for File” button or typing the URL in the Link box You can leave the Title and Target boxes empty
Adding, Editing, Removing Links • To add a button to the main menu, click the + button above the left-hand column. • To delete a button on the main nav bar, click its name in the left-hand column, and then click the – (minus) button at the top of the column
Adding, Editing, Removing Links • You can also rearrange the order of the buttons by selecting a name from the list and clicking the up or down arrow. • When Dr. inserts a Spry menu, it also adds a bunch of files to your site. These files are placed in folder Spry Assets in site’s local root folder. • These files control the look and functionality of the menu: one CSS file, one JavaScript file, and some image files for the arrows used to identify buttons with submenus
Changing the Look of the Menu • You can Use CSS to format the menu: • The styles for menu bars are stored in their own style sheets • SpryMenuBarVertical.css • SpryMenuBarHorizontal.css • The Style Definition window for that style. You can then change the menu’s font
Changing the Look of the Menu Ex: Double-click ul.MenuBarVertical a or ul.MenuBarHorizontal ato change the menu’s formatting
Changing the Look of the Menu • There are two different types of menu buttons on a Spry menu: • Regular menu item is a button that doesn’t have a pop-up menu attached • Submenu item is any button that produces a popup menu when a visitor mouse over it.
Changing the Look of the Menu • Formatting regular menu buttons: • By editing the ul.MenuBarHorizontal a style or ul.MenuBarVertical a style. • You can set any of the CSS text properties such as font, font size, and font color. • All text settings (except color) will be shared with the other types of buttons. • The font color changes when the mouse rolls over any button
Changing the Look of the Menu • Formatting rollover menu buttons: by editing either: • ul.MenuBarVerticala.MenuBarItemHover or • ul.MenuBarHorizontal a.MenuBarItemHoverstyle • To make sure the rollovers you must edit either: • ul.MenuBarVertical a:hover or • ul.MenuBarHorizontal a:hover
Changing the Look of the Menu • Formatting submenu buttons: Byedit either the • ul.MenuBarVerticala.MenuBarItemSubmenu • ul.MenuBarHorizontal .MenuBarItemSubmenu • The rollover state for submenu buttons in vertical menus is controlled by the • ul.MenuBarVertical a.MenuBarItemSubmenuHover • ul.MenuBarHorizontal a.MenuBarItemSubmenuHover
Changing the Look of the Menu • Changing the width of menus and buttons: • Main menu width. The overall width of the menu is set by • ul.MenuBarVertical • Main menu button width. The width of the buttons that appear on the main menu are determined by • ul.MenuBarVertical li • ul.MenuBarHorizontal li
Changing the Look of the Menu • Pop-up menu width: Control the overall width of pop-up menus with the • ul.MenuBarVertical ul • ul.MenuBarHorizontal ul • Pop-up menu button width: styles control the width of pop-up menu buttons on the vertical and horizontal are: • ul.MenuBarVertical ul li • ul.MenuBarHorizontal ul li
Changing the Look of the Menu • Positioning pop-up menus: To change the position of a pop-up menu, edit the • ul.MenuBarVertical ul • or ul.MenuBarHorizontal ul • The CSS margin property controls the placement of the menu. • For a vertical menu: the pop-up menu has a –5% top margin, the left margin is set to 95%.
Changing the Look of the Menu • Removing a Spry menu: • To get rid of a Spry menu, just select it and then press the delete key.
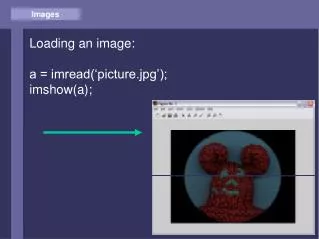
Adding Images • Adding Images: • Save the Web page that will contain the image. • In the document window, click where you want to insert the image. • Choose Insert ➝ Image. • Browse to, and then select the graphics file you wish to add to the page.
Adding Images • In the Alternate Text box, type a short, text description of the image-> OK.
Adding Images • Adding an Image Placeholder: To insert a placeholder, do one of the following: • Choose Insert ➝ Image Placeholder. • On the Insert bar’s Common category, from the Image menu, select the Image Placeholder icon
Adding Images • Inserting an Image from Photoshop: There two primary methods of adding a Photoshop document to a Web page: • Insert a PSD file (Photoshop’s native format) • Copy an image from Photoshop, and then paste it into a Dreamweaver document
Adding Images • Inserting a PSD file: • Insert ➝ Image. • Select Image Source window appears. You can then choose a Photoshop document (a .psd file) OK. • Dreamweaver opens an Image Preview window that lets you choose how to optimize the graphic • Select an image on document • Modify-> Image-> optimize
Adding Images • Copying and Pasting from Photoshop: • You can also copy a selection from Photoshop, and paste it into a Dreamweaver Web page. When you do this, the Image Preview window appears • Dreamweaver still keeps track of the location of the original PSD
Modifying an Image • After inserting a graphic, you can modify on it in several ways: • Attach a link to the image. • Align it on the page. • Add a border and margin to it… • Dreamweaver also includes some basic tools that let you crop, resize, optimize, sharpen, and adjust contrast and brightness
Modifying an Image • Use Properties inspector to modify an image properties: • Adding an ID to an Image • Adding a Text Description to an Image • Changing an Image’s Size • Some Properties to Avoid: Align, V Space, H Space, and Border
Controlling Images with CSS • Wrapping Text Around an Image: Use the CSS float property to wrap text around images • In the CSS Rule Definition window’s Box category, you set the float property • An element can be floated left or right. • The floated element must appear before anything that you wish to wrap around it
Controlling Images with CSS • Adding Borders: The border is controlled, from the CSS Rule Definition window’s Border category. You can control each side of the border independently with its own width and color settings by specifying the three main border properties:
Controlling Images with CSS • Style: This menu lets you specify the type of line used for the border, include: • none (the default choice) • dotted, dashed, solid, double, groove, ridge, inset, and outset.
Controlling Images with CSS • Border Widths: You can set the border separately around each side of a styled object. • Choose one of the preset widths: thin, medium, thick, or auto. • Border Colors: You can color each of the four borders
Controlling Images with CSS • CSS also provides a method of adding an image to the background of any tag. • You control background images by setting the following properties in the CSS Rule Definition window’s Background category