Download

1 / 28
280 likes | 300 Views
Door Controller Device. Door Controller Device (DCD). The DCD is the “Remote Brains” of the system. It is the controller device located at each access point within a secured facility. Each DCD handles a single reader and can control up to two on board relays.

E N D
Door Controller Device (DCD) • The DCD is the “Remote Brains” of the system. It is the controller device located at each access point within a secured facility. Each DCD handles a single reader and can control up to two on board relays. • Up to 100 DCD’s can be connected to a single SCU.
DCD Spec’s • Voltage: 9-14 VDC (DCD will not operate below 9 VDC). • Current: 150 mA (worst case consumption, board only). • Data Storage: 24hr minimum clock and memory backup. • Output: 2 Single Pole Form “C” relays. Contacts rated for 2 AMPs @ a nominal 24 VDC. • Tamper: The DCD comes with an integrated tamper switch. • Alarm Inputs: 4 supervised alarm inputs, and 3 additional non-supervised inputs. • Operational Temperature: 14ºF to 104 ºF (-10 ºC to 40 ºC)
DCD Memory • 10,000 Card Holders, Stored on-board. • 2,000 All Events History, Stored on-board (FIFO). • 200 Programmable Timezones. • 4 Separate Time Intervals Each. • 20 Programmable Holidays. • 8 Programmable Vacation Periods. • On-board Real Time Clock.
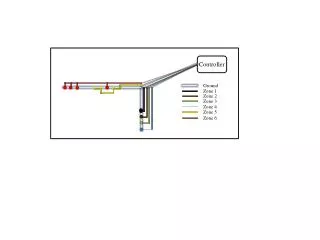
DCD Tech Notes • The inbound data trunk cable and the power cable should have some form of identification like a piece of electrical tape around the jacket to ensure that future trouble shooters know which direction the power and data source is feeding from. • The inbound and outbound shield of the trunk data cable, along with the reader shield (if it is shielded) should be twisted together and fastened with an electrical crimp or wire nut. The shield should not connect to any terminals of the DCD PCB.
DCD Tech Notes • Inbound and outbound data trunk connections should be made on terminals 1 and 2 (respective of polarity) on the J3 connector. This will ensure that if the connector is removed for troubleshooting, that all other boards down line are still communicating. • Since the 12 AWG power cable is difficult to install under the terminals of the DCD, it is recommended that the inbound and outbound cables be combined with an 18 AWG pigtail which is wired to terminals 1 and 3 of the J5 connector. • The device connected to the REX terminals must be a Normally Open device. No EOL resistor is required.
DCD Tech Notes • Only alarm inputs 1-4 are supervised with an EOL resistor. These four inputs will allow both Normally Open and Normally Closed devices to be wired to the same loop. Inputs 5-7 are Normally Closed devices only, with no EOL resistor required. EOL resistors are installed at the device, not at the DCD. All inputs are factory defaulted in the programming to be disabled. • Alarm input 7 is the only input which can detect both a Door Ajar and a Door Forced Open condition on the same loop. This is the input that the door contact for an access point should be wired to.
DCD Tech Notes • All locking devices which are connected to the DCD relays must have a surge protection device installed at the lock. Diodes for Fail Secure Locks (watch polarity) and MOV’s for Fail Safe Locks (no polarity). • All DCD’s come as a packed product with an accessory kit which includes: 4-1K EOL resistors, J1 jumper, tamper switch extension spring, 2-Diodes, and 2-MOV’s for surge suppression on the locking devices, . • Connector J2, Terminal 4, delivers 5.0 VDC for reader power. For those readers requiring more than 5.0 VDC, wire them to Connector J5, Terminal 2. • DCD’s are not sold with an enclosure, make you order them.